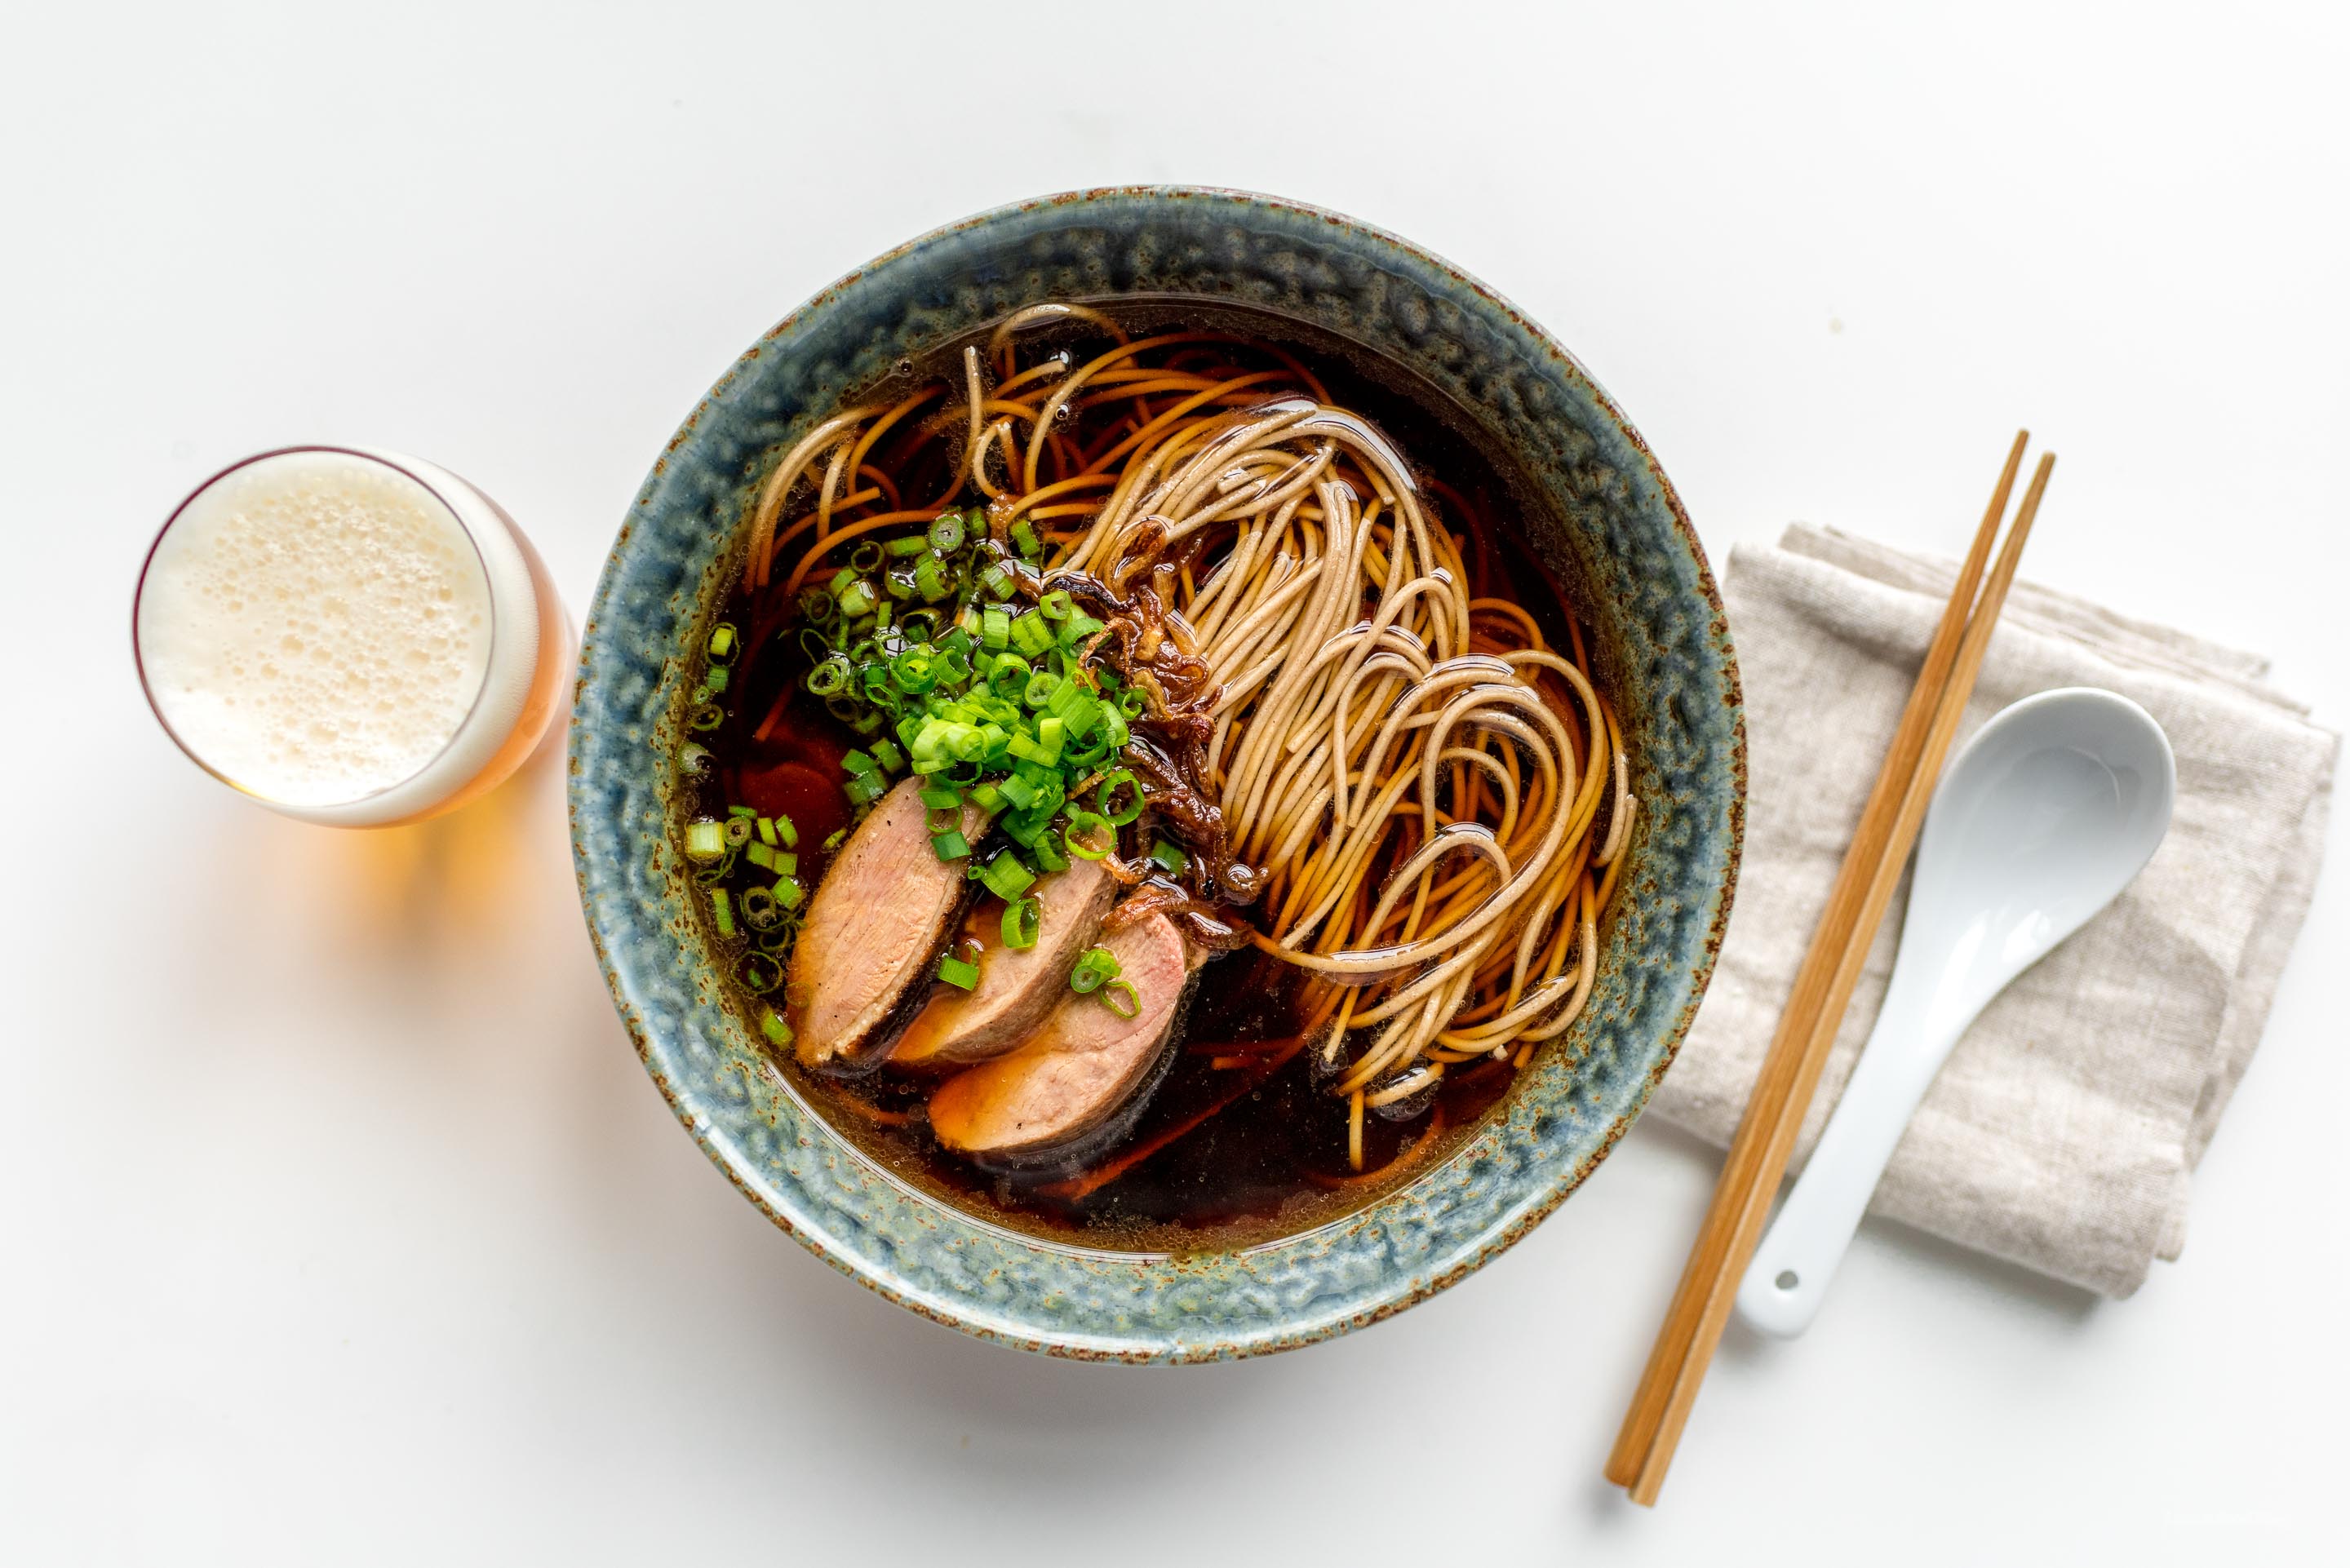
I Am... Japanese Sous-Vide Duck Ramen Recipe
How do you feel about all the latest new cooking toys like instant pot or sous vide? Steph and I first got an immersion circulator way back in 2014, but pretty much neither of us used it more than a couple times a year. We’d take it out to make sous-vide eggs, or the odd rib or steak, but overall we just never used it much. This year though, something changed and I broke it out every chance I got. Every time it was my turn to cook, if I could sous vide something, I did. I lived and breathed sous vide. I even read magazines about it. [caption id="attachment_21965" align="alignnone" width="1450"] where do they get these awesome clear bags?![/caption] I have this one beautifully shot magazine I love called Sous Vide. It features high powered interviews with people like Curtis Duffy (Grace Chicago, check out the documentary on Netflix) and Kenji Lopez Alt (needs no introduction if we're on the internet) as well as features of things you'd never think of like sous vide for cocktails. It's just a great magazine and really dives deep into sous vide - think of it like Kinfolk but sous vide instead of travel and eating. Recently I was flipping through when I noticed an interesting recipe for a sous vide duck. This was no ordinary sous vide duck recipe though; it was a super authentic looking Japanese duck recipe. I was immediately intrigued; Steph and I have a pretty close connection to Japanese food and we can usually spot fake Japanese recipes a mile away. Typically when you see ethnic asian recipes in mainstream magazines they’re way off base, or purposefully “asian-inspired” so you’re not going nuts shopping for esoteric ingredients. But this duck from Sous Vide was the real deal - to the point of obnoxiousness about the ingredients. If you are shopping at Ralphs or Whole Foods, you’ll be tearing your hair out finding a few of these items. It sounded perfect. [caption id="attachment_21902" align="alignnone" width="1450"] Our bonito flake stash - we splurge on good katsuobushi and keep it in the fridge[/caption]
How to sous-vide a duck
I love duck and have never made it before, I’m not sure why. Because it was a properly Japanese recipe I figured all I needed to do was get a duck breast. For living in North America we keep a fantastically stocked japanese pantry - there’s always dried goods like different kinds of niboshi and kombu to stuff like yuzu kosho and yuzusco (the name comes from yuzu + tabasco) - if it doesn’t go bad we probably have it. So, without checking the pantry, I left my sick wife underneath our kotatsu while I went to the store to get a duck. I probably should have checked our pantry first. If you read food blogs or recipe sites long enough you’ll notice a certain kind of comment. Let’s say for example it’s a recipe for spaghetti and meatballs, the comment will say something like “This was great - I subbed out the beef for shrimp, and changed the spaghetti for vermicelli, and instead of a tomato sauce I used a Vietnamese fish sauce instead - awesome recipe, 10/10 would recommend!” It’s not wrong, it’s just not spaghetti and meatballs anymore. In my mind I always laughed a little when I read those comments, but this time, the tables were turned on me because the truth is I found out I didn’t have all the ingredients. Not even close. So, I became one of “those” commenters. I subbed out the kombu for a fresh dashi we had in the fridge, the umeboshi for umeshu, and the yuzu juice for sudachi juice (I actually had yuzu juice, I just like sudachi a lot more). But you know, sometimes recipes are just guidelines and this was one of those times. The duck turned out perfectly anyway, and that’s the whole point of sous vide: you get good, consistent results every time if you set the temperature to the correct setting. For sous vide duck, 138.5ºF guarantees a you perfect duck, even if its your first time. I also didn’t have any of the ingredients for the side dishes the magazine recommended. Steph recommended soba and I thought that sounded like an inspired idea. I ended up making it as a classic dipping soba with some seasoned reduced dashi. It was amazing. The duck had an ultra crispy skin but still had that slightly gamey, ducky taste alongside the very authentic Japanese flavors that you would expect from these ingredients. But as good as the duck soba was, the siren call of the rendered duck fat left behind in the frying pan called to me. Who can waste duck fat? Not me. I decided to change the taste by turning it into a duck ramen. Ramen is something I like to think I’m pretty decent at, having experienced (with sometimes a less than willing Steph) hundreds of top ramen shops in Japan as well as made dozens of bowls over the last few years. There’s a guide on Tokyo ramen in our future if Steph still needs me to pick up the slack, by the way. [caption id="attachment_21971" align="alignnone" width="1450"] Yamaguchi in Waseda - #19 ramen shop in Tokyo depending on who you ask - this is Steph's bowl, she always gets an extra egg[/caption]Duck Ramen
Ramen at its heart is just wheat noodles, a broth, an ultra-concentrated seasoning (called tare and pronounced tar-eh), and usually a slow cooked, tender cut of meat. Everything is optional and up for interpretation. I already had duck, noodles, and dashi which could double as the broth, so all I needed was the tare. Tare provides a lot of the extreme layers of flavor ramen is famous for and it’s where I put most of my effort. For this one, I emulsified the duck marinade from the sous vide pouch into the rendered duck fat, then added the same amount of liquid in a good soy sauce. It was that easy. I loved the idea of using everything and wasting nothing - the complexity of the duck marinade boosted with the duck fat was perfect, and it was all there already. Once I had the tare I just combined it with dashi, dropped the soba in, and bam, I had a duck ramen. Not just any duck ramen, a duck ramen good enough that I’m planning to make again and again. It was perfect. The deepest, darkest, duckiest broth. The duck fat coating the noodles. Was it sacrilegious to use soba instead of ramen? No, because ramen is a freestyle thing, and the soba noodle, which are significantly less chewy, were perfect to offset the slight chewiness of duck. Duck-wise, was it the best duck I’ve ever had? Actually yes. It probably would come down to a close race on this duck vs Peking duck, but it was the best not-peking duck i’ve ever had and a million times simpler to make, so I think it deserves the win. I’m genuinely really happy this magazine pushed me out of my comfort zone and making my first duck a success. Sous vide for life baby. Check out and subscribe to the magazine here, then let me know if I should do a tokyo ramen roundup. PS, if you are new to sous vide - a secret to vacuum sealing liquids like this marinade is to freeze them before sealing.Japanese Inspired Sous Vide Duck Recipe Serves 4 Adapted from Sous Vide MagazineAdd all ingredients into a vacuum seal bag and marinate for a minimum of 2 hours. Set your immersion circulator to 138.5ºF and cook your duck for 1 hour. Carefully remove your duck from the vacuum seal pouch and reserve the liquid if making ramen. In a large saute pan without oil, sear duck with the skin side down over medium-low heat until golden brown, about 10 minutes. Flip and sear the other side for 1-2 minutes, then rest. Reserve the duck fat from the saute pan if making ramen. Slice and serve.
- 2 lbs duck breast
- 1 tablespoon yuzu juice (substitute with lemon if needed)
- 2 teaspoons Japanese soy sauce
- 2 tablespoons mirin
- 1 tablespoon sake
- 2 sheets of dried kelp (kombu), rinsed
- 1/2 cup bonito fish flakes
- 2 shiitake mushrooms, sliced (can be dried)
- 2 teaspoons plum paste (umeboshi - I used umeshu)
- 2 stalks scallions, chopped
- 2 cloves black garlic (optional)
Sous Vide Duck Ramen Makes 1 bowlFill your serving bowl with hot tap water to heat it up and set aside. Bring your dashi to a low simmer and hold. In a small saucepan over medium heat, combine duck fat with the reserved marinade and whisk. Add the same volume of liquid again in soy sauce. Remove from heat and reserve. Cook your soba noodles according to package instructions. While noodles are cooking, drain your ramen bowl, then add 2 teaspoons of tare and 2 cups of dashi. Taste and adjust for seasoning with more tare. The broth should be on the saltier side to offset the noodles. Once noodles are cooked, drain into a colander and rinse with warm water. Carefully add noodles to the bowl, then top with 3-4 slices of duck, chopped green onions, and if you have it, a few strips of nori and a ramen egg.
- 3-4 slices sous vide duck (from above)
- Sous vide duck marinade (from above)
- Duck fat (from above)
- Japanese soy sauce
- 2 cups of dashi
- 3oz soba noodles
- green onions, sliced, to serve
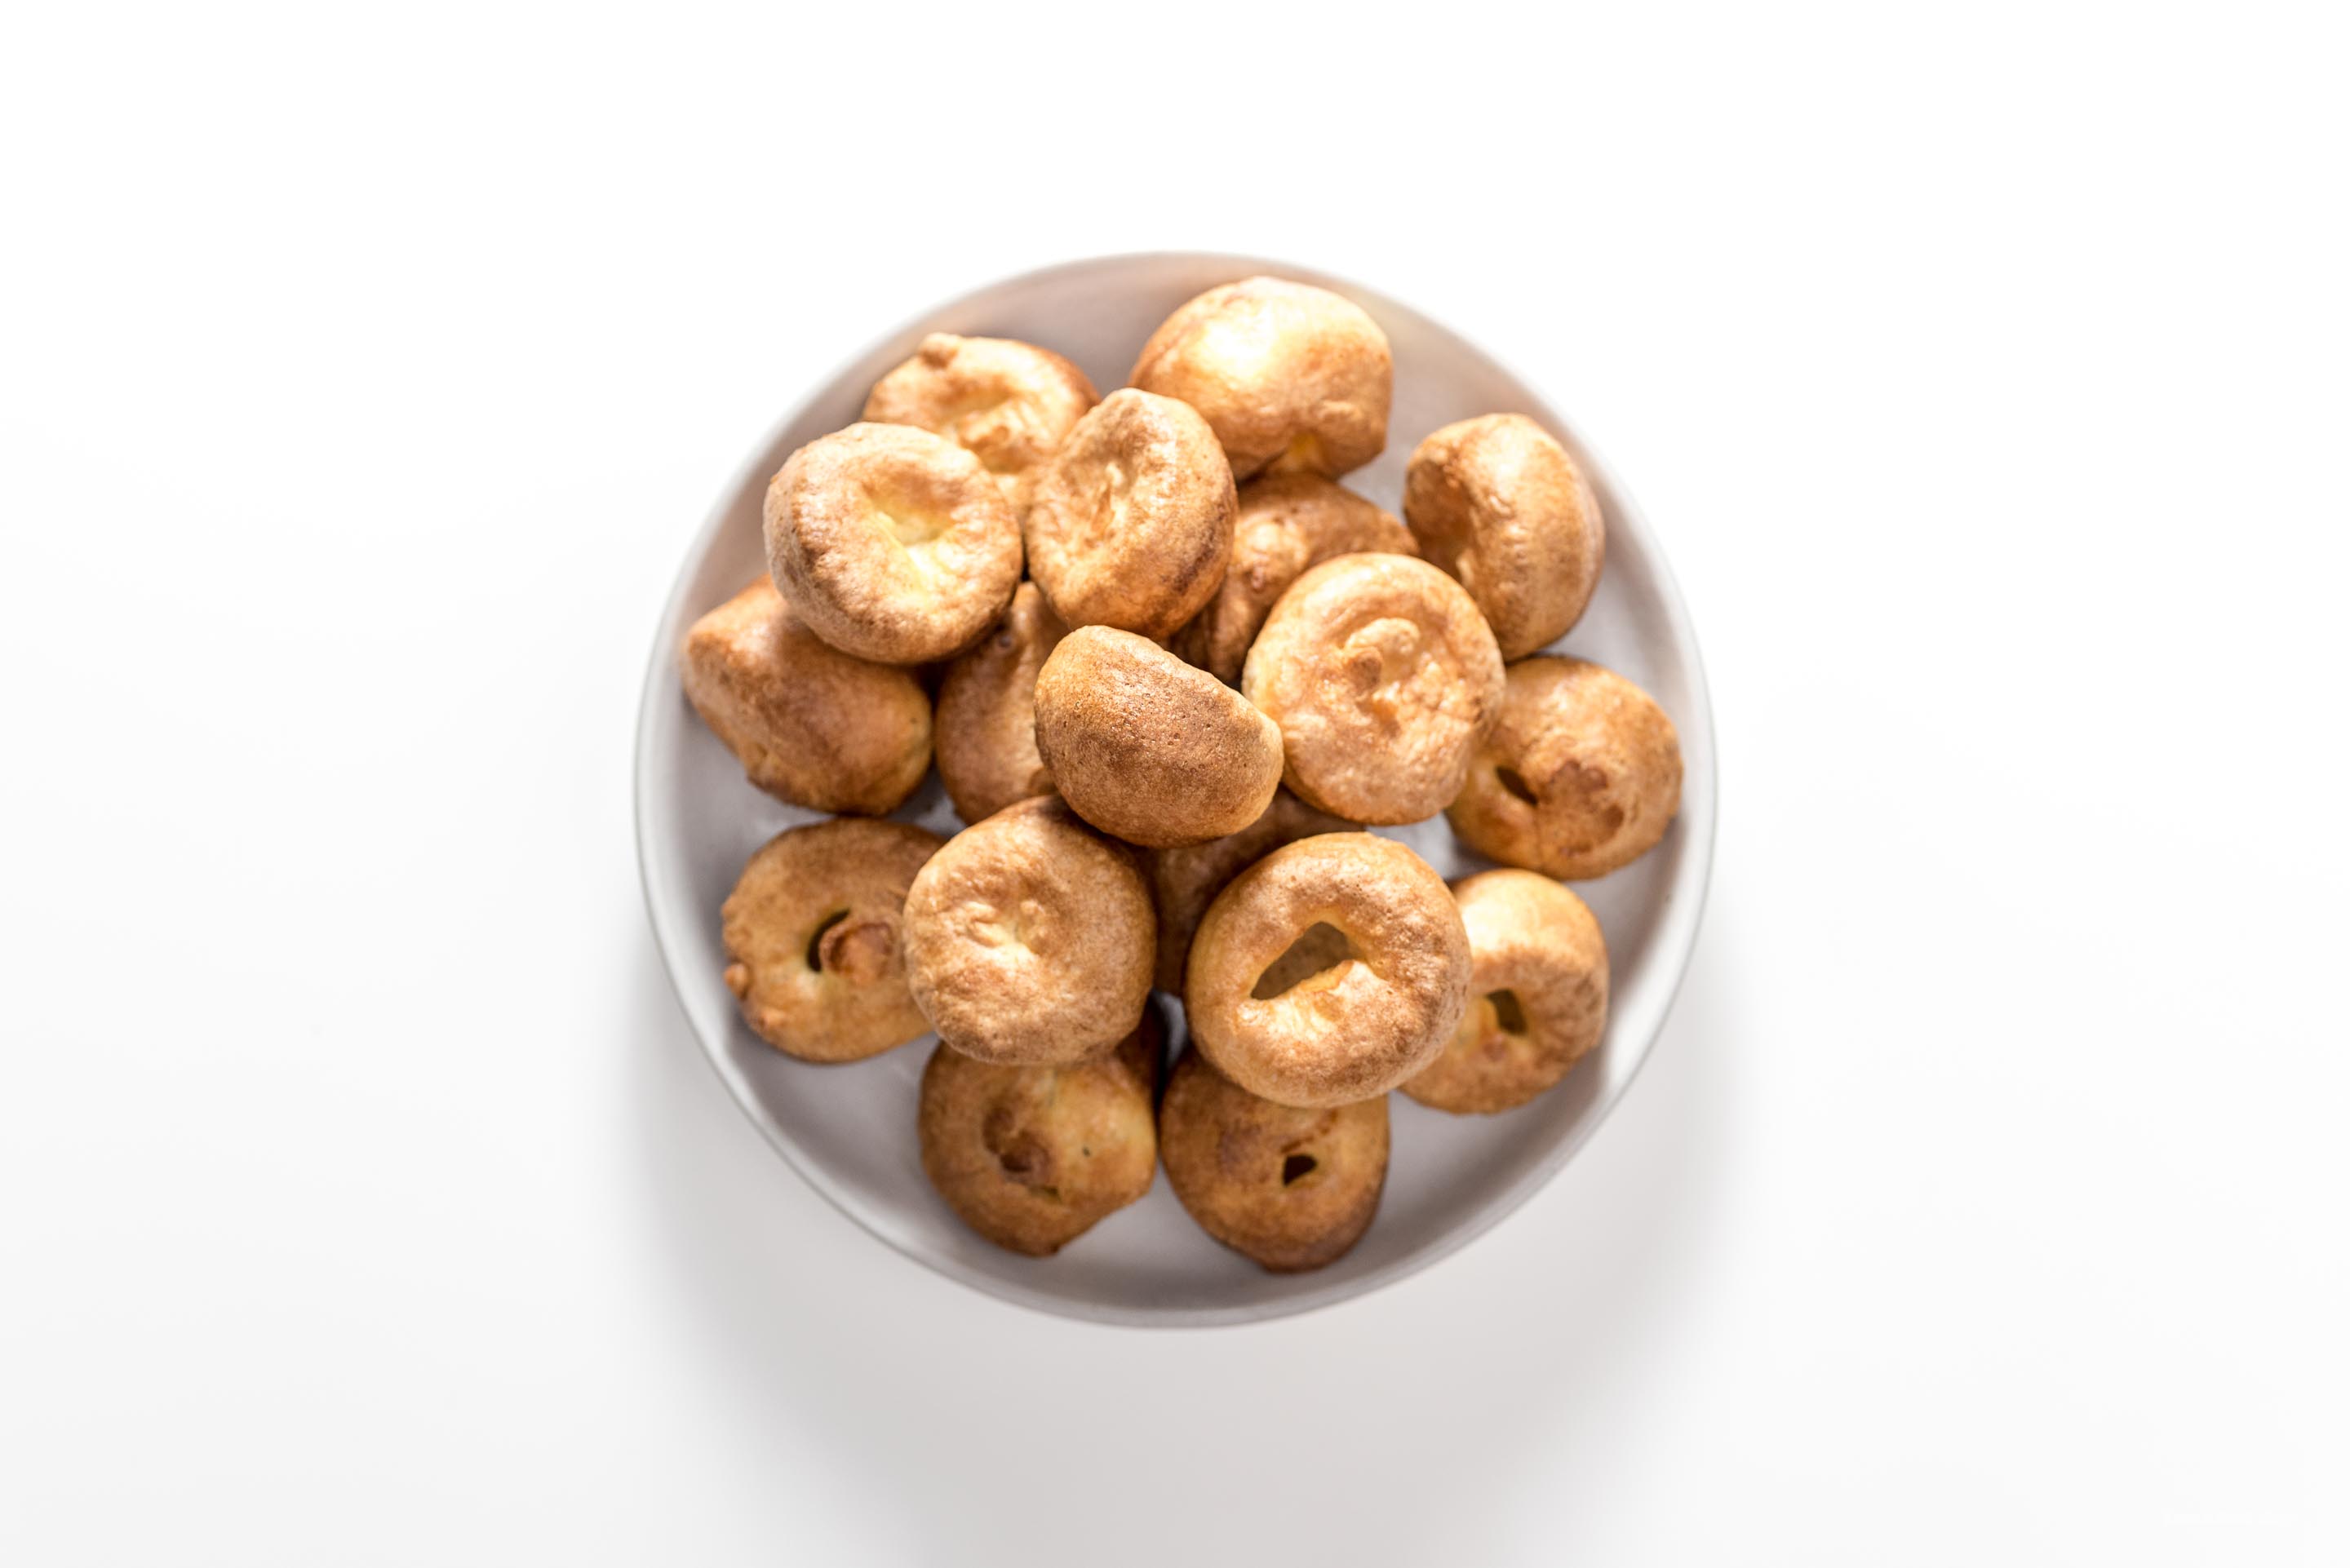
I Am... How to Make Mini Yorkshire Puddings
Yorkshire puddings are impressive yet surprisingly easy to make. These mini Yorkshire puddings are perfect for serving with a roast, scrambled eggs, or even just on their own. The key to making tall and fluffy Yorkshire puddings is making sure that you heat up the oil inside the pan in the oven for a good long time before pouring in the batter. Using a spoon to catch the drips between pours is helpful too. This recipes gives you mini puddings that are light and crisp on the outside, mostly hollow and a bit creamy in the middle.
Read More →
I Am... Soft and Fluffy Dinner Roll Recipe
This is, hands down, my favorite bread/roll recipe. It always works for me which means soft and fluffy rolls every time. Usually I make nine buns, nice and snuggled up close together in an eight by eight pan, but I also like making them extra extra mini. The beauty of this recipe is that you can shape the bread into any size you want.
Read More →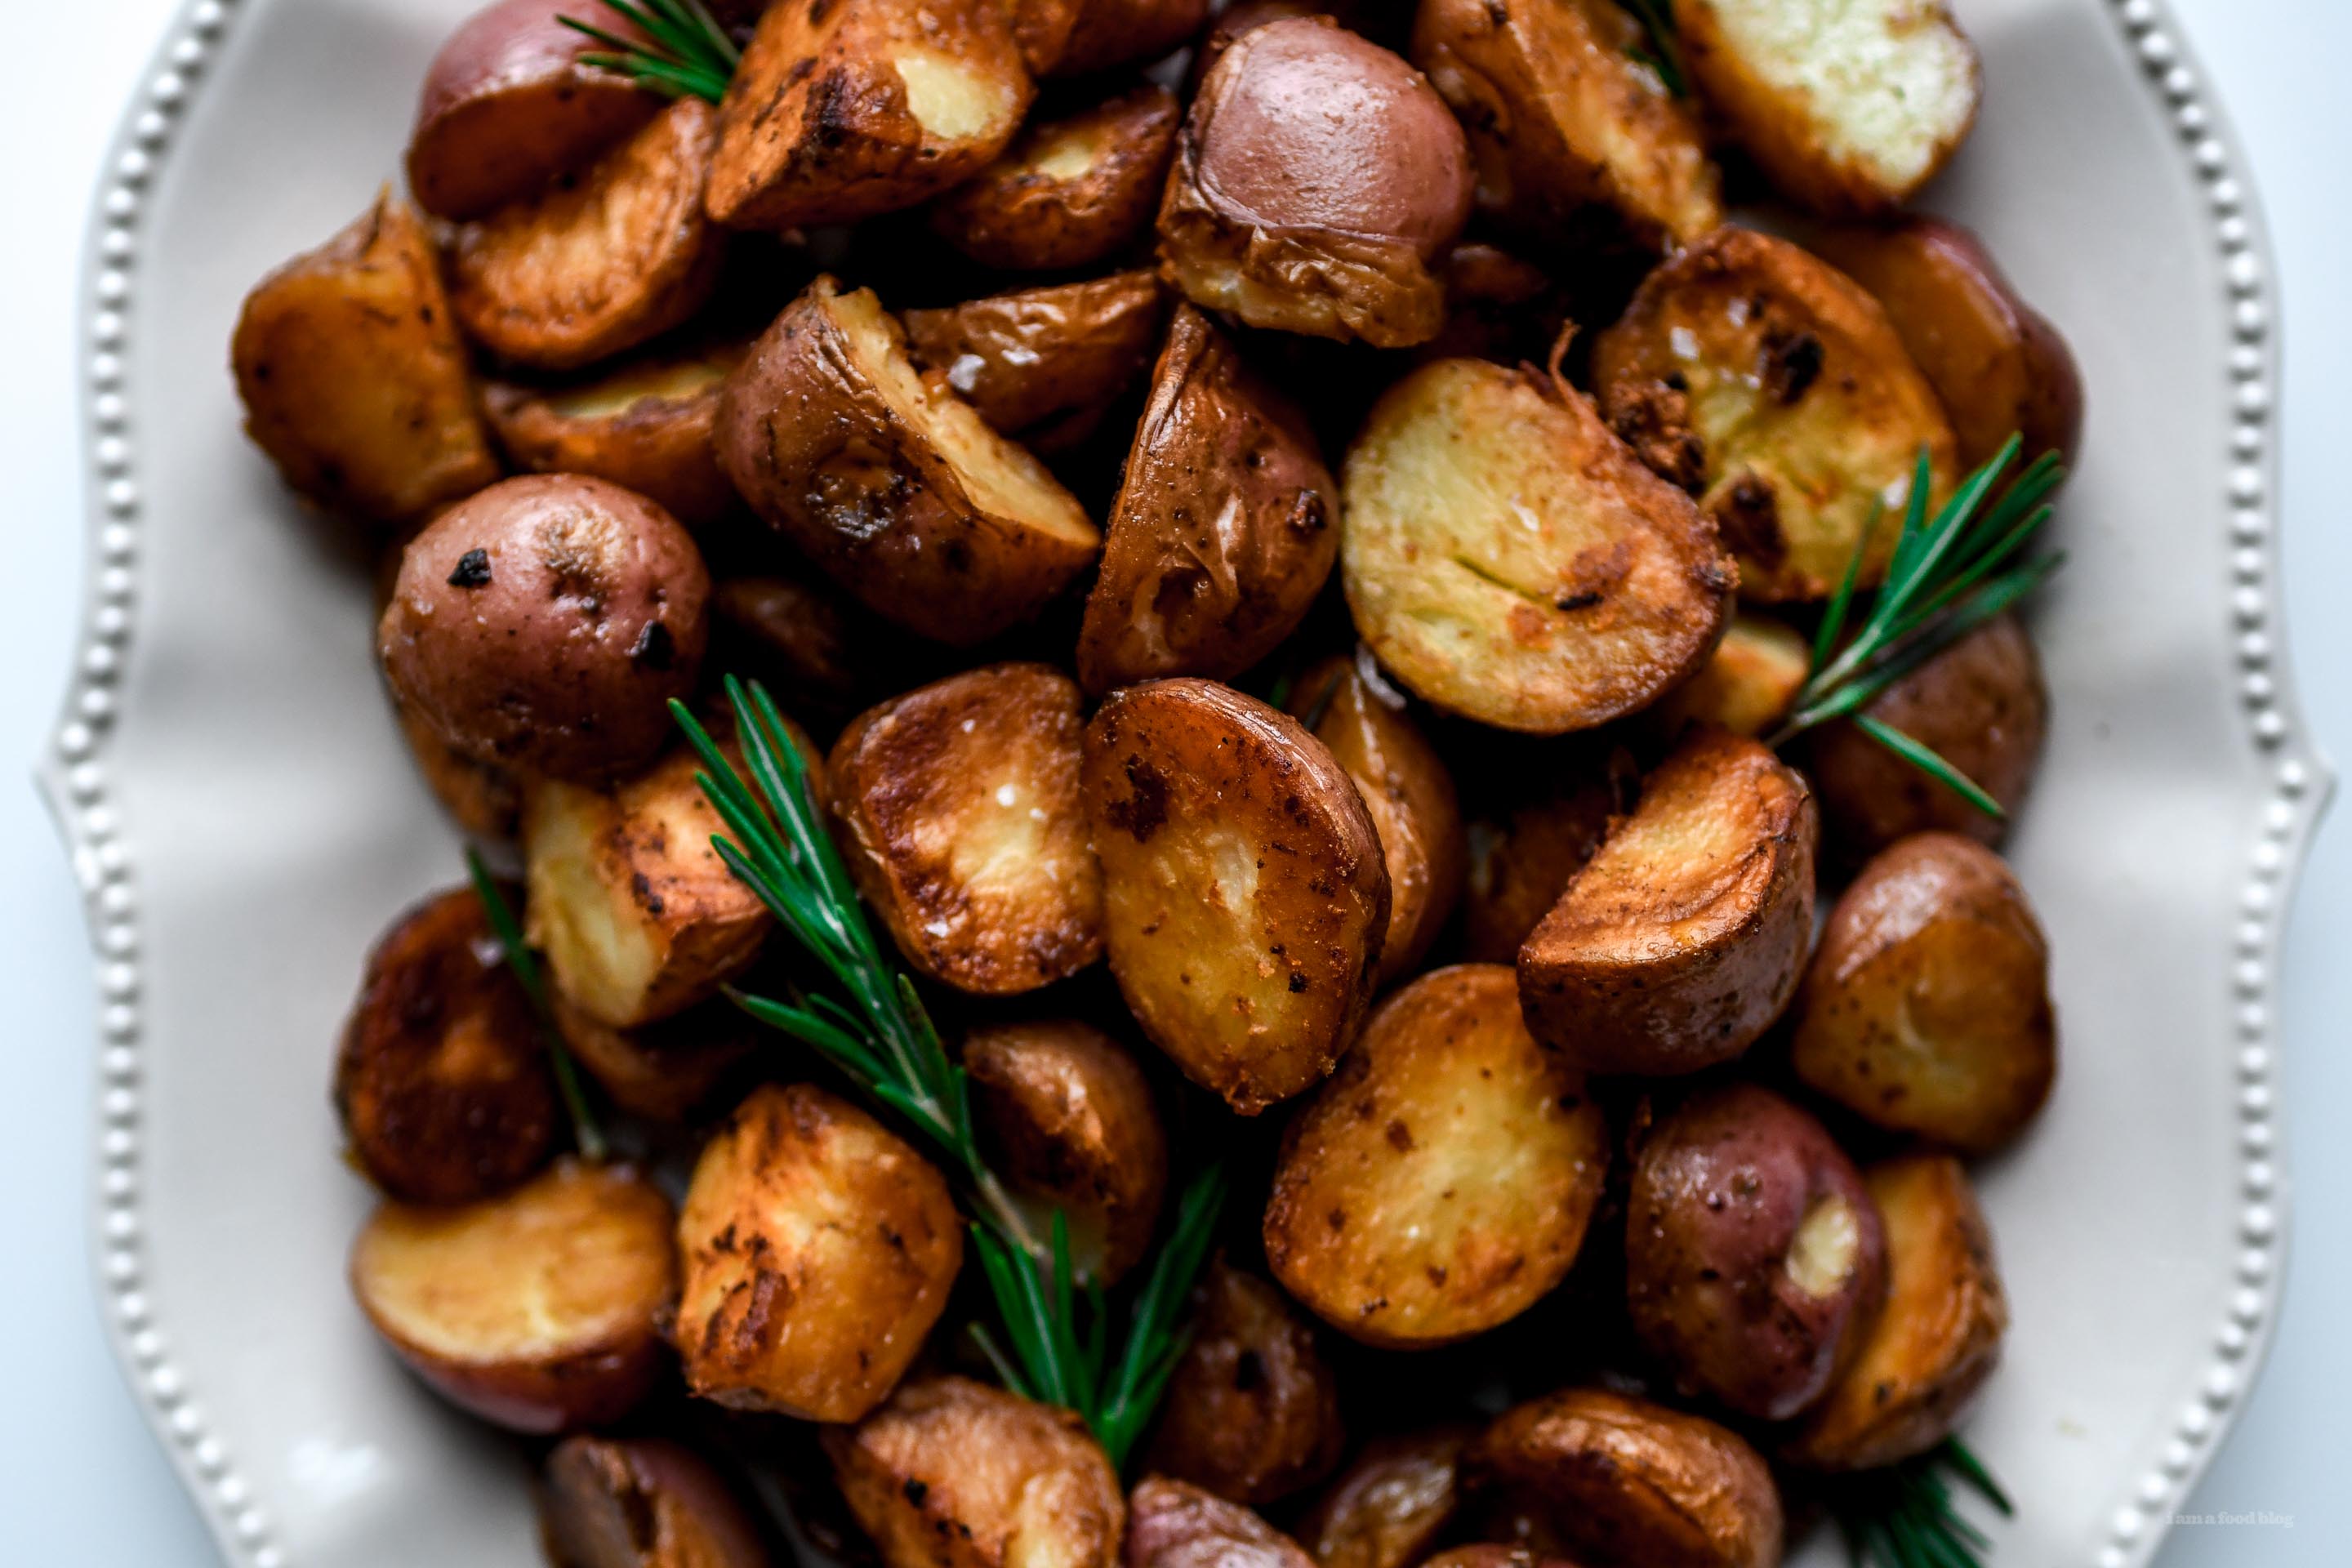
I Am... Crispy Stovetop Roasted Red Potatoes Recipe
I love potatoes, all kinds. Mashed, roasted, boiled, baked, fried...you get the idea. I developed these stovetop roasted red potatoes when the oven had a ham in it but I still wanted a roasted-type potato. At first I was going to boil and then pan fry the potatoes but then I thought about gyoza cooking technique and how everything is crisped up and cooked in one pan. I tried it with red potatoes – frying, then steaming with stock – and the potatoes ended up crispy and brown on the cut edges and creamy and delicious on the inside.
Read More →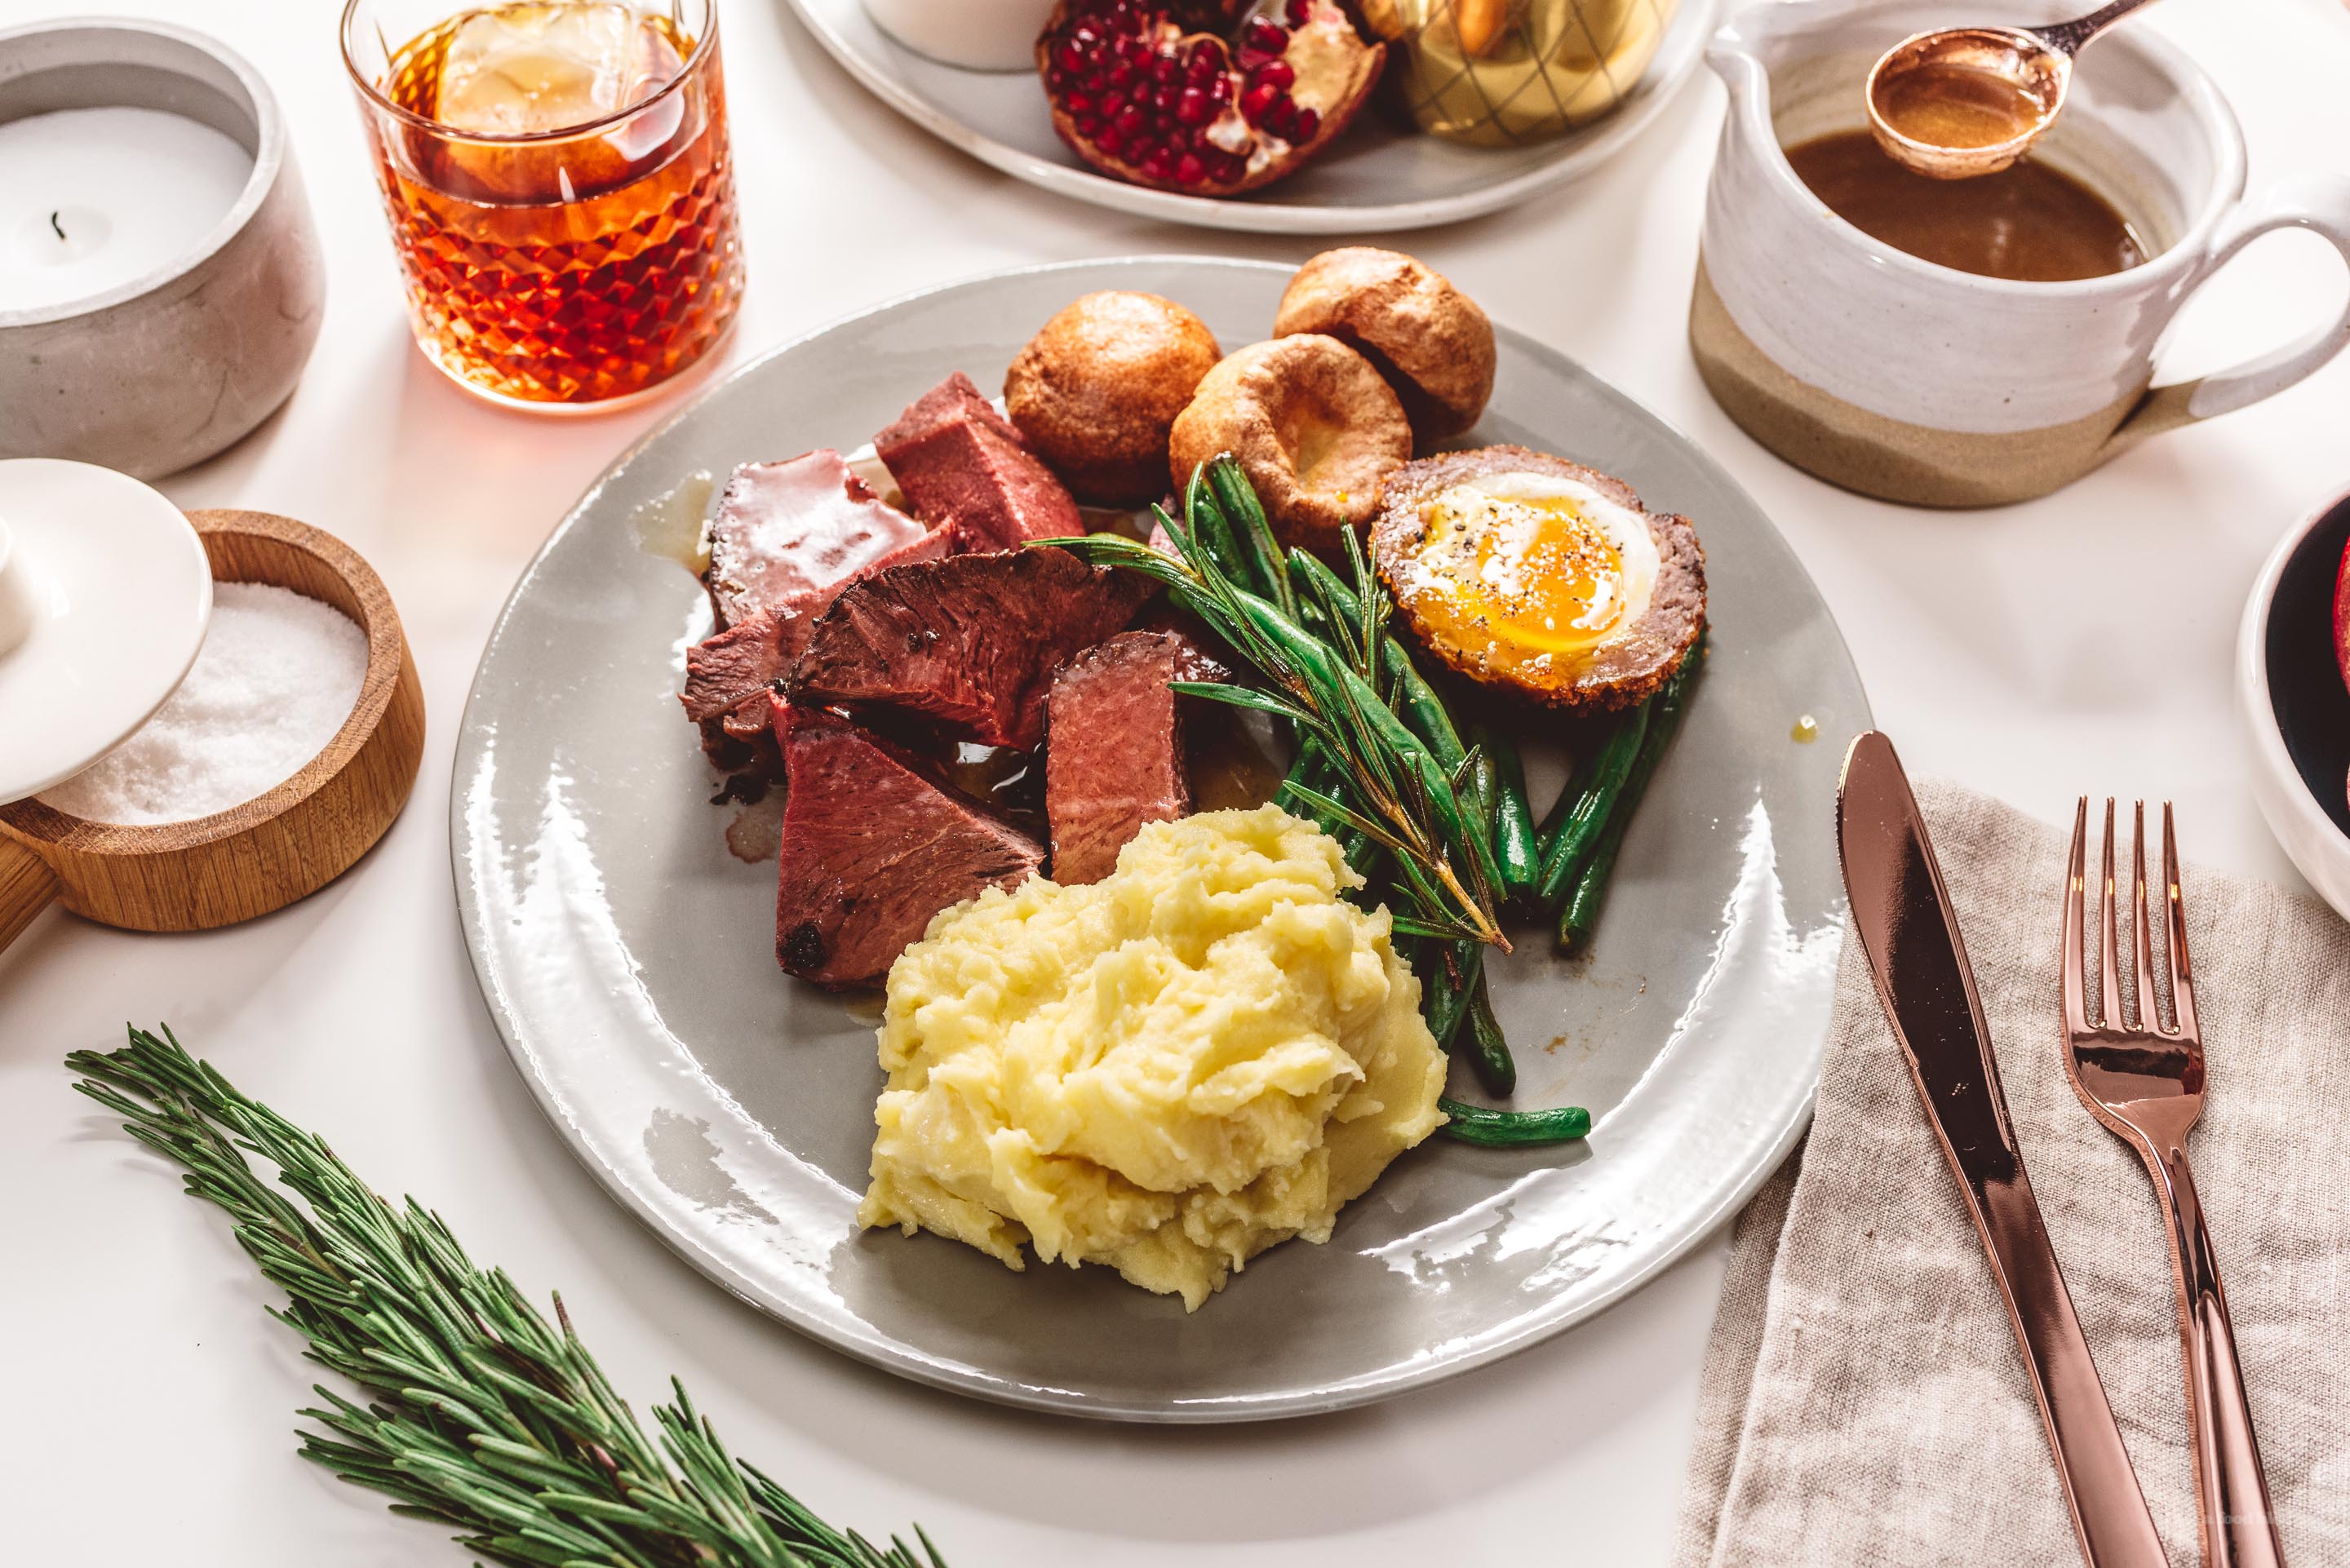
I Am... Simple Classic English Roast Recipe
Growing up, we never had a set traditional holiday meal. Sure, some years we would have a turkey, but sometimes we’d have duck, or salmon, but really, it was essentially any mix of dishes. There'd always be an Asian theme because we're Chinese and a meal isn't a meal without rice or noodles, so I guess maybe that was always consistent. But other than that, the holidays were basically an excuse to gather everyone around and feast on yummy food, whatever it might be.
Read More →
I Am... 12 Sweet Holiday Treats to Make and Eat this Winter
Winter time is ALL about those classic (and not so classic) sweet holiday treats so here are 12 sweet holiday treats to make and eat this winter. For me, it isn't the holidays if I don't spend a day (or five) making a bunch of sweet treats. I like to either a.) blast holiday music or b.) put on a never ending cycle of holiday movies or c.) stream Christmas cooking specials while I hang out in the kitchen, like some sort of deranged kitchen elf that absolutely must decorate just one more cookie even though it's three in the morning and all the snowmen look like melted instead of cute. Cheers to the holiday spirit!
Read More →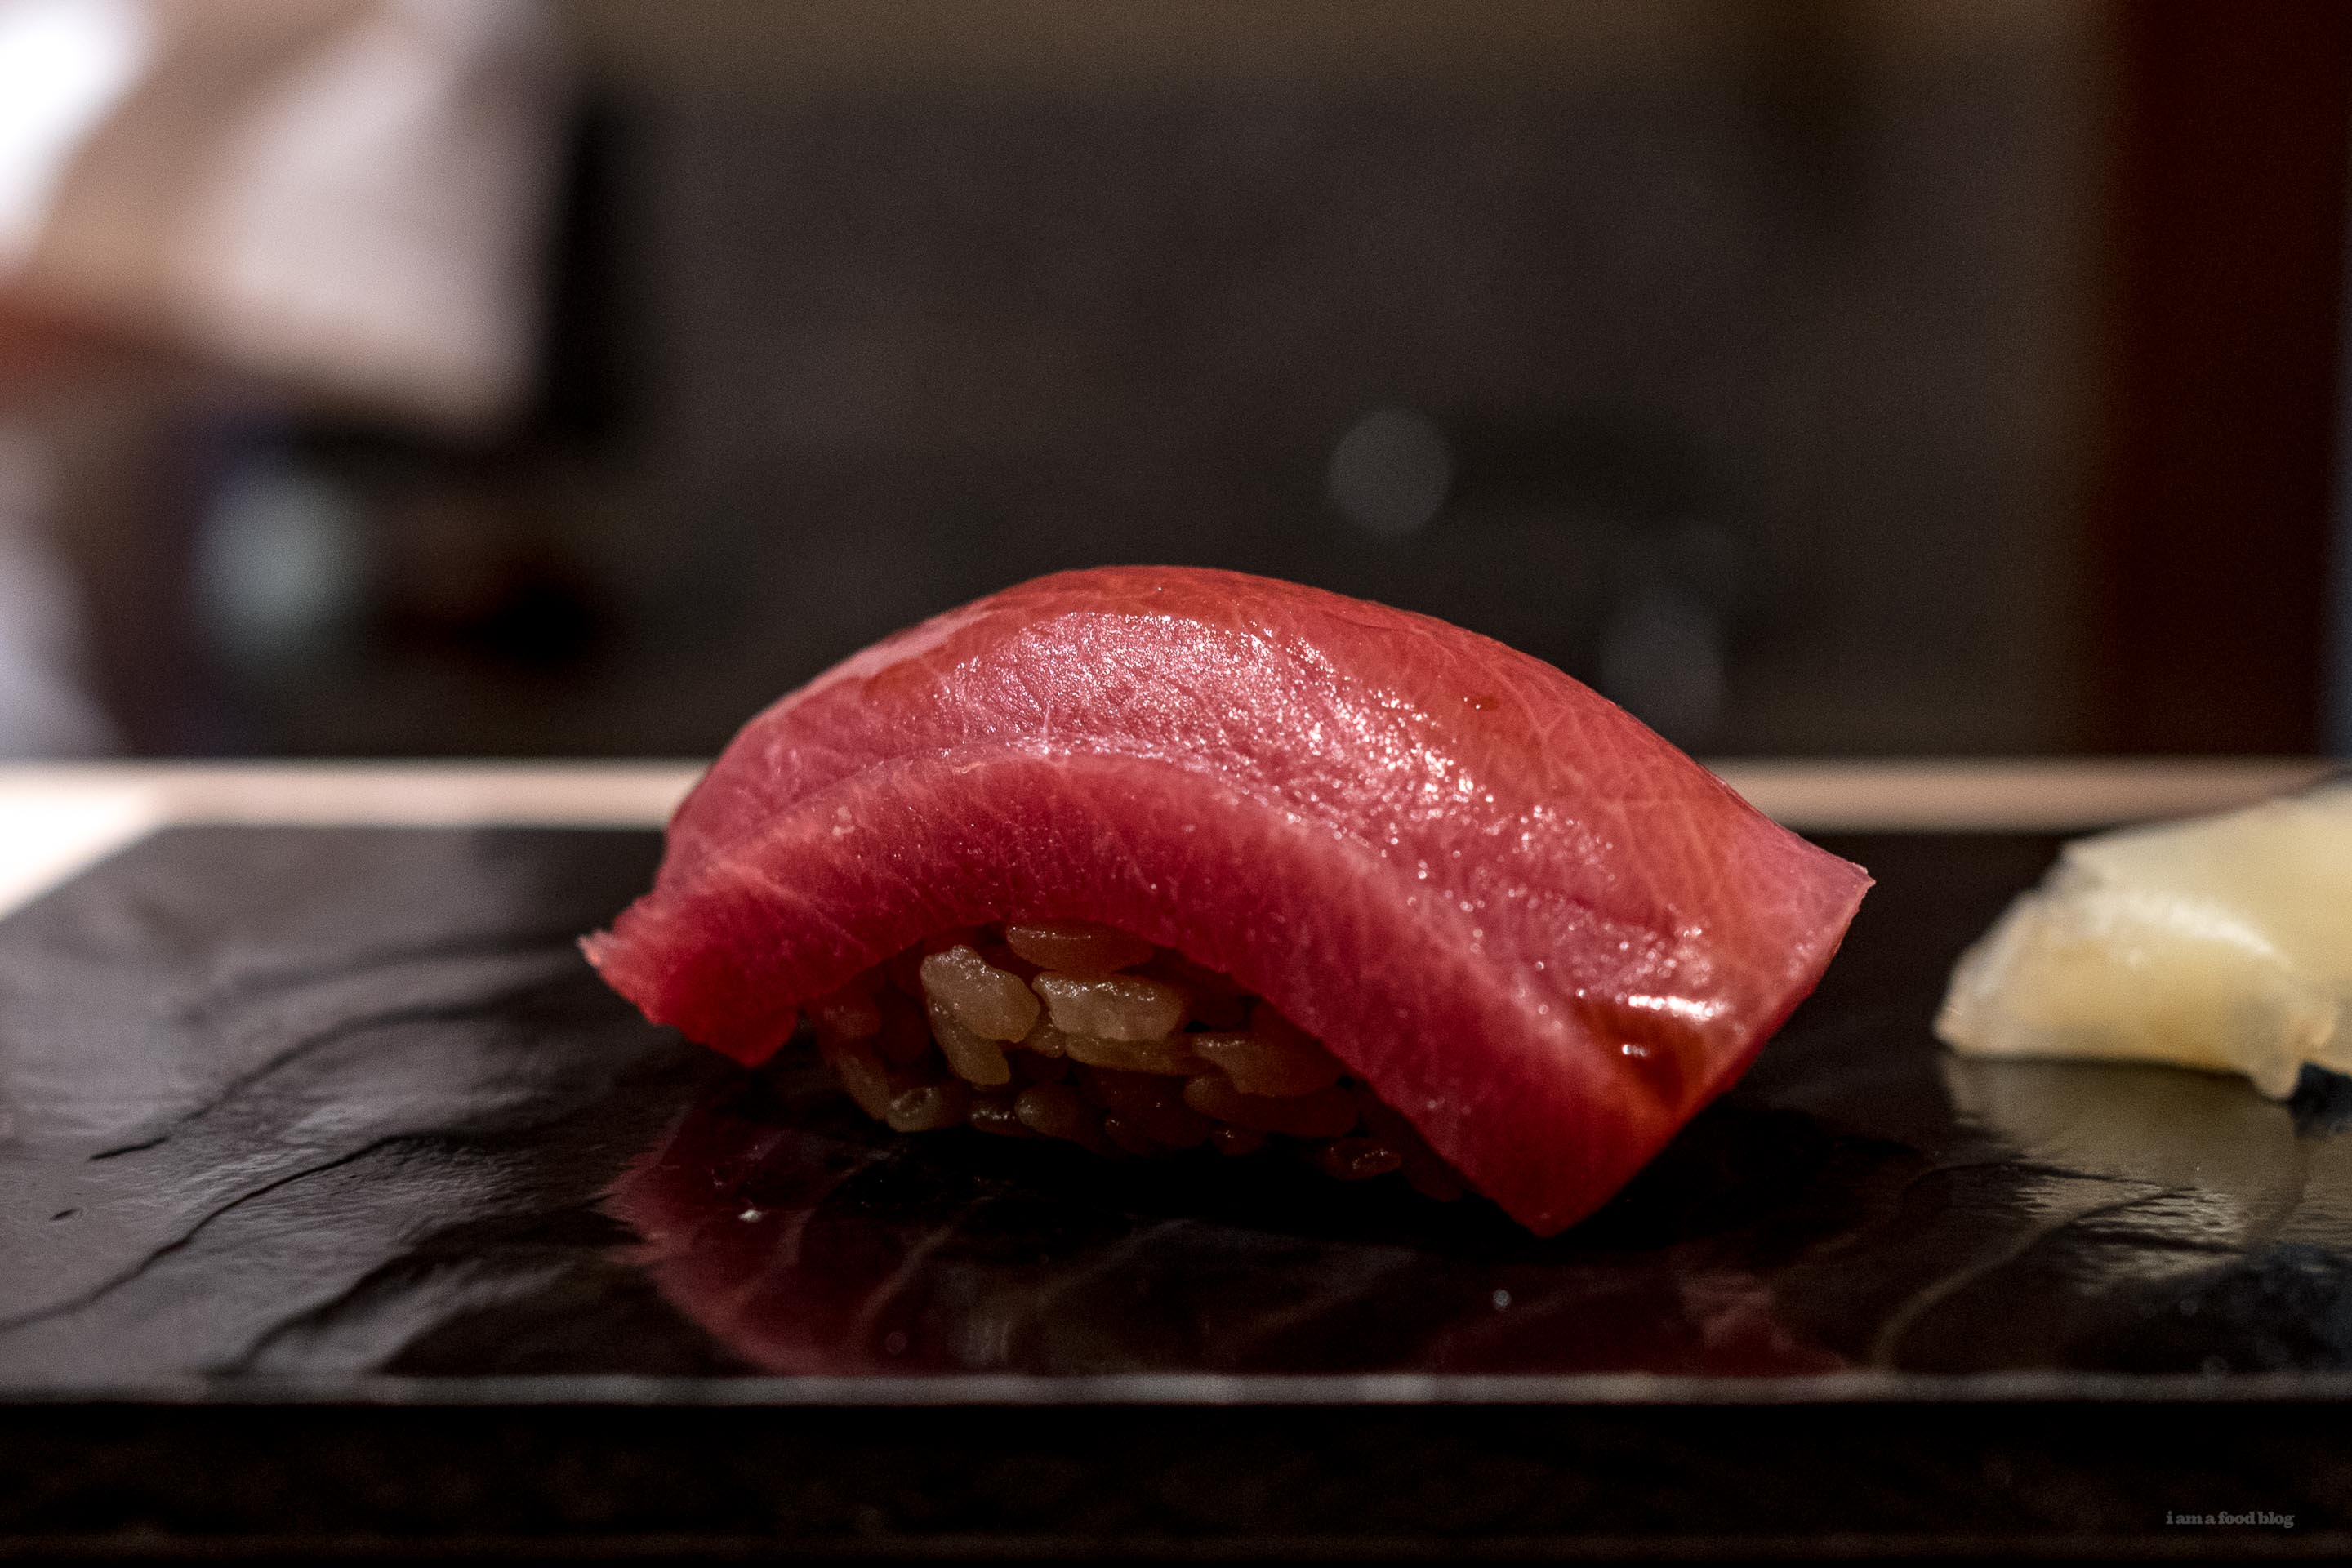
I Am... Tokyo Food Guide: Sushi Tokami and what it’s like to eat high end Tokyo sushi
I love sushi, but to be honest, my taste in sushi is, admittedly, pretty pedestrian. It tends to run more casual than fancy and when we're in Tokyo, we've been known to eat depachika (department store)/supermarket sushi and more relaxed sushi places like kaiten (conveyor belt) and small family run places. But, one can only eat so many discounted pieces of tuna nigiri before one starts wondering, what's it like to eat high end Tokyo sushi?
Read More →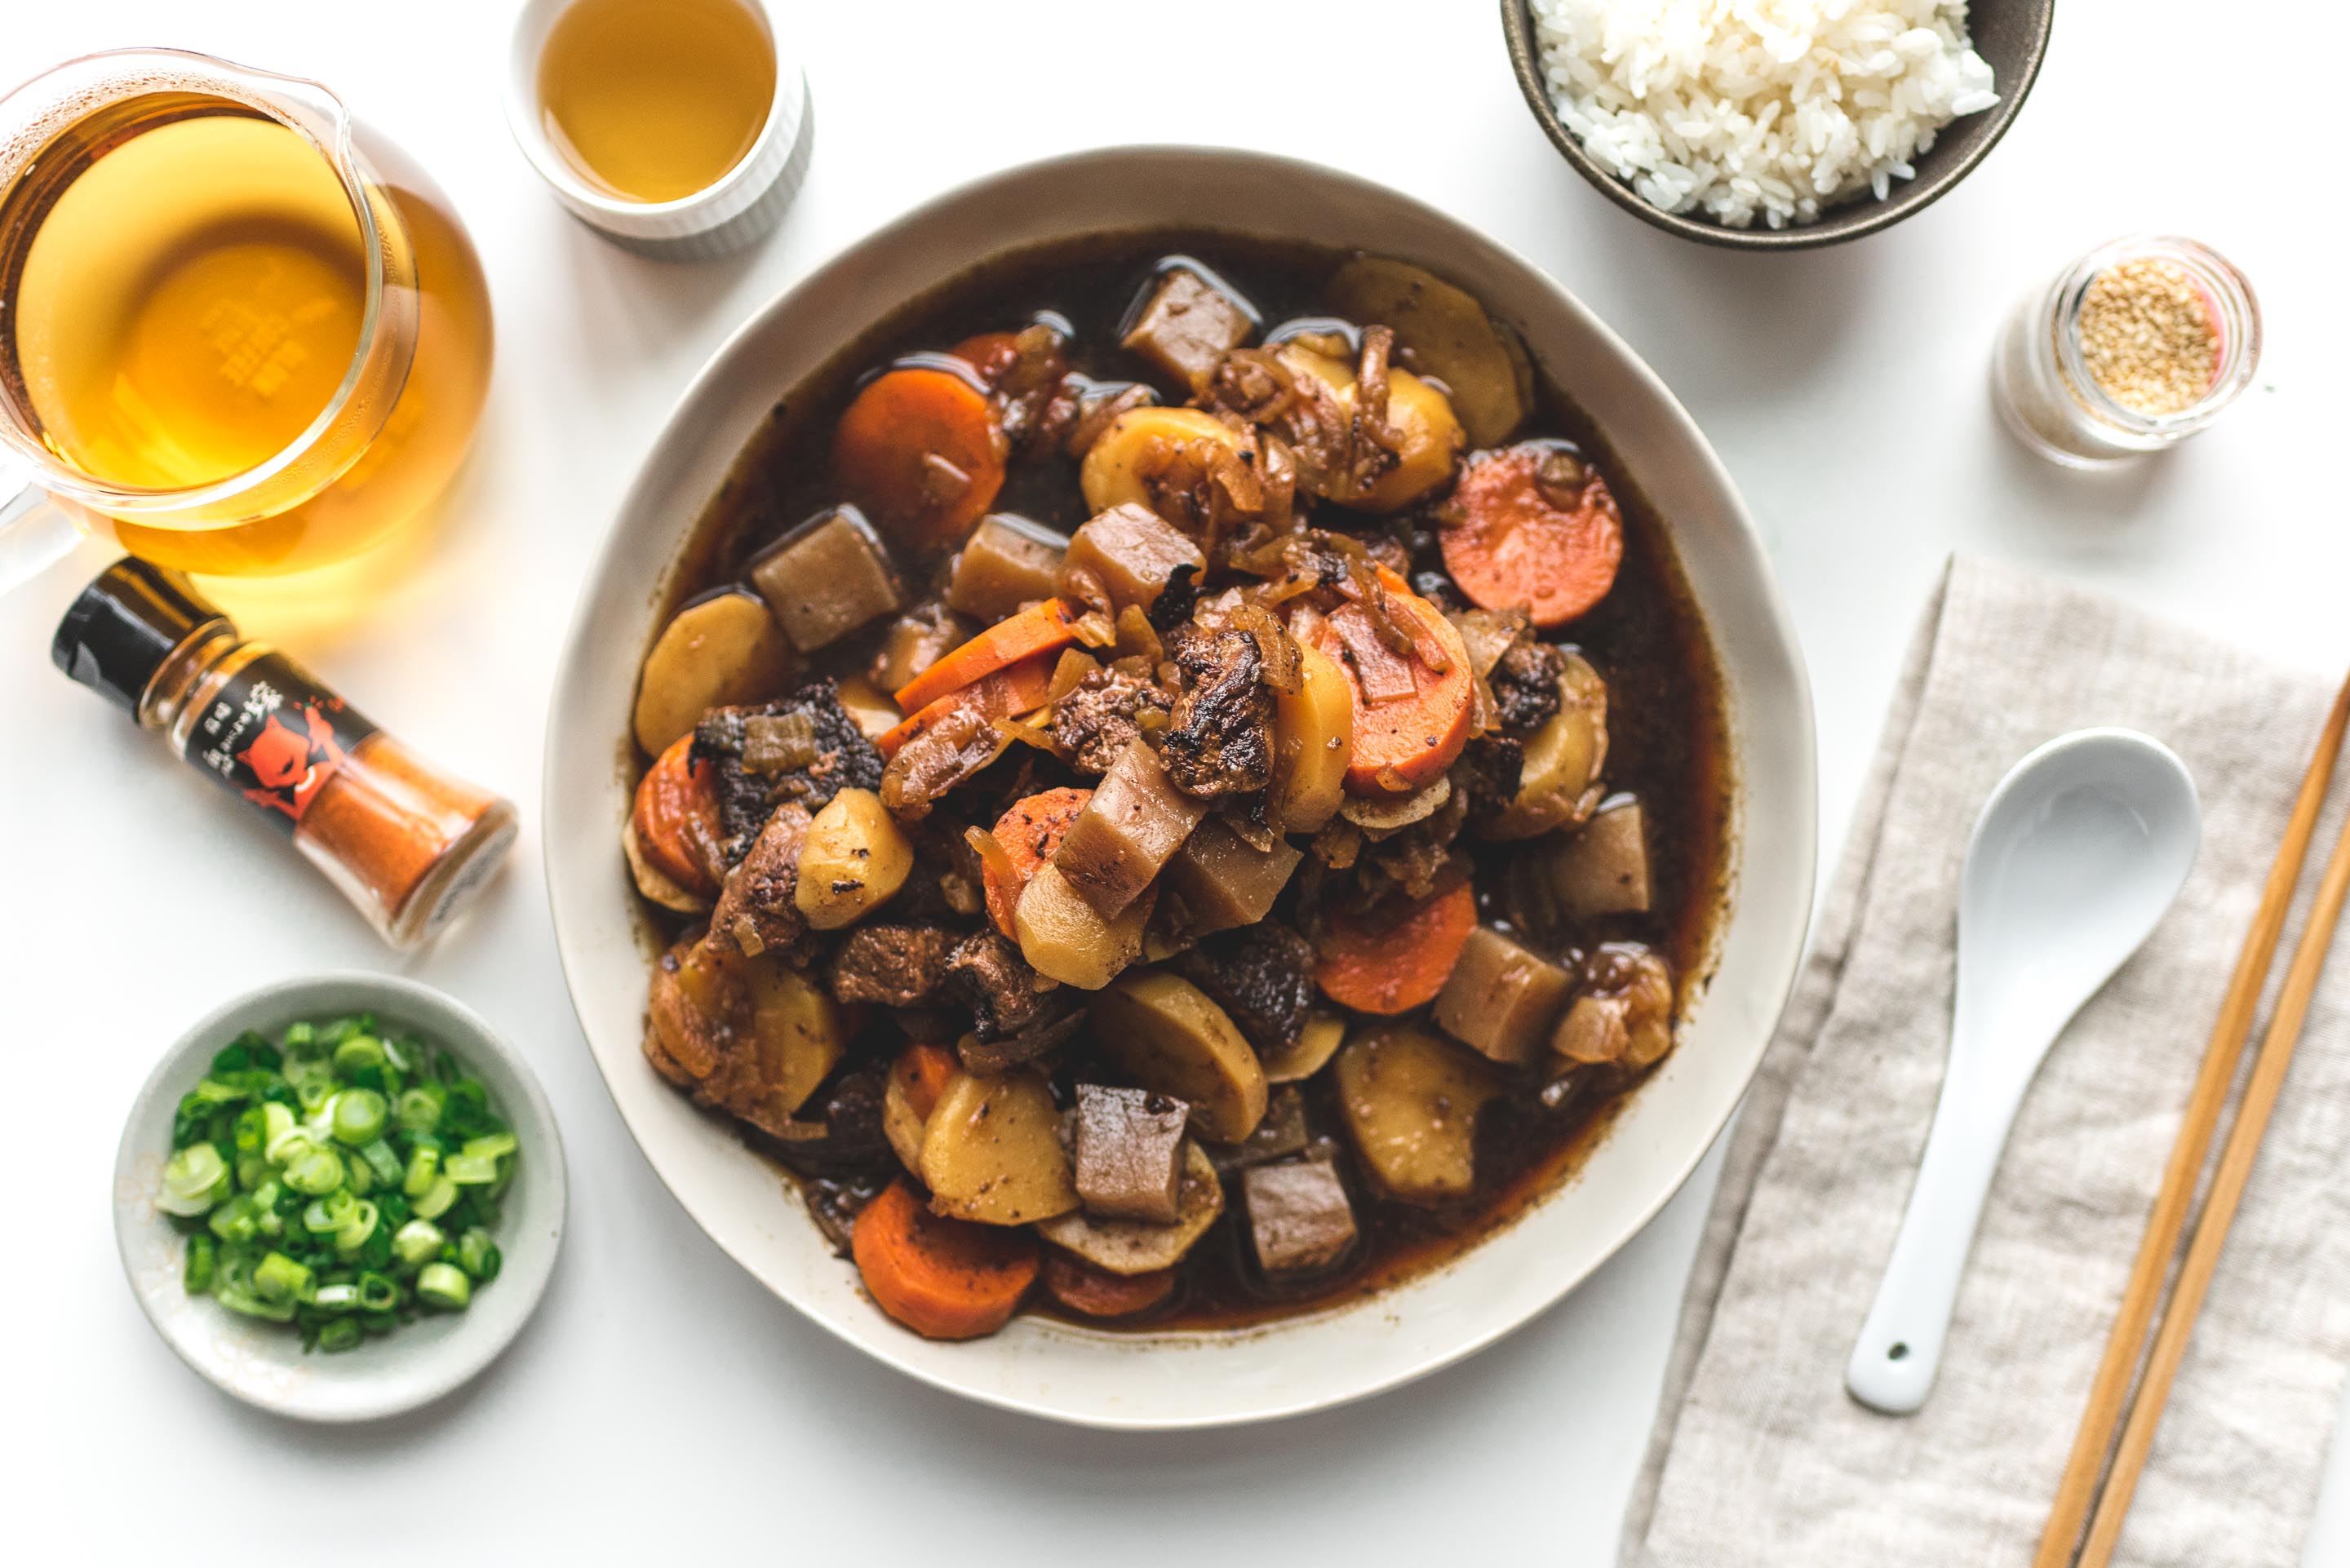
I Am... Nikujaga: Japanese Beef Stew Recipe
Steph has always had the slowest immune system of anyone I know, so she is still sick. To cheer her up a bit, I sent her this great explanation of why she is currently a toxic piñata. I’m also trying to help her get better through food, starting with this nikujaga - which is a super fast, super delicious Japanese beef stew recipe. Beef stew doesn’t get enough love as a get well soon food, probably because it can be hard to chew, but if you do it right - like in this nikujaga recipe - it’s just as easy and comforting as chicken noodle soup. You need energy to get well, and there is nothing like a nice hearty stew to get your energy up. It also happens one of my most favorite foods in the world, so I can't see a downside. Is this like a cliche “guy gets his wife a gift he secretly wants” kind of deal? Yes, but we both love beef stew, so it’s like a win/win present for both of us. We've also partnered up with Staub to do a giveaway on this post of a 3.5qt heritage braiser, so it’s like a present for one lucky reader too. It's super pretty, I loved using it, and you can probably ask for it in any color you want. It's the last of our three giveaways for this year, so don't forget to enter. A while back, my favorite stew was daube - a provencal beef stew with oranges and wine. I was coming back from a work trip and Steph decided to surprise me with a house smelling of daube and my favorite dinner on the table as I came home from the airport and a 10 hour flight. She’s awesome like that. We were living in a weird part of town at the time with no normal grocery stores nearby - just fancy organic stores selling $5 oranges. She couldn’t drive, so she walked to the expensive grocery store and bought a $5 orange to put in the stew. I loved it - it was the perfect welcome home. I love all beef stews though. Brown food doesn’t get much love in our Instagram world of today, but I think there’s something warming and comforting about tucking into a big bowl of stew that you won’t feel with a delicate matcha and gold-flaked unicorn bagel. Especially in winter. Even when you’re sick. My current favorite is Little Sister in LA - the downtown location if you’re being specific. It’s to die for, and no one talks about it. After Steph gets better, I might have to book a fake work trip so I can come home to her version of Little Sister’s Bo Kho. [caption id="attachment_21986" align="alignnone" width="1450"] takeout from Little Sister DTLA - bo kho, e-fu noodles, and fried rice[/caption]
Nikujaga: the best 20 minute beef stew around
One of the most common and very valid criticisms of stew is that it just takes too long to make. Although personally I don’t know who wouldn’t want their house to smell of slow cooked stew all day long, sometimes you just want to eat when you get home. Lately we’ve been on the instant pot train, but if you don’t have an instant pot, a super fast beef stew that you don’t need special gadgets for is super useful, and that’s what we have here. This stew works in 20 minutes because the beef is thinly sliced so it tenderizes in 20 minutes instead of 4 hours. I’ve made it different in the photos because I’m a terrible blogger and just used whatever we had in the fridge - which in our case was frozen wagyu stew cubes. Wagyu is soft enough that I wasn’t worried about it taking hours to get tender and left it in cube form, but it is correctly made with thinly sliced beef. [caption id="attachment_21923" align="alignnone" width="1450"] Your selection at any tiny Japanese grocery store[/caption] In Japan they sell beef precut into thin slices that works specifically for this recipe. If you’re feeling up to it, the best way to replicate this is to throw a steak in the freezer for a few minutes and then slice it to about a 1/8” thickness, but if you’re feeling lazy - and this is a 20 minute stew recipe after all - stir fry beef probably works just as well. Don’t let the 20 minute cook time fool you, nikujaga has a lot of depth and layers of flavor - first from the classic Japanese trifecta of mirin/sake/soy, then from the dashi or broth, then finally from the meat and vegetables and konnyaku. Actually, if you've ever had a beef bowl from Yoshinoya (preferably the Japanese one, not the California one), you pretty much know what this tastes like, but with veggies and more depth of flavor.What is konnyaku?
If you’ve never heard of konnyaku before, you’re not alone. I’ve never paid attention to it until the beginning of this year, and now I’m a total convert. It’s awesome - I’ve really come to love its unique texture and subtle flavor. It also comes as a noodle and a lot of people rave about how awesome the noodles are. You should be able to find konnyaku as either a loaf or noodle at any higher end grocery store or asian market, but it’s completely optional and you can replace it with tofu as well for an added health kick. While writing this post I asked Steph what she thought of the nikujaga and (because she had lost her voice and couldn't answer) she gave it two thumbs up! I'm really convinced that beef stew is the new chicken noodle soup, and more to the point, that this 20 minute beef stew is better than any slow simmered 4 hour recipe you’ll find. It’s the perfect thing for anyone who loves stew but doesn’t love the cook time, or is looking for a new twist on beef stew.Nikujaga Japanese Beef Stew Recipe Serves 4Read More →In a large heavy bottomed pan or dutch oven over high heat, heat your oil and brown your beef. Remove and set aside. Reduce heat to medium, add onions and cook until transparent. Add sake and boil off until the alcohol is gone (about 1-2 minutes), then add your mirin, soy, sugar, and dashi. Reduce to a low simmer. Add potatoes, carrots, konnyaku, and previously cooked beef to the pan and simmer until potatoes and beef are tender (about 15 minutes).
- 1lb thinly sliced beef
- 2 tablespoons oil
- 1 large onion, sliced thinly
- 1/4 cup sake
- 1/4 cup soy
- 1/4 cup mirin
- 2 tablespoons sugar
- 4 cups dashi or beef/chicken broth
- 1lb nugget potatoes, peeled and sliced into 1/4" rounds
- 1 large carrot, sliced
- 1 package konnyaku (noodles or cubed, optional)
I Am... Birthday Choux au Craquelin: Sweet and Smokey Whiskey Lapsang Cookie Cream Puff Recipe
We're in Japan and it's Mike's birthday!! Two very sweet things. Unfortunately I am sick and cannot eat a thing but Mike is being very chill about not eating 24/7 and we're still having a ton of fun. It's one of the things I love best about him. If you look up easy going in the dictionary, I'm sure you'll see a very cute illustration of his face. Mike and I are opposites in so many ways. When I'm sick, I'm essentially a big baby. I'm making a very huge effort right now not to be because we're in Tokyo and it's Mike's birthday month, so I can't really get away with it, but usually, I will lie around like a baby seal, thinking that I'm going to die, and hope for the best.
Read More →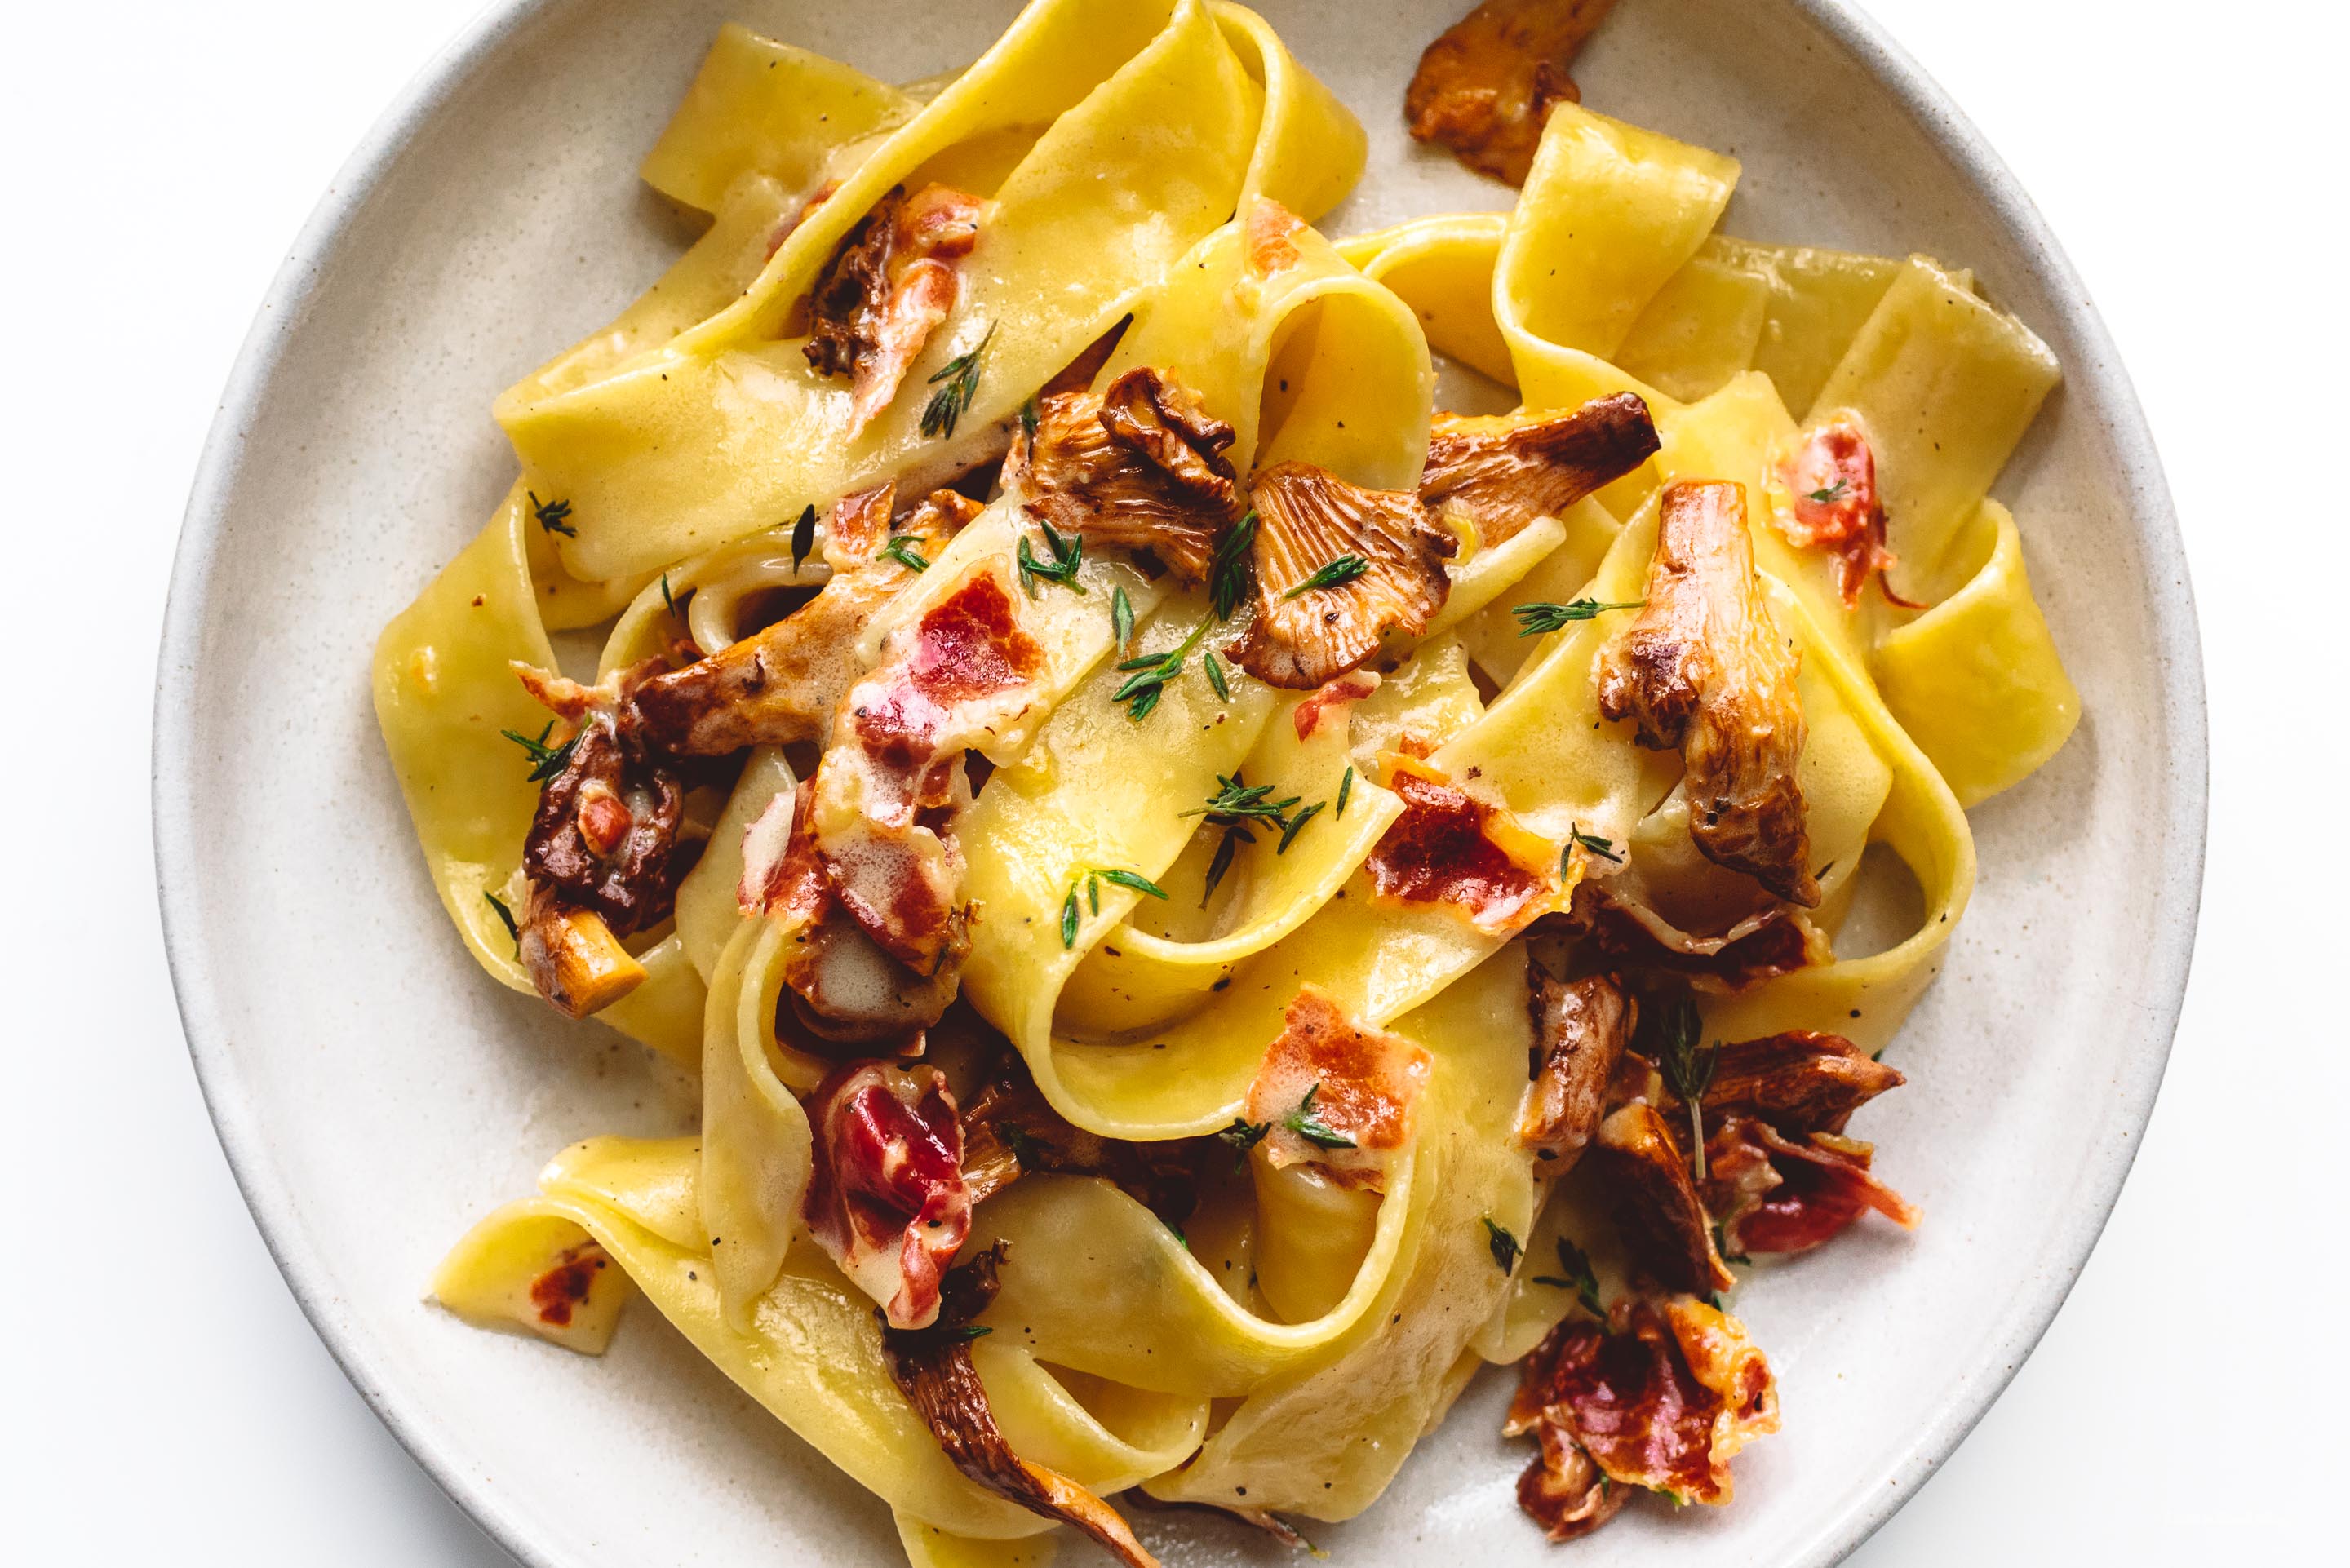
I Am... A beginner’s guide to food photography
Steph is out sick with the flu to end all flus so I'm picking up the slack with some posts that we've been putting off, starting with this beginner's guide to food photography. When I was first starting out shooting food, I found tons of general tips for how to take great food photos online but what I wanted most (and never found) was a guide that said: “Do you like this photo? Here’s how you make it from beginning to end” - so today that's what I'm going to be doing with this gorgeous shot from Bon Appetit's Pasta with Mushrooms and Prosciutto: [caption id="attachment_21760" align="alignnone" width="725"] Photo credit: Bon Appetit / Michael Graydon + Nikole Herriott[/caption] It's important to choose a good recipe to practice with because many dishes will wilt, congeal, or otherwise look unappealing when you’re taking a long time to take photos (I’m looking at you, egg yolks). This pasta is a nice stable dish that will look as good 30 minutes later as it does right out of the pan, because it's glossy, stable, and most of all, pretty. I adapted the recipe fairly heavily to make life simpler on myself and it ended up being a pretty amazing 6 ingredient pasta dish that you definitely need to try. I dropped BA’s ingredient-heavy sauce in favor of emulsifying cream, parmigiano, pancetta fat, and pasta water into a sauce. It came out awesome, and is easily one of the most impressive dishes you could make in 15 minutes. This post is going to be pretty long, so it’s split up into 3 parts. Feel free to jump around or skip: 1. Technical Stuff: Cameras, Lenses, RAW vs JPEG, and Manual Shooting, 2. How to recreate the shot: Lighting, Angles, Food Styling 3. Giveaway: How to get two free awesome Nikon lenses (they fit most mirrorless cameras too)
Part I - technical stuff you need to know for food photography
CAMERAS They say the best camera is the one you have with you - I say the second best camera is the one you already own. There's no real reason to run out and get a new camera just to shoot food. If you did want to however, there are a lot of cameras on the market these days, from mirrorless, to superzooms, to full frame SLRs that all claim to be the best thing since sliced bread, and they’re probably not wrong if you have thousands of dollars. On the more reasonable end of the pricing bin, a good budget DSLR will outperform anything else in its price range both on image quality and professional features. Even if you have thousands of dollars, when you walk into any professional studio, you’ll always see an SLR as the main camera used, and there’s a good reason for that: an SLR is a system that allows you to upgrade your component parts as you outgrow them. [caption id="attachment_21774" align="alignnone" width="1450"] Taken with an iPhone 6[/caption] If you’re on a budget, you definitely don’t need an SLR to get good photos. All of the tips and tricks in this post work with any camera. Photography is about what you know, not your gear. But good gear certainly helps. Takeaway: A DSLR is the best type of camera for food photography. Budget pick: Nikon D3400 Splurge pick: Nikon D500 More money than sense: Nikon D850 LENSES The lens of your camera is the single most important thing on it. Most people start off using the lens that comes with their camera, then look for something with creamy bokeh or something for low light. For food photography, there is pretty much no reason to get a zoom lens. The best pick for a good food lens that won’t blow your budget is a prime normal lens. A normal lens is one that doesn’t distort the image coming in, vs a wide angle or a telephoto. If you have a crop sensor - which is to say if your SLR didn’t cost $2000 or more - this means you’re looking for a 35mm lens, and if you have a full-frame, you need a 50mm lens. [caption id="attachment_21789" align="alignnone" width="1450"] 20mm f/3.5 Nikon D810 - note how flat the rim of the plate looks and how much space there is between the food and plate[/caption] [caption id="attachment_21790" align="alignnone" width="1450"] 50mm f/3.5 Nikon D810[/caption] Generally, lenses are priced based on construction, focus motor, build quality, coatings, and stabilization. For food photography, you don’t need build quality, coatings, or stabilization, so if the lens will never leave the kitchen, there’s very little need to buy a fully weather sealed nano-coated lens with 6 axis stabilization. Takeaway: Buy a prime normal lens that doesn’t break the bank. Budget pick: 50mm 1.8D Splurge pick: 35mm 1.8G DX More money than sense: 50mm 1.4G RAW vs JPEG SLRs have the option to save your photos as RAW or JPEG. While JPEG has a smaller file size and is ready to go right out of the camera, you should really shoot in RAW when you can. RAW files contain the image information your camera sees and can be ‘developed’ in post on your computer. Your camera’s sensor actually sees a wider range of light than your eyes can see (even infrared if the filter is removed), so RAW files contain much more light information than JPEG, and that means you get a lot of headroom to play with. Photo too bright or too dark? White balance is off? You can fix that in post, but only if you shoot RAW. You’ll need something to develop the raw files in however, whether that is photoshop, lightroom, capture one, or something else. [caption id="attachment_21794" align="alignnone" width="1450"] deliberately underexposed RAW shot[/caption] [caption id="attachment_21795" align="alignnone" width="1450"] the same shot, fixed in post[/caption] Takeaway: Shoot in RAW ISO, APERTURE, & SHUTTER SPEED You should shoot in Manual mode. There are a lot of guides on the internet about how to use the manual controls on your camera, so I’m going to skip to the important bits. The exposure of a photography is controlled by 3 elements: ISO, aperture, and shutter speed. The idea behind this is that you balance these three items to get a properly exposed image - more ISO, faster shutter speed / smaller aperture, slower shutter speed, that kind of thing. ISO is how sensitive your sensor is. Every sensor has a different min/max ISO, and generally speaking it’s always safe to use something between 100 and 800. The higher you go up, the grainier your photo will be, and that can definitely be an artistic choice. For food photography, I like 500. [caption id="attachment_21803" align="alignnone" width="1450"] ISO100 vs ISO12800[/caption] Shutter speed is how long the camera takes light in for. In food photography, you only need to care about two things when it comes to shutter speed: 1. is it so low your hand shake blurs the photograph? 2. Do you want to capture some falling action? The answer to 1 is to keep it above 100. If you have steady hands, you can go down to 60 or 30, but why risk it? The answer to 2 is to keep it above 1000. [caption id="attachment_21806" align="alignnone" width="1450"] f/2.5[/caption] [caption id="attachment_21807" align="alignnone" width="1450"] f/11[/caption] Aperture is how wide of an opening the lens creates, and is confusingly numbered opposite to size, so f/1.4 is a huge hole and f/16 is a tiny hole. The larger the number though, the more of the image will be in focus. Aperture’s main benefit is to determine how much of your background and foreground is in focus (bokeh) and is mostly an artistic decision, but here is a quick tip: on almost all lenses, the lowest and highest number will usually produce a less sharp image than if you use one or two stops away. For instance, on the Nikon 1.8G lenses, the sharpest image comes from F/2.8, even though the lens goes down to F/1.8. Takeaway: ISO range: 100-800, Shutter speed above 100, aperture: avoid the first and last settings.Part II - how to take a food photo like Bon Appetit
So now that we have the technical stuff out of the way, what do you need to know to shoot this photo? Good food photos come down to lighting, angles, and food styling. LIGHTING The best lighting for beginning food photography is right next to a window outside of direct sunshine, like a north facing window (or any other direction window when the sun is not shining in directly). Get as close to the window as you can. The farther away from your light source you go, the longer your shadows, and long shadows aren’t always a good thing in food photography. You should also turn off all other sources of light in the house, because conflicting light sources will wreck your white balance, cast multiple shadows, and create odd reflections. [caption id="attachment_21811" align="alignnone" width="1450"] this is what happens when you have conflicting lighting sources[/caption] Takeaway: Turn off all the lights, use natural light from a window, not direct sunlight, get as close to the window as possible. ANGLES In food photography, unless you get really creative there are only three possible angles: overhead, perspective, or side view. Most people gravitate towards overhead because that’s both easiest and you don’t have to worry about having a nice background behind the food. I prefer a more perspective view, because that’s how we see food in real life, but most people will be more impressed with an overhead shot. If you are shooting from perspective or side, the angle your light comes from is very important. Light from in front of your food will be brightest but wash out textures. Light from the side shows texture best. Light from behind will backlight your food. Generally speaking, stick with light from the side when shooting in perspective. [caption id="attachment_21846" align="alignnone" width="1450"] light from front[/caption] [caption id="attachment_21844" align="alignnone" width="1450"] light from side[/caption] [caption id="attachment_21845" align="alignnone" width="1450"] light from behind[/caption] Takeaway: Shoot from overhead, with light from the top or side FOOD STYLING Getting your food looking the way you want it to when you shoot is probably the most difficult part to learn, and whole courses could be developed on the subject. There are no hard and fast rules on getting food to look good, but here are my hard and fast rules:- Food should be glossy if it's supposed to be glossy
- Stick to a color palette, don't go nuts
- Don't go monochrome either
- Garnishes should be either sparing, or extremely generous
- Plate your food as a generous portion for one
CLOSED! Part III - the giveaway
I've been shooting Nikon since before they made DSLRs, my first camera was a Nikon F4 and I've been hooked ever since, and I've hooked Steph into it as well. So it was an obvious choice to partner with Nikon to help new food photographers find their feet. To do this, we're giving away 2 lenses - the 35mm f/1.8G and an amazing 85mm f/3.5G ED VR macro lens - worth $750 if you buy them today on Amazon. Both of these lenses are perfect for any new (or veteran) food photographer and both will fit every Nikon ever made, plus with a pretty cheap converter will fit most mirrorless cameras including Fuji, Olympus, and Sony.
CLOSED! Congrats Francis Moon, keep your eyes on the lookout for an email from me!
[caption id="attachment_21829" align="alignnone" width="1450"] in case you ever wanted to count the grains of pepper on your food[/caption]
6 ingredient mushroom pasta with chanterelles and pancetta
- 2 tbsp olive oil
- 1 oz pancetta (thinly sliced, about 5 slices)
- 1/2 cup cup chanterelles (torn into small pieces, or other mushroom of choice)
- 1 tsp fresh thyme (plus more for garnish)
- 3.5 oz pappardelle (or fettucine)
- 1/4 cup heavy cream
- 1/4 cup Parmigiano Reggiano cheese (grated)
Set a large pot of salted water to boil.
Heat oil over medium heat in a large saute pan and fry the pancetta until crispy. Remove the pancetta and set aside on a paper towel lined plate. Reserve saute pan and oil.
Turn the heat to high and add the mushrooms to the pan. Cook for 10 minutes or until golden brown, then remove and drain. Turn off the heat.
Cook pasta for 4 minutes. Add a cup of pasta water to the saute pan and turn heat back to medium. Whisk oil and water mixture together until emulsified (about 1 minute).
Using tongs, transfer pasta to saute pan, along with another cup of pasta water, cream, thyme, and parmigiano. Reserve pasta water. Cook until pasta is the desired doneness, adding pasta water as necessary.
Add mushrooms and pancetta back to the pasta, season with kosher salt, black pepper, and extra thyme.
You can start making the pasta about 5 minutes after the mushrooms have been started.
Very adapted from Bon Appetit

I Am... 10 Holiday party appetizers your friends won’t be able to get enough of
Appy hour – it's the happiest hour around. Give me all the appetizers at holiday parties because I'd rather eat a meal full of many little bites of different dishes then lots of one dish! Here are 10 holiday party appetizers that are 100% friend approved :)
Read More →
I Am... Mini Gingerbread Houses
How cute are these tiny gingerbread houses? They totally put me in the holiday mood. There's just something magical about the smell of gingerbread baking. I love opening up all the windows and letting in the cold December air so you get that mix of warm and cold. Somehow the smell of the crisp outside makes warm gingerbread smell even more intensely like the holidays.
Read More →