
I Am... The ultimate guide to dashi
If you’re wondering why Japanese food is so full of flavor and umami, the reason why is dashi! Dashi is a key component to much of Japanese cuisine. Instead of water as a component to cooking, dashi adds flavor and complexity.
What is dashi?
Dashi is a Japanese soup stock that is the base of many Japanese dishes. It’s the base of miso soup and is an key ingredient for noodle soup dishes, simmered dishes, ramen broth, and sauces. and it's one of the backbones of Japanese cuisine. There are three main kinds of dashi. The most common is awase, a simple broth made from kombu (dried kelp) and shaved katsuobushi (dried bonito/skipjack tuna). To make it, kombu and flakes of bonito soak in near-boiling water. The strained liquid is salty, sweet, and full of umami.Five main kinds
- Kombu - kelp stock. This is the simplest version there is. It’s kombu (kelp, a type of seaweed) soaked in almost boiling water, then strained. Kombu dashi is vegan and used in many vegetarian and vegan dishes.
- Katsuo - bonito stock. This is a simple broth made from soaking katsuobushi in almost boiling water. It’s simple, pure flavor.
- Niboshi - sardine stock. Tiny dried sardines (with the heads and insides removed) are soak in almost boiling water. Niboshi stock is an umami forward, bombastic dashi that adds so much flavor.
- Shiitake - mushroom stock. Dried shiitakes have huge umami flavor. Shiitakes soak in almost boiling water, and the strained liquid is equals shiitake dashi. Like kombu, it’s vegan.
- Awase - meaning a combination, this is the most delicious! My favorite is kombu and katsuo, probably the most common combination that you’ll find used in most Japanese dishes. I find it the most delicious of all the different versions. Awase dashi can also be a mix of any of the other versions described above.
How to make dashi
- Simmer. Place a piece of kombu in a pot with water and gently bring to a simmer until the water just about reaches a boil. Remove the kombu and set aside.
- Steep. Add katsuobushi to the pot and bring to a simmer for 30 seconds, then remove the pot from the stove and let steep.
- Strain. After 10 minutes the katsuobushi should gently sink to the bottom. Strain the stock using a fine mesh sieve.
- Enjoy. You have dashi! You can enjoy it as is or use it in your favorite recipe.
Dashi ingredients
We like to use kombu and katsuobushi for our most standard, basic version. Kombu - kombu, or dried kelp, is a variety of seaweed. It has all the umami salty flavor of the sea. It comes in large pieces with a slightly white powdery substance on it. The white stuff is umami. Sometimes people tell you to wash kombu but if you do, you’re really washing off flavor. Your kombu shouldn’t be dirty but if it is, you can wipe it down with a damp cloth. Since kombu comes in large pieces, simply use a pair of scissors to cut it into a manageable square piece, about 4 inches by 4 inches. You can find kombu at Asian grocery stores and online. There are so many different brands and qualities available. We usually buy kombu that’s sourced from Japan. Katsuobushi - also known as bonito flakes, kastsuobushi are the shavings of a bonito fish (slapjack tuna) that’s been dried and shaved. They smell like smoked fish and are delicious! If you’ve ever had high end kasuobushi freshly shaved on a fluffy bowl of rice, you know what I’m talking about. That being said, the quality of katsuobushi quality can really vary. Try to look for large, fresh, supple shavings imported from Japan. If your kasuobushi is dry and crumbly, it won’t have as much flavor. You can find kasuobushi at Asian grocery stores and online.What are dashi granules?
Even though dashi is incredibly easy to make, there’s an even easier way to make it: with instant granules. Most Asian grocery stores will sell instant dashi packets containing granules that instantly dissolve. They’re handily packaged in single serving sizes. These are readily available in Asian grocery stores and online, in all of the flavors.How to use dashi granules
To make dashi using granules, bring water up to a boil, then remove from the heat. Measure out 1 cup of hot water into a heatproof liquid measuring cup and stir in 1 teaspoon of the granules. Usually granules are sold in pre-measured packs that make 1 cup each. The ratio tends to be 1 teaspoon of granules for 1 cup of hot water, but always check the package to be sure. A very popular Japanese brand for granules in Shimaya Dashi-no-Moto. They make instant katsuo, kombu, shiitake, niboshi, and awase.What are dashi packs?
If you want a mix of ease and the feeling of making something from scratch, you’ll want to use dashi packs. These are ready-to-steep packages of pre-measured ingredients (kombu, bonito flakes, shiitake mushrooms, niboshi) that are sealed in a large bag that resembles a tea bag. You steep the bag in almost boiling water and simply pull the bag out when done, meaning there’s no straining. Dashi packs are delicious! They’re readily available at Asian grocery stores and online.How to use dashi packs
To use a dashi pack, add 2 cups of water to a saucepan over medium heat. Once it boils, turn the heat down, add the little tea bag, and let everything simmer for 3-5 minutes. Of course, different brands have different instructions, so make sure you read the package. Our favorite brand of dashi packs has got to Kayanoya. Kayanoya has been around since 1893 and they've become something of a luxury brand. Japanese people even buy it as omiyage (an edible gift) for people when they visit the island of Kyushu, the birthplace of Kayanoya. Their dashi is absolutely delicious.Recipes that use dashi
For us, we utilize all of these cooking methods, and there's not one that's better than another, depending on what we're doing. For something like yakiudon, granules add a huge hit of umami. If we’re making a complex ramen, Mike will make something from scratch, carefully tweaking the proportions of kombu and katsuo. And, the best, if we’re making oden, a dashi pack is a fast and easy way to make a flavorful base. Dashi is truly a unique and amazing ingredient that adds so much flavor to everything. You can use it anywhere you use water to add a bit more flavor. Or, you can substitute it in recipes that call for chicken stock to add a bit more umami. I hope you give dashi a try, it’s really delicious! Happy dashi-ing! xoxo stephDashi
Katsuo Dashi Recipe
- 1 piece kombu (~4" x 4")
- 1 cup katsuobushi (~10g)
Use a pair of scissors to cut some slits into the sheet of kombu. The kombu might have specks of what looks like powdered salt. That’s umami! There’s no need to wipe it off. The only reason you need to wipe it is if it looks dirty with literal dirt - which shouldn’t happen in this day and age.
Place the kombu in a medium saucepan with 4 cups of water. Turn the heat to medium low. The water should slowly heat up and almost come to a boil. If needed, skim off any foam that rises to the surface. Heating up the pot of water will take about 8-10 minutes, depending on the strength of your stove. When the water starts forming bubbles and almost starts to boil, remove the kombu and set aside.
Add all of the katsuobushi to the pan and bring to a boil over medium high heat. Once the dashi comes to a boil, reduce the heat and simmer for 30 seconds, then turn off the heat and remove from the stove.
Let the katsuobushi infuse the dashi for 10 minutes. It should gently sink to the bottom.
When the 10 minutes are up, strain the dashi through a fine mesh sieve into a bowl or liquid measuring cup. Your dashi is ready to use in recipes or to enjoy as is!
If needed, you can store the dashi in a tightly covered container for 3-5 days in the fridge.

I Am... Tiktok Pancakes
Tiktok pancakes are coming to make your breakfast life easier. Ice cube tray pancakes aren’t pre-cooked frozen pancakes, they’re raw frozen pancake batter that you cook from frozen. This means a fresh stack of pancakes without the mixing and cleaning! I’m a breakfast person. I used to skip breakfast on the regular but now that I’m an “adult” I aim to eat breakfast everyday. It really IS the most important meal of the day. Usually I just have a slice of toast or something simple, but lately, thanks to Tiktok, I’ve been having daily breakfasts of quick and easy fluffy pancake stacks.
What are tiktok pancakes?
Frozen pancakes, ice cube pancakes, ice cute tray pancakes, pancake ice cube hack, freezer pancakes: whatever you want to call them, they’re all essentially the same thing. Pour pancake batter into an ice cube tray (or food mold), freeze it, and boom, you have ice cube tray pancakes. You can add mix-ins to the batter or leave it plain, it’s up to you. The genius part is that the batter is pre-mixed, pre-portioned, and ready for the frying pan. That means there’s no measuring, no mixing, and not as much clean up. It’s perfect for those days when you feel like a little bit of a special breakfast but don’t have the time or inclination to break out everything you need to mix up a batch of pancakes.Frozen pancake batter?!
Some people think raw frozen pancake batter is ridiculous – you can’t win over everyone – but for me, I love that almost instantaneous, but still cooking aspect of ice cube pancakes. I love a fresh stack of pancakes and they cook up super cute and small. Sure, it’s true that you can meal prep pancakes and freeze them already cooked, but it’s not quite the same as freshly cooked. As for where ice cube tray pancakes came from, I think they’ve been around for a while, at least according to a quick google search, but I first saw them on Tiktok when I saw this post. The thick and fluffy pancakes caught my eye and more than 8 million other people too.How to make Tiktok pancakes
Make your favorite pancake recipe
You can go with store bought pancake mix or use your go-to pancake recipe. I like to use my simple fluffy buttermilk pancake recipe. It’s one cup flour mixed with 2 tablespoons sugar, 1 teaspoon baking powder, and 1 teaspoon baking soda. After that’s mixed up in a bowl, you whisk an egg with 1 cup of buttermilk then add it to the dry mix. Stir it up so everything’s mixed together – this batter is nice and thick which means extra fluffy pancakes.Pour the pancake batter into an ice cube tray
After your pancake batter is ready, all you need to do is pour it into clean ice cube trays. The smaller your ice cubes, the smaller your pancakes will be, so be sure to use an appropriate sized ice cube tray to how big you want your pancakes to be.Add-ins
If you want, this is the time to add mix-ins to your pancakes. Make sure whatever you’re adding is small enough to fit into the ice cube molds. You can do fruit (berries, bananas, apples), sprinkles (for funfetti pancakes!), nuts (chopped pecans, almonds, walnuts, pistachios), chocolate, or spices like cinnamon or pumpkin spice. Just drop the mix ins on top of the pancake batter, as you cook the pancakes, the mix ins will gently insert themselves into the pancakes.Freeze the pancakes
Once the pancake batter (and mix-ins, if using) are all set up in the ice cube trays, it’s time to freeze. Simply freeze in the freezer until frozen solid. After that, you can leave them in the trays or pop them out and place them in freezer bags/a freezer container. I like to just pop them out and put them in a container.Cook the pancakes as needed
When you need a quick pancake fix, heat up a non stick frying pan over medium-low heat. Add a bit of butter or oil and a frozen ice cube pancake straight from the freezer. Cook, on low and slow, until the until the pancake melts, cooks, and starts to bubble at the edges, about 2-3 minutes, depending on the size. When the edges are set, flip the pancake and cook the other side until golden then enjoy with butter and syrup!What ice cube tray for Tiktok pancakes?
Truthfully you can use any ice cube tray you have at home, but the best tray you can use is a silicone ice cube tray. They come in so many sizes and it’s super easy to push the pancakes out. I like using the silicone molds that I use for hot chocolate bombs because I have them and they’re round like pancakes.Tiktok pancakes tips and tricks
- Use a liquid measuring cup to pour the pancake batter into the ice cube tray/mold.
- Chop up your fruit or nuts so they’re small enough to fit inside each individual ice cube.
- Mini chocolate chips work better than large chocolate chips.
- Any size ice cube tray or mold will work: regular size ice cube trays make small, cute pancakes and larger ice cube trays will make regular standard size pancakes.
- Cook ice cube tray pancakes low and slow to give them enough time to melt and cook through.
How long will Tiktok pancakes keep in the freezer?
They’re best in the first month that you freeze them, but you can keep them in the freezer for up to three months.More pancake recipes
- super fluffy Japanese pancakes
- extra mini cereal pancakes
- strawberry shortcake pancakes
- crème brûlée pancakes
- pumpkin chocolate chip pancakes
- Greek yogurt pancakes
- chocolate coconut pancakes
- crispy cornmeal pancakes
- fruity pebble pancakes
Tiktok Pancakes
Ice cube tray pancakes make breakfast a breeze!
- 1 cup all purpose flour
- 2 tbsp sugar
- 1 tsp baking powder
- 1 tsp baking soda
- 1 cup buttermilk
- 1 large egg
- 1/2 cup add ins (of choice, optional, such as chopped fruit, mini chocolate chips, chopped nuts, or sprinkles)
In a large bowl, whisk together the flour, sugar, baking powder, and baking soda.
In another bowl or large glass measuring cup, whisk the egg and mix in the buttermilk.
Add the buttermilk egg mix to the dry ingredients and stir until well combined, some small lumps are okay.
Evenly pour the pancake batter into your ice cube tray or food molds, about 1/4 inch from the top. If you are using add ins, add your fruit, nuts, or chocolate to each individual pancake now.
Freeze the tray in the freezer until completely solid.
Remove the pancakes from the tray and store in an air tight container or ziplock bag.
To cook: Heat up a non-stick frying pan over medium high heat. Melt a bit of butter or add a bit of oil of choice. Add the frozen ice cube pancake and cook on medium low, until the pancake melts, cooks, and starts to bubble at the edges, about 2-3 minutes.
When the edges are set and there are bubbles in the surface of the pancake, flip and cook for another 1-2 minutes or until golden. Remove from the pan and enjoy with butter and syrup!
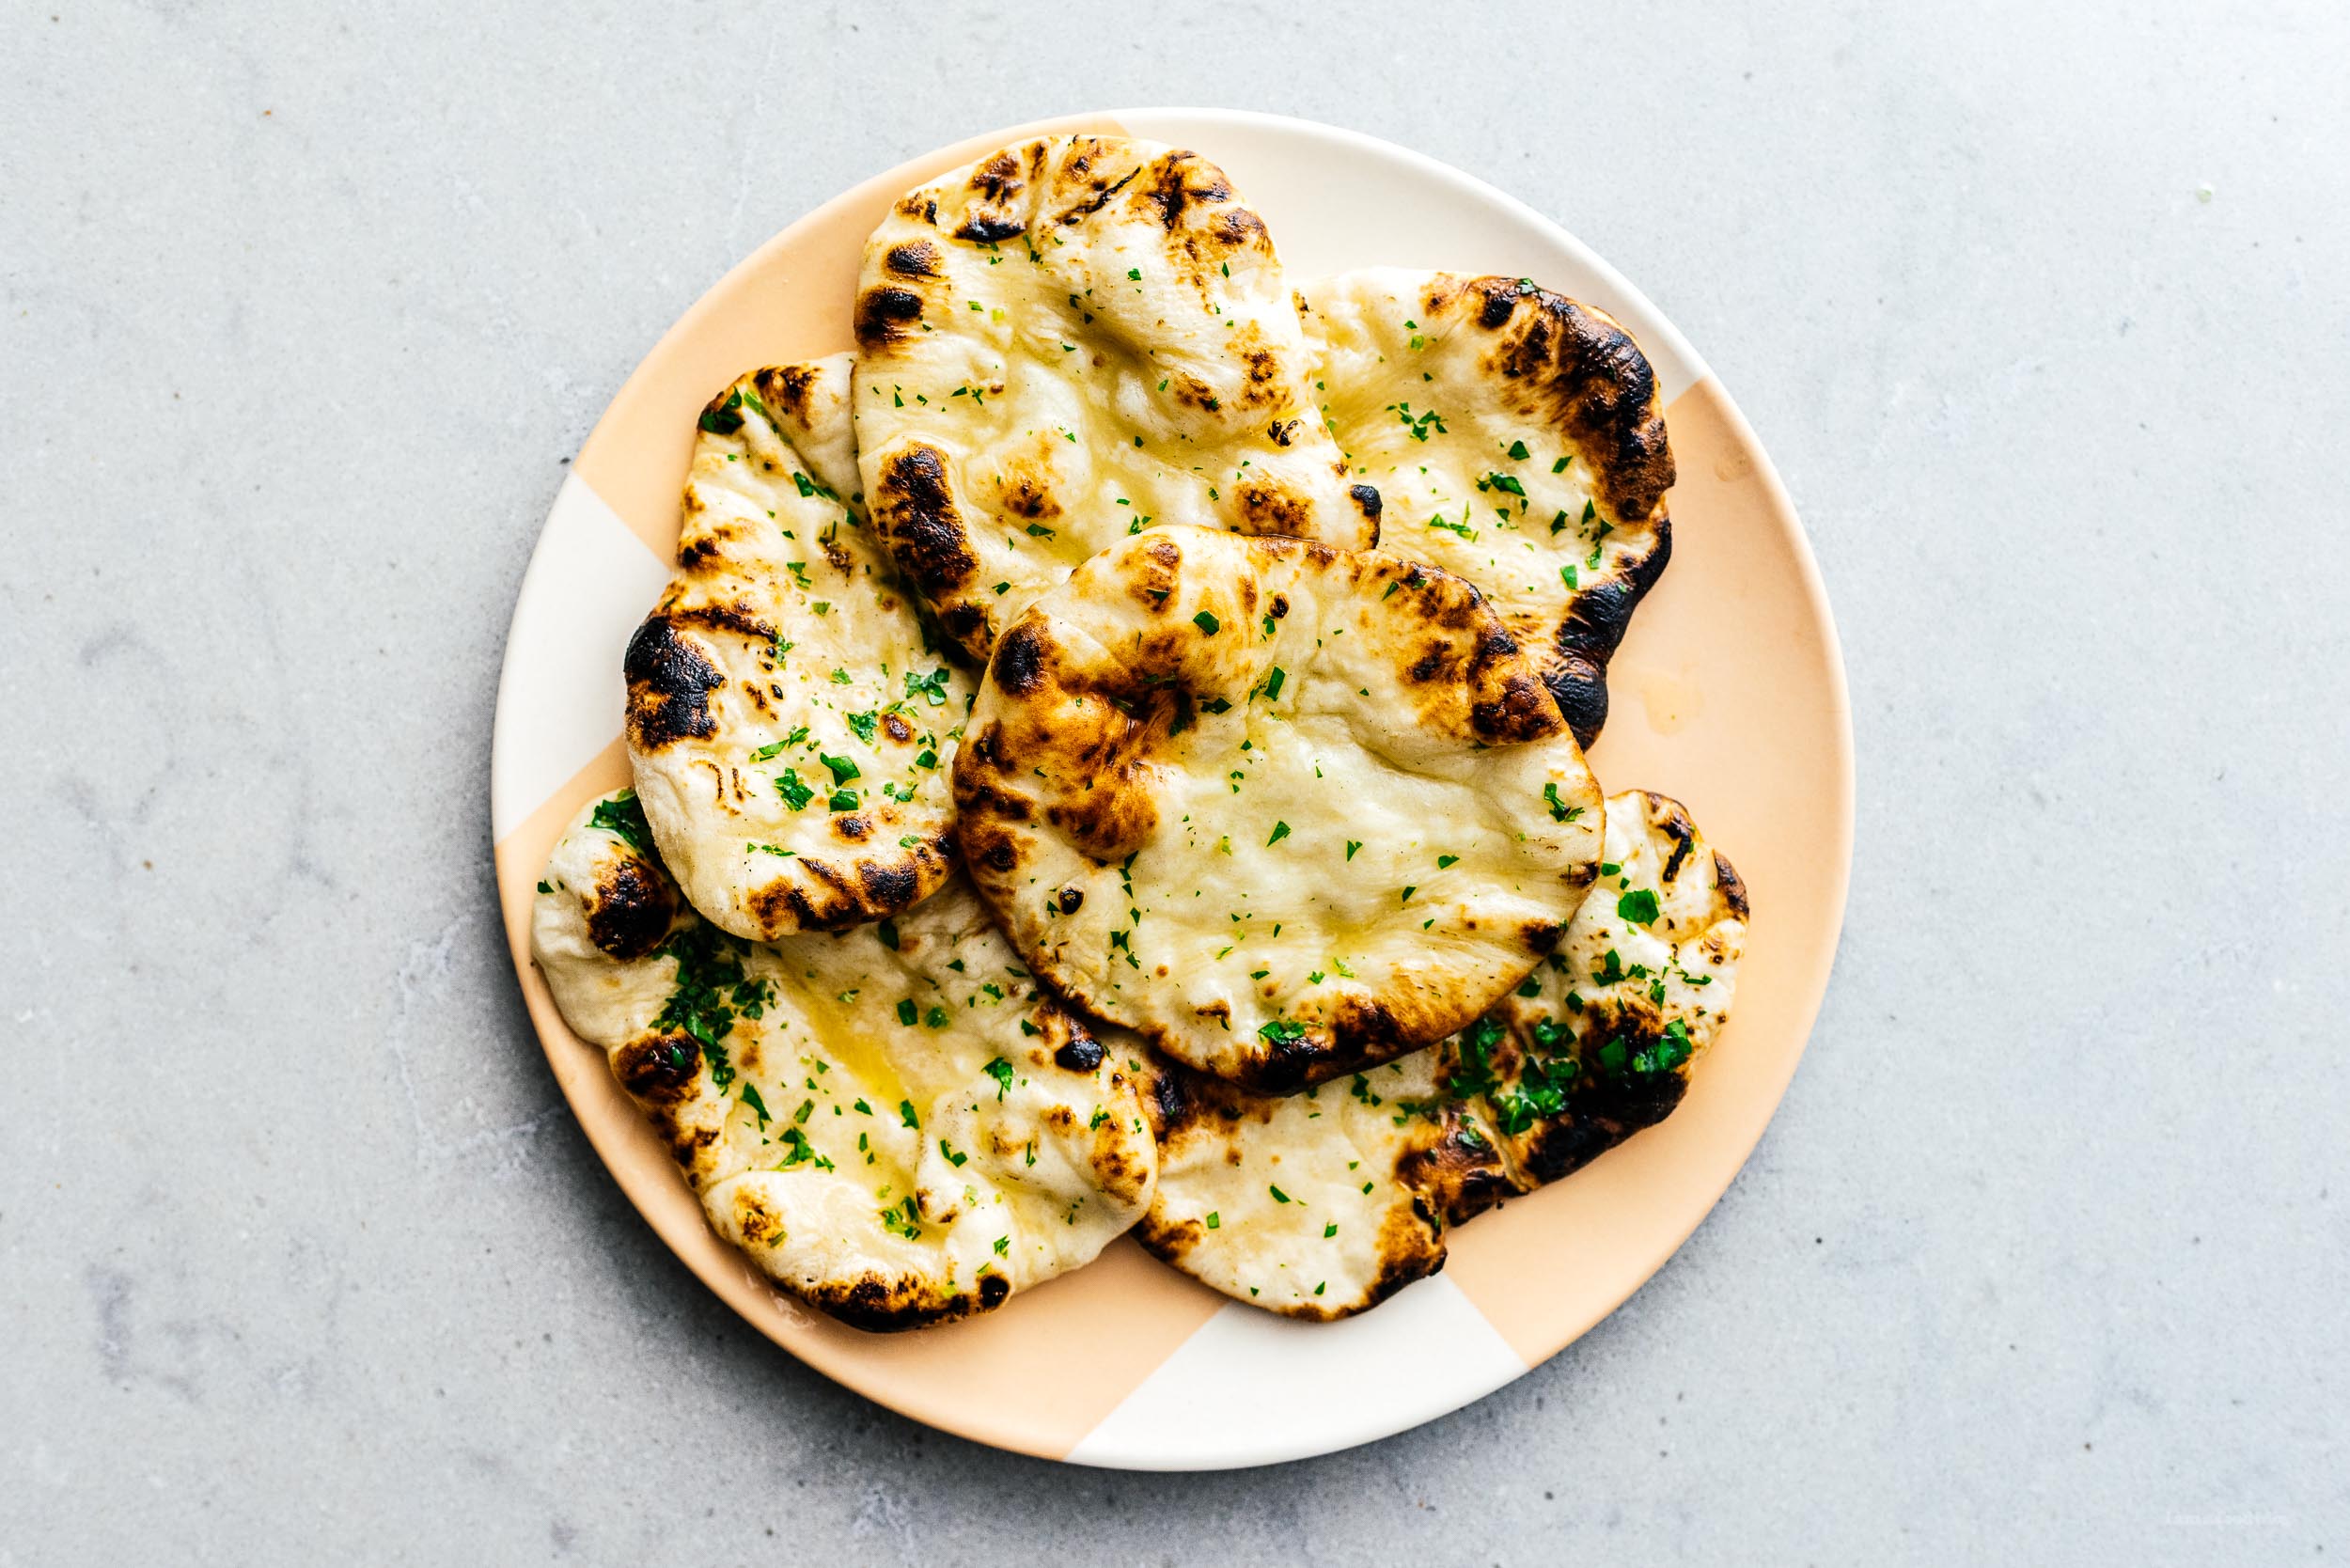
I Am... The Easiest Naan
Making homemade naan is easy and delicious – it’s the fastest, best bread you’ll make at home. This naan recipe comes together super quick. It’s soft and puffy, just like the bread you get at your favorite Indian restaurant. A recipe for naan is something every home cook should have in their back pocket. This recipe gets it tang and softness from milk and yogurt. The fluffy plushness is thanks to baking powder and soda which is amazing because you don’t need to proof it as long as you would with yeasted dough.
What is naan?
Naan is a type of flatbread, popular in India, South Asia, and Indonesia. The kind we’re talking about here specifically, is Indian-style bread baked in a super hot tandoor oven where the bread gets puffy and bubbly. Most home cooks use a (hopefully gas) stove top with a hot cast iron skillet because who has a tandoori at home?! (Some people, actually. They even make not-well-rated mini tandoori ovens for home) Naan is soft yet crispy, puffy and lush. It’s basically the best flatbread you’ll ever eat. If you like fresh homemade bread, you’ll love this recipe. Side note, although a lot of people call it naan bread, it’s kind of funny because the word naan actually means bread. So really, you’re saying “bread bread”. It’s kind of how like when you say shrimp scampi you’re saying “shrimp shrimp.”Naan ingredients
- Milk. I use 2% milk because it’s usually what I have in the fridge but this recipe will work with any kind of milk. If you’re vegan, you can make a vegan version by using a plant-based milk.
- Yogurt. Yogurt gives your bread a bit of tang and flavor. I’ve made this with Greek yogurt, regular yogurt, kefir, and soy yogurt.
- Flour. Simple all-purpose flour is what you need. If you’re looking to sub whole wheat, you can use 3/4 cup whole wheat with 1/4 cup all-purpose.
- Baking powder and baking soda. This is a yeast free recipe which is perfect because you don’t need to wait for it to rise. Instead it gets its fluffiness from baking powder and soda.
- Sugar. We need just a touch of sugar for a bit of sweetness. There’s only 1/4 teaspoon in this whole recipe so you can always skip the sugar if you want to be sugar-free, you probably won’t miss it.
- Salt. You need just a touch of salt to make your naan sing. We like our homemade naan more neutral, so be sure to adjust the salt level to your personal salt taste.
- Butter and herbs. Butter and herbs are optional but so delicious. We use melted butter and chopped cilantro, but you can use all kinds of herbs and spices. Try parsley, mint, green onions, garlic, cayenne, cumin, graham masala, chili powder, the world is your oyster! If you’re making vegan naan, sub olive oil or a vegan butter.
How to make naan
- Whisk. Whisk the milk and yogurt together in a liquid measuring cup.
- Combine. In a large bowl, stir together the flour, baking soda, baking powder, salt, and sugar. Make well in the middle and add the yogurt mix in bit by bit with a rubber spatula. Knead into a soft dough, gather into a ball, cover, and let rest for 1 hour.
- Shape. Give your dough a little knead on a lightly floured work surface then divide it up. Use a rolling pin to roll it out into ovals or circles. You’ve made naan!
- Bake. Heat up a heavy bottomed cast iron skillet over high heat. Brush the naan with water and place in the skillet water side down and cover. When it bubbles and rises, take the lid off and then flip it over and cook the other side.
Variations
- Mini naan - Divide the dough into 8-10 pieces and make naan dippers then cook as usual.
- Giant naan - Divide the dough into 2 and then cook as usual. If your naan isn’t rolling out large enough, let the dough rest longer. The longer it rests, the more relaxed the dough will be and the larger you’ll be able to roll it.
- Garlic naan - To make garlic naan, melt together 1/4 cup butter with 4 cloves minced garlic and 1 tbsp finely chopped parsley or cilantro. Brush the garlic butter on both sides of cooked naan and enjoy.
- Cheesy naan - To make cheesy naan, divide the dough into four pieces then roll them out. Place 2 tbsp shredded cheese into the middle of each naan and seal it in the middle by pinching together the edges. Let it rest briefly, then use a rolling pin to roll it out. Cook as per usual.
How to store naan
Naan tastes best fresh. But if you want to make it in advance, just cook it and leave it plain, without butter. Let it cool off completely then store in an airtight container or zip top bag. It should keep for up to three days.How to freeze
To freeze, just cook it and keep it plain, then let it cool completely. Wrap tightly in plastic wrap before putting it in an air tight container or bag. It should keep frozen for up to 2 months.Reheating
Microwave
Lightly brush with water and heat briefly, in 20 second intervals until it’s warm and pliable. When it’s warm, brush with melted butter and finish with chopped herbs.Oven
Heat the oven to 400°F. Lightly brush the naan with water and heat on a baking sheet for 2-3 minutes. When it’s warm, brush with melted butter and finish with chopped herbs.From frozen
Let thaw at room temp before reheating, either in the microwave or oven.What to serve alongside
- butter chicken
- basmati rice
- butter paneer
- dal makhani aka black dal
- tandoori chicken
- chicken tikka masala
- chicken biryani
Naan Recipe
The best flatbread you’ll ever eat.
- 1/4 cup milk
- 1/4 cup yogurt
- 1 cup all purpose flour
- 1/4 tsp baking powder (+ an extra 1/8 tsp)
- 1/4 tsp baking soda
- 1/4 tsp sugar
- 1/8 tsp salt
- 1 tbsp butter (melted, to serve)
- 1 tbsp fresh cilantro (chopped, to serve)
In a small bowl, whisk together the milk and yogurt. Set aside.
Mix the dry ingredients together in a bowl or on a clean work surface. Make a well and slowly add in the milk-yogurt mix bit by bit, combining with the flour. Knead into a soft dough. Gather into ball and cover for 1 hour.
Lightly dust your work surface with flour. Divide the dough into 4-6 equal pieces and use a rolling pin to flatten and stretch out.
Heat up a heavy bottomed or cast iron skillet (with a lid, preferably a glass lid) over high heat. Brush one side of the naan with water and place in the skillet, water side down.
Cover the pan and cook for 30 seconds, then check it to see if has started to bubble and rise. If it has, use a pair of tongs and take it off the pan and cook the uncooked side over direct flames until it starts to char. Alternatively, flip and cook the pan until it starts to brown.
When the naan is browned on both sides, brush with a bit of melted butter and sprinkle on chopped cilantro. Repeat with the remaining dough. Enjoy warm.
via Indian Simmer

I Am... Warm and Cozy Chicken Stuffed Shells
It’s stuffed shell season and chicken stuffed shells are here for it. This recipe is two of my favorite things ever in one dish: stuffed shells and chicken pot pie. I love the creamy flavors of chicken pot pie but honestly I hardly ever make it because I’m not the greatest at making pie crust. So, I thought I’d combine chicken pot pie with pasta, but went a little further and took the time to stuff giant pasta shells. Because honestly, stuffed shells are elite.
This recipe is perfect for people who:
- love stuffed shells but don’t like tomatoes or red sauce
- love chicken pot pie filling
- don’t love making pie crust
- want a giant pan of comfort
- want a cozy make ahead meal that can be frozen and gifted
What are stuffed shells
Stuffed shells are the ultimate casserole. They’re giant pasta shells, called conchiglioni, in Italian. Cooked shells are stuffed with filling, placed in a casserole or baking dish, topped with sauce and cheese and baked in the oven. Just like lasagna or manicotti, you can stuff shells with just about any sauce you can think of. Most commonly you’ll see them stuffed with ricotta and topped with marinara or meat sauce and cheese. I went with a creamy chicken pot pie filling here because chicken pot pie is essentially a creamy chicken sauce, perfect for stuffing into shells.How to make chicken stuffed shells
- Cook the onions and garlic - cook the onions and garlic in a bit of butter until soft and translucent.
- Cook the chicken - add the chicken and lightly sear. It doesn’t need to be cooked through because it will continue to cook in the sauce.
- Add flour to make a roux - sprinkle the flour over the chicken, onions, and garlic, stirring to coat everything evenly in flour. The flour should cook and stick to the chicken, giving it a little golden coat.
- Stream in chicken stock and milk - slowly stream in the chicken stock while whisking. Stir in the milk and simmer until the sauce thickens.
- Stir in the cheese - stir in the cheese and season to taste with salt and freshly ground pepper.
- Cook the shells - cook the shells in salted water 2-3 minutes less than al dente according to the package. Drain, shock in cold water, then drain well. We do this after making the filling so the filling has time to cool.
- Stuff the shells - Spoon a generous amount of sauce into a large baking/casserole dish. Stir the frozen peas into the remaining sauce. Adding frozen peas to the sauce right before baking makes sure that they don’t get mushy. Stuff each pasta shell with a generous amount of filling. Place the stuffed shells into the sauced dish, tucking them neatly next to each other. Top the shells with any left over sauce as well as mozzarella and parmesan.
- Bake the shells - place the baking dish into a 375°F oven and bake until the sauce is bubbly and the cheese is golden.
Chicken stuffed shell ingredients
- jumbo pasta shells - you’ll need 1 box of jumbo pasta shells for this dish. They typically come in 12 oz boxes. Shells come in three sizes, small, medium, and jumbo. You want the jumbo box.
- butter and flour - butter and flour cook together to make a roux, which is what is going to thicken our chicken pot pie sauce
- onion and garlic - onion and garlic are classic savory aromatics that add so much background flavor to the sauce
- chicken - you can’t have chicken pot pie without chicken. I used boneless skinless chicken thighs, but if you have leftover cooked chicken, you can use that too!
- peas - personally I love peas in chicken pot pie! Frozen peas are the best peas because they’re picked and frozen at their peak. We will add them in at the very last minute, without thawing or really letting them get warm so they hold their pea shape and texture while being baked.
- chicken stock and milk - a mix of chicken stock and milk make the sauce creamy and full of chicken-y flavor
- mozzarella and parmesan - a mix of mozzarella and parm here is key. The mozzarella gives the sauce a cheesy, unctuous stretch and a sprinkle of parmesan on top when the shells bake in the oven add a deep cheese umami and slight crunch.
- flat leaf parsley - you might be tempted to skip this but freshly chopped flat leaf parsley adds much a needed fresh herbaceousness. Plus, finishing your casserole after it comes out of the oven with whole leaves of parsley is extra pretty.
Which shells to buy for stuffed shells
Jumbo shells are the shells you want. They’re usually hanging out near the lasagna noodles and manicotti in a big box. They come in 12 oz boxes and 1 box has enough shells to fill a standard casserole dish.Tips and tricks for stuffed shells
Undercook your shells
There are usually two cooking times on pasta shell boxes: one for al dente and one for baking. Use the cooking time for baking so your shells don’t get over cooked. If the box doesn’t come with a baking time, make sure to cook your shells 2-3 minutes under the cooking time. Firmer, undercooked shells are easier to stuff and don’t break as much. The shells will continue to cook in the oven becoming tender and perfectly cooked.Don’t sweat broken shells
It’s inevitable that some of the shells in the box will be broken. Or maybe you’ll be too excited and stuff a shell too much and it’ll rip. Don’t worry about it, just put it in your pan, the sauce on top plus the cheese will hide the fact that it’s broken.What size baking dish for stuffed shells
A standard 9x13 inch casserole or baking dish will fit your stuffed shells perfectly. If you have a pan that you use for lasagna, that is what you should reach for. That being said, you can bake stuffed shells in any heat proof vessel, it doesn’t have to be a rectangle. You can use a cake pan or even a cast iron pan.Make ahead chicken stuffed shells
You can make and assemble the entire casserole the day before, cover it tightly and keep it in the fridge for up to 3 days before baking it. Add 15 minutes onto the baking time, covering with foil if the top starts to brown too much. You can also make the sauce the day before and assemble the next day. If you do, loosen the sauce slightly before spreading it in the pan by giving it a minute or two in microwave, stirring well after it’s been warmed.How to freeze stuffed shells
Make the stuffed shells in a foil pan and wrap tightly. Freeze the entire pan. You can keep this in the freezer for up to 1 month.How to reheat stuffed shells
- Microwave - Simply scoop out a portion, cover, and warm in the microwave for 1-2 minutes or until warmed through.
- Oven - Cover the pan with foil and bake in a preheated 350°F oven for 30 minutes or until warmed through.
How to reheat frozen stuffed shells
Cover the casserole with foil and bake from frozen for 1 hour and 30 minutes then remove the foil and bake for another 15-20 minutes or until the cheese is golden.What to serve with stuffed shells
I think these stuffed shells are a complete meal, but salad and bread is always good! A simple kale salad and the best fluffy garlic rolls would make this the ultimate dinner. Have a cozy one, happy shell stuffing! xoxo stephChicken Stuffed Shells
All the goodness of chicken pot pie stuffed into giant pasta shells and baked with a cheesy golden blanket
- 12 oz jumbo pasta shells (~1 box)
- 5 tbsp butter (divided)
- 1 medium onion (peeled and diced)
- 2 cloves garlic (minced)
- 2 lbs boneless skinless chicken thighs (cut into 1/2 inch pieces)
- 1/2 cup all purpose flour
- 2 cups chicken stock (no sodium preferred)
- 1 1/2 cups milk
- 4 cups mozzarella cheese (shredded)
- 1/4 cup fresh flat leaf parsley (finely chopped)
- 10 oz frozen peas (~1 bag)
- salt and freshly ground pepper (to taste)
- 1 cup parmesan (finely grated)
In a large sauté pan over medium heat, melt 1 tablespoon of the butter in a large sauté pan over medium heat. Add the onion and garlic and cook until soft and translucent.
Add the chicken and lightly sear, then melt in the remaining butter. When melted, sprinkle in the flour and stir until the chicken is coated evenly.
Add the chicken stock in a thin stream, whisking constantly. Stir in the milk and let simmer until thickened, about 5 minutes.
Add 3 cups of the shredded mozzarella and the parsley. Stir until the cheese is melted, then season generously with salt and pepper. Remove from the heat and let cool completely.
While the filling is cooling, cook the shells in a large pot of salted water over high heat. Cook to the package instructions for baking (usually 2-3 minutes less than al dente) - they will continue to cook as you bake them. When the shells are cooked, drain them and shock them in cold tap water. Drain well.
Heat the oven to 375°F. Spread out a generous amount of sauce in the bottom of a large baking dish.
Stir the frozen peas into the remaining sauce.
Stuff each shell with a generous amount of filling, placing the stuffed shells in the sauced dish. Top the shells with any remaining sauce and remaining shredded mozzarella and the parmesan. Bake the dish for 30-45 minutes or until sauce is bubbly and cheese is golden. Remove and let cool slightly before enjoying.

I Am... Sour Cream Sauce
Sour cream sauce is fast, easy, and delicious. You can use it with chicken, fish, potatoes, you name it, it adds delicious tart creaminess. I especially love it drizzled on tacos and as a dip with nachos. If you’re looking for a fast and easy sour cream sauce, this is it. No roux, no flour, just sour cream and flavor!
What is sour cream sauce?
It’s exactly what it sounds like, sauce that’s made with sour cream. Essentially it’s a flavored sour cream that’s a bit looser than plain sour cream, making it easy to drizzle or smother over anything that needs a bit of creamy, fresh, tart flavor.What is it made of?
The main ingredient is sour cream. No surprises there, sour cream sauce is simple and consists of: sour cream, spices, and a bit of milk to thin it out.Sour cream sauce ingredients
- sour cream - at its heart, sour cream is simply regular cream that’s been fermented with enzymes and active cultures (like yogurt) so it thickens. My all time favorite brand of sour cream is Good Culture. Sour creams vary by thickness, tanginess, and creaminess, so grab a brand that you love the taste of.
- garlic and onion powder - a small amount of garlic and onion powder stirred into sour cream is virtually indistinguishable, texture-wise, but it adds so much savoriness and flavor. You could use fresh garlic and onion, but I find that granulated/powdered garlic and onion powder superior because you end up with a smooth sauce. Just be sure to get garlic power and onion power, not garlic salt or onion salt.
- milk - just the tiniest bit of milk is going to thin out sour cream to a saucy, pourable consistency. I like using whole milk to keep the sauce creamy but if you don’t have milk on hand, you can actually use a bit of water.
- salt and freshly ground pepper - this is pretty self explanatory, add salt and freshly ground pepper to taste to your sauce.
Can you heat up sour cream?
For this sauce, you don’t need to heat up your sour cream, so it’s not relevant, but for the sake of science, let’s talk about heating up sour cream. The answer is yes, you can. The key to adding sour cream to warm sauces is to add it at the end, when your hot sauce is off the heat. The residual heat of your sauce will gently heat and melt the sour cream without breaking it. If you heat it too high or too quickly sour cream has a tendency to break or curdle. If you want to add something that’s similar to a warm sauce that you bring to a boil, it’s better to reach for crème fraîche.Is it the same as crema or crème fraîche?
Sour cream sauce is not the same as crema or crème fraîche, but you can certainly use it as a substitute, especially if you using sour cream to finish your dish.Crème fraîche vs crema vs sour cream
- Crème fraîche - 30% butterfat, rich, thick, works well cold and hot. Naturally cultured cream with tang and richness.
- Mexican crema - 30% butterfat, slightly thick but drizzleable, tangy, rich, works well cold and hot. Naturally tangy, slightly thickened cream that tastes like a mix of sour cream and crème fraîche.
- Sour cream - 20% butterfat, lots of body, thick, mildly tangy, better for cold sauces/finishing. Naturally cultured, cooling, rich, and creamy.
What to use sour cream sauce for
This sauce is perfect for serving with:- paprika chicken
- wings
- salmon
- chicken
- steak
- tacos
- chili
- tostadas
- baked potatoes
- beef tenderloin
- chilaquiles
- potatoes
- lasagna soup
- enchiladas
- tortilla soup
Pasta too!
Also, if you love sour cream, please check out our sour cream and onion pasta recipe – it’s a warm sour cream sauce made with a roux (butter and flour cooked together) served on penne and it’s AMAZING. Happy saucing! xoxo stephSour Cream Sauce
Sour cream sauce adds delicious tart creaminess to chicken, fish, potatoes, and it's so easy to make.
- 1 cup sour cream
- 2 tbsp milk (of choice, whole milk preferred)
- 1/4 tsp onion powder
- 1/4 tsp garlic powder
In a bowl, stir together the sour cream, milk, onion powder, and garlic powder. Taste and season with salt and freshly ground pepper to taste.
If you need your sauce to be looser, stir in more milk, 1 tsp at a time, until the desired consistency.
Sauce will keep in the fridge, covered, for up to 1 week.

I Am... Poutine Recipe
One of the absolute best things in the world to eat is poutine. It has everything: savory deep flavors, hearty carbs, mountains of cheese, and gravy. It’s an absolute beast of a dish, in the best way. I have eaten so many poutines in my life and I don’t regret any of them.
What is poutine
Poutine is a classic Quebequois Canadian dish consisting of fries, fresh cheese curds, and gravy. It’s fairly newish, created in the 50s - it doesn’t really have a clear inventor, but there are tons of places who claim they invented it. It’s insanely popular in Canada and is pretty much known around the world as a classic Canadian snack food. It’s definitely a favorite amongst Canadians: there are poutineries that sell only poutine, high-end poutines at fancy restaurants, snack shack poutines, and even poutine at McDonald’s and Costco.Poutine ingredients
- Fries: almost always medium thick with creamy, soft interiors, double fried for crunch.
- Cheese curds: fresh cheese curds are a must. Fresh cheese curds are squeaky, chewy, and melt just the tiniest bit on the outside when drenched in gravy. They’re mild and a little salty and they taste amazing.
- Gravy: also known as poutine sauce. This is where everyone gets a little inventive. Classic poutine sauce is a brown gravy that is butter and flour roux based. People use a mix of beef or chicken stock and spices. Vegetarian gravy is super common as well and and a lot of the poutinerie in Quebec exclusively serve vegetarian gravy. Poutine sauce is so popular that they even sell poutine sauce packets in the grocery store.
- Toppings: classic poutine is always just fries, cheese curds, and gravy, but there are loads of toppings you can add on top like bacon, scallions, sausages, pulled pork, mushrooms, peppers, essentially anything you can ever think of.
You probably haven’t had poutine
If you haven’t visited Canada, you’ve probably never had real poutine. For me, real poutine MUST have fresh and squeaky cheese curds. They serve poutine in the US, but trust me when I say it’s not the same. The worst contenders use shredded cheese that melts into the gravy making it cheesy gravy and fries. Which is delicious in its own right, but a real poutine needs to have 3 distinct ingredients/textures.What makes a good poutine
In my humble opinion as a lifelong eater of poutine, I love poutine that has golden brown, crisp and crunchy fries with fluffy insides, thick but not too thick umami filled gravy, and loads of fresh cheese curds that have melty edges and squeaky middles. The ultimate expression of poutine that I’ve had was at the Chez Ashton in the food court in the mall where Celine Dion was discovered.Regional differences
A note about poutine in Montreal. I think it’s something you need to grow up with, but for some reason, the poutine in Montreal features soggy fries. I’m not a fan. I just don’t LOVE the style of fries that people in Montreal prefer. I find them oily and limp. I need my fries to hold up gravy and heat. I want them to be crispy and crunchy and fluffy, not soggy and creamy.Fresh cheese curds
Cheese curds, aka squeaky cheese, are little randomly shaped nuggets of fresh young cheddar cheese. They are mild like mozzarella and are squeaky between your teeth when you chew them. They keep their shape well and and melt slightly when warmed. Cheese curds are essentially baby cheese that aren’t mature and pressed. The have extra air in them which is what makes the squeak.Why fresh cheese curds?
Fresh cheese curds are perfect for poutine because you don’t want the curds to melt into the gravy, you want little nuggets of cheese that hold up to the heat. The perfect poutine cheese curd has a blanket of piping hot gravy and is slightly melty and gooey on the outside with a firm yet soft squeaky distinct bite on the inside. The contrast in temperature and texture is what makes fresh cheese curds in poutine amazing.Where to buy fresh cheese curds
Fresh cheese curds are always sold at room temp and they can be hard to find depending on if there’s cheese being made near you or not. Once you refrigerate fresh cheese curds, they lose their squeak and texture. Even in the West Coast of Canada, it can be difficult to find fresh, unrefrigerated cheese curds. In the East Coast, you’ll find bags of fresh cheese curds, unrefrigerated, near the bakery/deli. In Quebec they’ll also be near the checkouts, like candy. In America (and western Canada) you can find cheese curds in the cheese section. Outside of Wisconsin, they probably won’t be same day fresh, so they won’t be squeaky, but leaving them on the counter top for 20 minutes at room temp will at least give them a bit of a head start on the melting. You can even buy cheese curds online these days, believe it or not.What is poutine sauce?
Poutine sauce is another way Canadians say gravy. I kid, I kid – but really poutine sauce is essentially a brown gravy that’s make from butter, flour, stock, and spices. Like gravy, it’s rich and hearty, warm and full of flavor. Not all poutine sauces are meat based, in fact a lot of them are vegetarian, but they have a very hearty, rich flavor to them that tastes like the brown gravy you get when you eat pot roast or a roast dinner. The nice thing about it is that unlike brown gravy, you don’t need drippings. You can buy little packets of instant poutine sauce at the grocery store in Quebec and they also sell jarred and canned versions too.How to make poutine sauce
If you’ve made gravy before, you can make poutine sauce! This particular poutine sauce is special because it uses both a roux and a cornstarch slurry to thicken. You get the best of both worlds: the richness of a roux based gravy and the silliness of a cornstarch thickened gravy. This gravy is just thick enough to cling to and coat the fries and curds without being goopy.- Melt some butter over low heat and sprinkle on some flour. Cook the butter and flour into a roux, stirring and letting it bubble away for 2-3 minutes.
- Slowly stream in beef stock (or vegetable if you prefer) while whisking over medium low heat.
- Whisk in ketchup, Worcestershire sauce, onion powder, and garlic powder.
- Mix cornstarch with a bit of water to create a slurry and add it to the gravy. Bring the heat up to medium high and simmer until bubbly and thick.
- Taste and season with salt and pepper.
Best fries for poutine
Mike and I almost always turn to frozen fries and our air fryer when it comes to fries at home. Frozen fries exist for a reason. They’re consistent and come out crispier than fresh cut french fried potatoes. The air fryer magically makes frozen fries hot and crisp and just as good (if not better) than fries fried in oil. We like to choose a sturdy straight cut fry and fry it for 10-15 minutes with a couple of shakes in between.What are the best potatoes for poutine?
If you’re going to go the route and make your own fries, I recommend Russets because of their dense high starch content. You want them to be able to soak up as much gravy as possible.Less-traditional but amazing variations
Traditional is good but life is too short to be just the classics. You can take any flavor or dish and fries, cheese curds, and gravy them up. Here are some we've made over the years (warning, throwback posts):- Thanksgiving Poutine
- Peking Duck Poutine
- Breakfast Poutine: Fries, Crispy Quail Eggs, Cheese Curds and Bacon Gravy
Poutine Recipe
One of the absolute best things in the world to eat is poutine.
- 1 lb frozen french fries (~ 1 bag)
- 3 tbsp butter
- 3 tbsp all purpose flour
- 2 1/4 cups beef stock (no sodium preferred)
- 1 tbsp ketchup
- 2 tsp Worcestershire sauce
- 1/2 tsp onion powder
- 1/2 tsp garlic powder
- 1 tbsp cornstarch (made into a slurry with 1 tbsp water)
- 1.5 cups fresh cheese curds
Make the frozen fries in the air fryer or oven according to the package.
While the fries are crisping up, make the gravy: Melt the butter over low heat then sprinkle in the flour. Cook, stirring for 2-3 minutes. Slowly stream in the beef stock while whisking. Add the ketchup, Worcestershire, onion powder, garlic powder, and cornstarch slurry. Bring the heat up to medium high and let simmer, stirring occasionally, until thick. Taste and season with salt and pepper.
When the fries are ready, make the poutine: layer the fries and cheese curds and ladle on the gravy. Enjoy hot!

I Am... Singapore Noodles
If you love noodles and curry, you’ll love Singapore noodles. They’re one of the most popular Chinese take out dishes out there, and for good reason! Along with wonton soup, sweet and sour chicken, sesame noodles, and fried rice, they are one of my go-to choices, especially when I’m in the mood for a warm and flavorful fried noodle dish. When done well, Singapore noodles are amazing: the right mix of soft and chewy rice noodles tossed with crisp vegetables, juicy meats, and just the right amount of seasoning.
What are Singapore noodles?
Singapore noodles, sometimes called Singapore-style noodles or Singapore fried noodles, are a stir-fried rice vermicelli noodle dish flavored with curry powder. In Chinese, they’re called sing chow mei fun (星洲炒米) which translates to star continent fried vermicelli rice noodles, aka Singapore noodles. The noodles usually come with vegetables, scrambled eggs, and a protein, most commonly chicken, pork, shrimp, or a combination of all three. Contrary to the name, Singapore noodles are not from Singapore, but Hong Kong.How to make Singapore noodles
- Prep the noodles - soak the noodles in a large bowl of cold tap water until pliable and slightly soft. Drain well.
- Prep the vegetables and proteins - slice the onion, julienne the carrot and bell pepper, and cut the green onions in to 1-2 inch lengths. Cut the meats into slices/bite sizes and peel and clean the shrimp.
- Prep the seasoning - in a bowl, mix together chicken stock, oyster sauce, curry powder, toasted sesame oil, salt, and sugar. Set aside.
- Cook the eggs - lightly beat the eggs, season with salt, then scramble in a large pan or wok until mostly set. Scoop the eggs out and set aside.
- Cook the proteins - if your pan needs it, give a bit of a wipe then stir fry the proteins, moving and tossing, until they’re cooked.
- Cook the vegetables - add the vegetables to the wok/pan and cook, stirring, and tossing, until the vegetables are crisp. This step won’t take long at all.
- Mix and Toss - add the noodles, the sauce you made earlier, and the eggs. Use a scooping lifting motion to toss and combine everything together until the noodles are hot and the ingredients are well distributed and seasoned. Taste and adjust if needed.
- Enjoy - eat up while fresh and hot!
Why this recipe
When done well, Singapore noodles are amazing, but they're often not done well. Because they are a sauce-less fried noodle they can be prone to drying out, especially if you’re having them from a restaurant that isn’t a Singapore noodle specialist. My answer to combating dry Singapore noodles is more sauce. I grew up eating Singapore noodles and my favorite iteration is not particularly traditional but is extremely delicious. Whenever I can, I love topping Singapore noodles with a flavorful curry chicken gravy. The savory, rich curry gravy makes the noodles extra saucy and addictive. Of course, extra curry gravy on top is not traditional so you can skip this extra step if you want, but trust me when I say that it definitely ups the flavors and enjoyability of Singapore noodles.Are Singapore noodles from Singapore?
Nope, they aren’t! Singapore noodles come from Hong Kong via casual Hong Kong style cafes. The origins of the name is somewhat murky, but most people agree that Singapore noodles contain an eclectic mashup of distinct cultures and cuisines Singapore is known for: Chinese, Malaysian, and India. Singapore noodles are super popular in Hong Kong and in Chinese restaurants around the world. Singapore noodles are also a common takeout/delivery dish in America.Are Singapore noodles spicy?
Not really – they’re more of a savory fried noodle dish with a hint of the warming spices found in curry powder. Curry powder is not inherently spicy, they range from mild to extra spicy depending on what is added to the mix. Generally, the curry powder used for Singapore noodles is on the mild side, used mostly for coloring and a hint of warming spice flavors, not spicy heat. If you like it hot, you can definitely make your noodles on the spicy side, but in restaurants, it’s a fairly mild noodle dish.Singapore noodle ingredients
Noodles
The noodles used in Singapore noodles are thin rice vermicelli noodles. Made from just rice and water, these noodles are very slightly chewy and absorb a huge amount of flavor. More on which noodles to buy, below.Protein
Like all noodle stir fries, Singapore noodles are incredibly customizable. Classically you’ll find a mix of pork, chicken, and shrimp or any combination there of. The pork is typical char siu. Usually people just buy a 1/4 pound at the Asian grocery store – most Asian grocers have a Chinese BBQ meat section. If you don’t live near a Chinese grocery store, you can either make your own char siu, substitute in a well-marbled pork chop, or skip the pork all together. The chicken can either be breast or thigh/drumstick meat. It’s cut into thin strips, so both work well. Shrimp wise, smaller shrimp work better so you can pick them up easily with your chopsticks and pop them in your mouth with noodles and vegetables. If you only have prawns on hand, you can simply cut them into smaller pieces. Either way, make sure to peel and devein. If you’re vegetarian, you can add tofu or skip out on the protein entirely.Vegetables
A mix of vegetables that stand up to heat and stay crisp while being stir fried are key. The vegetables add flavor, color and texture. We usually like to include julienned bell peppers, onions, carrot, and green onions.Eggs
Soft scrambled eggs add delightful bits of texture and pops of yellow in the noodles. Be sure to lightly season your eggs so each fluffy curd tastes amazing.Sauce
Technically there’s no sauce for Singapore noodles, but I like to mix all the seasonings together with a bit of chicken stock so it’s easier for the curry powder to coat the noodles. We’re going to season with chicken stock, oyster sauce, curry powder, sesame oil, salt, and a touch of sugar. The curry powder matters because it’s where most of the flavor is going to be coming from so make sure your curry powder is fairly fresh and that it’s something you love the flavor of. I usually reach for a mild curry powder, like this one by Japanese brand S&B.What kind of noodles for Singapore noodles?
Thin rice vermicelli is what is traditional for Singapore fried noodles. They’re thin, chewy, and pick up flavor and color beautifully. You can find them at your local Asian grocery store or in the International aisle in most neighborhood grocery stores. We typically like using the Wai Wai brand of noodles that come in a clear bag with red and white branding. Of course, there are dozens of brands that will work. Sometimes they label it as rice sticks or bihoon. Just take a look at the package, make sure the ingredients are rice and water and that the thickness of the noodles is about the size of angel hair pasta. The best way to prepare vermicelli is by soaking so you rehydrate the noodles without breaking them. Typically, I soak them in cold water until pliable, for about 10-20 minutes. The rehydrated noodles then cook in the hot pan with minimal breakage.What to serve with Singapore noodles
Singapore noodles are a complete meal with vegetables, protein, and a carb. That being said, if you want to create a feast, think about making and serving up these other Chinese takeout favorites: Happy noodling! xoxo steph PS - if you’re a noodle lover, as we definitely are, please check out our noodle cookbook, That Noodle Life for more noodle recipes!Singapore Noodles
If you love noodles and curry, you’ll love Singapore noodles.
Singapore Noodles Sauce
- 1/4 cup chicken stock
- 2 tbsp oyster sauce
- 1.5 tbsp curry powder
- 1.5 tbsp toasted sesame oil
- 2 tsp sugar
- 1 tsp salt
Singapore Noodles
- 6 oz rice vermicelli ((thin))
- 3 tbsp neutral oil
- 2 large eggs (lightly beaten)
- 4 oz chicken breast (or thigh, cut into strips, optional)
- 12 shrimp (peeled and deveined, optional)
- 4 oz pork (char siu preferred, optional, char siu recipe here)
- 1 red bell pepper (sliced)
- 1/2 medium onion (sliced)
- 1/2 small carrot (julienned)
- 2 green onions (julienned, or cut into 1.5 inch lengths)
Soak the vermicelli in a large bowl filled with cold tap water until pliable, about 10-15 minutes. When soft and pliable, drain well and set aside.
Make the sauce: In a bowl, whisk together the chicken stock, oyster sauce, curry powder, sesame oil, salt, and sugar. Set aside.
Heat up 1 tbsp oil in a wok or large frying pan over medium high heat. When hot, add lightly beaten salted eggs and scramble, pushing from the outside in, until mostly set, but still slightly runny. Remove and set aside. If needed, wipe down your wok/pan if there are any egg bits left inside.
Heat up another tbsp of oil and add the protein (shrimp, chicken breast, and/or pork). Cook, stir frying and tossing, for 1-2 minutes, or until cooked through.
Add the bell pepper, onion, and carrots and stir fry for 15-30 seconds. Add the last tbsp of oil and then add the drained noodles, eggs, and sauce.
Fry, using a scoop and lift motion to loosen the noodles and incorporate all of the ingredients evenly amongst the noodles. Continue to stir fry, tossing and mixing, until everything is hot and the noodles are evenly seasoned with the sauce mix. This should take about 2-3 minutes.
Finish by tossing in the green onions, serve hot, and enjoy immediately.
Optional curry chicken
serves 4
prep 30 minutes
cook 15 minutes
4 cloves garlic, minced
1 small shallot, peeled and minced
1 tbsp minced ginger
1 tbsp curry powder
4 large boneless skinless chicken thighs cut into 1 inch pieces
1 tbsp neutral oil
1 tbsp all purpose flour
1 cup coconut milk
1/2 cup no sodium chicken stock
1/2 cinnamon stick
1 star anise pod
1.5 tsp fish sauce
1 tsp brown sugar
Using a mortar and pestle, pound together the garlic, shallots, ginger, and curry powder. Alternatively, pulse in the food processor until everything comes together in a loose paste. Coat the chicken throughly with the curry paste and marinate for 30 minutes.
In a sauce pan, heat up the oil over medium high heat and lightly sear the chicken until slightly golden, but not cooked all the way through.
When lightly browned, sprinkle on the flour and cook, stirring, until the flour coats and sticks to the chicken. Stir in the coconut milk, chicken stock, cinnamon stick, and star anise.
Simmer over low heat for 15 minutes, stirring occasionally. Season with fish sauce and brown sugar. Serve spooned generously over Singapore noodles.
Estimated nutrition does not include your protein(s) of choice

I Am... Cabbage Soup
Are you a cabbage soup fan? I love it! It’s hearty, filling, and full of all the good stuff. You can make a giant pot and eat it throughout the week and it’s the best thing to come into after being out in the cold. This cabbage soup is super savory, a little bit spicy, with bits of tender cabbage, meaty sausage, and sweet carrots. This cabbage soup is going to warm you right up! Cabbage is one of those under appreciated vegetables. It’s not trendy like kale or sexy like heirloom tomatoes. Cabbage just is. It hangs out in the fridge section of the grocery store, doing its thing day after day. Cabbage is an unsung hero! It’s cheap, it keeps forever, and is SO versatile. Can you imagine a life without coleslaw, cabbage rolls, or kimchi?! Would we even be living? This soup celebrates cabbage for all that it is: silky and sweet, tender and soft.
This isn’t your classic cabbage soup
It’s based on Korean jjigae and it’s a little bit spicier and a lot more addictive. It gets its flavor from a healthy amount of kimchi: great for adding flavor (and more cabbage) and probiotics. This soup also features farmer’s sausage (or any other smoked sausage), onions, carrots, and cabbage of course! It’s flavorful, healthy, and comes together incredibly quickly. Make a pot and feed yourself for the week.How to make cabbage soup
- Optional: Start off by browning some slices of smoked sausage, they’ll add a huge amount of meaty flavor.
- Sauté some onions, garlic, and ginger to add layers of warming flavors.
- Stir in the cabbage and vegetables along with some stock, kimchi, and seasonings.
- Simmer until everything is tender and cooked through and all the flavors have melded together.
- Enjoy!
Ingredients
The ingredients for this cabbage soup are pretty standard with a couple of extras to make it extra special. You have the usual suspects: green cabbage, onions, garlic, and carrots. Then we’re going to add in some kimchi for a bit of acidity and spice, gochujang, soy sauce, and toasted sesame oil.- Kimchi - they sell kimchi pretty much everywhere now and it’s no wonder why: it’s healthy, sour, addictive, and spicy. When you cook it, the flavors of kimchi mellow out and sweeten making it only slightly spicy and much more sweet.
- Gochujang - a savory, sweet, spicy fermented paste made from chili powder and sticky rice. It adds sweet and heat and a ton of flavor. Traditionally it comes in tubs, but these days you can find it in squeeze bottles in the Asian aisle of literally any grocery store (or online, as always).
- Soy sauce and toasted sesame oil - the soy sauce adds umami and saltiness while the toasted sesame oil adds a hint of round nuttiness that will make you want to eat bowl after bowl of this soup.
Vegetarian cabbage soup
The photos of this soup feature sausages, but you don't need them. It tastes really good as a vegetarian soup too! To make this soup vegetarian, leave out the sausage and switch the stock to vegetable stock, and also make sure you use vegetarian kimchi. Kimchi is traditionally made with tiny shrimp or fish, so by default it's not vegetarian/vegan. Many popular brands, such as Chongga, color code their caps - green is traditional and red is vegan - but it's not always true so be sure to check the ingredients.Instant pot cabbage soup
To make this soup in the instant pot, turn the Instant Pot on Sauté high and brown the sausages, if using. Stir in the onions, ginger, and garlic. Add the remaining ingredients and set the Instant Pot to high pressure for 15 minutes. Quick release when done, taste and season.
Crock pot cabbage soup
To make this soup in a crock pot, just add all of the ingredients to the Crock Pot. If using, brown the sausages in a pan on the stove before hand. Cook for 8 hours on low or 4-5 hours on high. Taste and season before enjoying.
How to prep and cut cabbage
- Wash the whole end and peel the first layer of leaves, which tend to be older and tougher.
- Lay the cabbage down on a cutting board, core side down. Slice through the middle of the cabbage with a large knife, cutting straight through the core.
- Place the cut sides down on the cutting board and cut in half again, vertically so you have a quarter cabbage.
- Cut out the core (that’s the solid looking part in the middle) at a slight angle.
- Cut the cored cabbage into bite size pieces.
What to serve with cabbage soup
- A side of rice for some cabbage roll vibes
- Garlic knots because garlic knots
- Spicy chili crisp grilled cheese would be AMAZING
Storing and freezing
You can keep this soup covered in the fridge for up to five days (hello meal prep!) or you can freeze it in an air tight container for up to three months. Reheat on the stovetop or in the microwave. Happy soup season! xoxo stephCabbage Soup
Super savory little bit spicy cabbage soup with bits of tender cabbage, meaty sausage, and sweet carrots.
- 1 lb sausages (sliced, farmers or kielbasa preferred, optional)
- 1 medium onion (chopped)
- 4 cloves garlic (minced)
- 1 inch ginger (minced)
- 8 cups chicken stock (no sodium preferred, or vegetable stock)
- 2 cups kimchi (including juice)
- 1-2 tbsp gochujang (optional, see notes)
- 1 tbsp soy sauce
- 1 tsp toasted sesame oil
- 1/2 head cabbage (cut into 1 inch pieces)
- 2 carrots (peeled and diced)
- 2 tbsp green onions (sliced, to finish)
In a large pot, heat up a bit of oil over medium high heat. If using sausages, add the sliced sausages and cook until lightly browned on both sides, 3-4 minutes.
Stir in the onion, garlic, and ginger, and cook until the onion is soft, 2-3 minutes.
Stir in the chicken broth, kimchi with juice, gochujang, soy sauce, sesame oil, cabbage, and carrots. Bring to a simmer and cook for 30-40 minutes, or until cabbage is tender and to your taste. Taste and season with salt and pepper and enjoy warm!
Gochujang can be pretty spicy, about half as spicy as sriracha, so use it based on your own spice tolerance.
Estimated nutrition does not include sausages or gochujang.

I Am... Shepherd’s Pie
If you asked 6 year old me what my favorite meal was, the answer was shepherd’s pie. And if you ask me right now what my favorite comfort meal is, the answer would be: shepherd’s pie. There’s just something so cozy and comforting about a big bowl – yes, I have to have it in a bowl – of super savory saucy beef mixed with corn and peas topped off with a huge pile of creamy mashed potatoes. I still eat it the same way I did when I was little: I mix everything together so each bite is essentially mashed potatoes with meat mixed in. I use a spoon so everything goes from the bowl to my mouth in no time flat. For me I can’t imagine anything more cozy than being wrapped up in a blanket, on the couch, with a bowl of shepherd’s pie. But wait! You’re probably thinking to yourself right now, shepherd’s pie isn’t made with beef. And you’re right! Shepherd’s pie is traditionally made with lamb, but beef is just as tasty – if not more! Technically what I love eating is called a cottage pie, but tomato, to-mah-to, am I right? Whatever you want to call it, a super savory meaty ragu topped off with creamy mashed potatoes is a comfort food classic, one that you’ll come back to time and time again.
What is shepherd’s pie?
Shepherd’s pie is an classic English dish: a ground meat pie topped off with mashed potatoes. There are so many variations, but generally, they all have a saucy ground minced meat bottom and a layer of potatoes baked up until bubbling and crisp. Originally, shepherd’s or cottage pie was an ingeniously way use up leftover meat by baking it into a potato topped casserole. Now, most people purposely make it instead of it being a leftovers dish.How to make shepherd’s pie
One of the reasons why shepherd’s pie is so popular is probably because it’s so easy to make. It’s a great weeknight meal, it’s perfect for meal prep, and you can make it ahead and freeze it as well.- Cook the potatoes. Start off by cooking peeled potatoes in salted water. While they’re happily simmering away, you can multitask and make the pie filling.
- Cook the aromatics. Lightly cook some onions, garlic, carrots, celery until soft and tender.
- Cook the beef. Add the beef to the pan and cook, breaking up, until cooked through. Sprinkle on some flour - this helps thicken up the base of the pie - and then add some beef stock, tomato paste, herbs, and a splash of soy sauce for an extra bit of umami. Scoop everything into a casserole dish and set aside.
- Mash the potatoes. By now your potatoes should be tender. Drain them well then mash and season. I like stirring in a bit of sour cream for tang. You can also add in shredded cheese for cheesy potato tops too!
- Make the pie. Finish off the pie by spooning the potatoes onto the meat and evenly spreading them off. Top the potatoes off with a bit of butter and it’s ready to go in the oven.
- Bake. Bake the casserole (place it on a baking sheet to catch any drips) until the tops are golden brown and crispy and enjoy!
Shepherd’s pie vs cottage pie
Purists will say that shepherd’s pie is made with lamb and cottage pie is made with beef, but in America, most people refer to cottage pie (which is made with beef) as shepherd’s pie. This particular iteration is made with beef so it’s technically a cottage pie! Try this recipe for a classic lamb version.Shepherd’s pie ingredients
We’re making a classic shepherd’s/cottage pie with ground beef, onions, garlic, celery, carrots, corn, peas, herbs, potatoes, butter, sour cream, and just a touch of soy sauce and tomato paste to bring everything together and give the pie an extra boost of flavor.To bake or not to bake
When I was making this, Mike asked me, why the heck do you bake it when all the ingredients are cooked? That is a good question! I do it because I like the tops to be browned and crispy, but if you don’t want to wait or don’t care for crispy potato tops, you can serve this up in a bowl with a scoop of the saucy meat with mashed potatoes on top. In fact, I’ve seen lots of shepherd’s pie served like this in pubs and restaurants. Some might argue that they’re baked together to meld the flavors or some such stuff like that but really, with a comfort food like this, I think you can pretty much get away with doing what you like!Make ahead
Assemble the shepherd’s pie completely (don’t bake it) and then cover it tightly and pop it into the fridge. You can make this up to 2 days in advance. When you want to serve, bake it in a 375°F oven until bubbly and crisp.How to freeze
To freeze, make the pie but don’t bake it. Cover tightly and freeze for up to 3 months. Thaw completely before warming in the oven.How to reheat
My preferred way of reheating individual portions is the microwave for about 1 minute but you can also heat this up in a low 300°F oven, covered, for 10-15 minutes or until heated through. If you’re heating it up from frozen, let the pie thaw before heating in the oven.Variations
- Jamie Oliver's Lamb Shepherd's Pie Recipe
- Shepherd's Pie with Roasted Garlic Cream Cheese Mashed Potatoes
- Turkey Shepherd's Pie
Shepherd’s Pie Recipe
Super savory saucy beef mixed with corn and peas topped off with a huge pile of creamy mashed potatoes.
- 1.5 lb potatoes (Yukon gold, peeled and quartered, about 3-4 large potatoes)
- 1 medium onion (diced)
- 2 cloves garlic (crushed)
- 2 small carrots (peeled and diced)
- 2 stalks celery (diced)
- 1 lb ground beef (lean preferred, or lamb)
- 1 tbsp flour
- 1/2 cup beef stock (no sodium preferred)
- 1 tbsp tomato paste
- 2 tsp soy sauce
- 2 sprigs fresh thyme
- 1 sprig fresh rosemary (minced, leaves only)
- 1/2 cup corn
- 1/2 cup frozen peas
- 3 tbsp butter (divided)
- 1/4 cup sour cream
- 1/4-1/2 cup milk
Preheat your oven to 375°F. While the oven’s warming up, make the mashed potatoes: place peeled and cut potatoes in a pot and cover with water. Generously salt the water and bring to a boil over high heat. When boiling, reduce the heat to maintain a simmer and cook for 15-20 minutes or until fork tender.
While the potatoes are cooking, make the pie filling. Heat a bit of oil over medium-high heat in a large skillet. When the oil is hot, add the diced onions and brown slightly, 2 minutes or so. Add the garlic, carrots, and celery. Cook until slightly tender, 2-3 minutes. Add the ground beef and cook, breaking up into pieces. When browned and cooked through, stir in the flour.
Add the broth, tomato paste, soy sauce, thyme, and rosemary. Stir and cook over medium low. Stir in the the corn and peas. Mix well, simmering, until it thickens slightly. Taste and season with salt and pepper, then scoop into the bottom of an oven-safe casserole dish.
When the potatoes are cooked, drain well and return to the pot. Add the roasted garlic. Over very low heat, mash the potatoes. Stir in 2 tablespoons butter and the sour cream. Stir in the milk until desired consistency. Taste and season generously.
Top the meat portion with the mashed potatoes and dot with the remaining 1 tablespoon of butter.
Bake the casserole (place on a baking sheet to catch any drips) until the potatoes are golden brown and crispy, about 30 minutes. If needed, broil for 5-8 minutes for an extra golden potato top. Enjoy warm.

I Am... Pilk
It has an unfortunate name, but guys, pilk is actually really good, especially if you like ice cream floats. Pilk, a portmanteau of Pepsi and milk, is trying hard to be THE DRINK this holiday season. It's creamy and sweet and apparently pairs perfectly with cookies. I’m a huge fan of dirty soda, so it’s no surprise that pilk is right up my alley.
What is pilk?
Pilk is a drink made from two ingredients: Pepsi and milk. It’s the holiday season and it’s time for pilk, at least according to Lindsay Lohan and Pepsi. All over the socials people are trying pilk. Some love it, some hate it, but it’s undeniable, Pepsi has hit viral marketing out of the park. It's a straight up meme now, with people trying it for the first time and either loving it or hating it. Pro tip, I like dirty sodas with heavy cream instead of milk. The thickness and richness of cream is more akin to a melted soda float and is smoother and more delicious. Bonus points if you use vanilla sweet cream instead of milk.Dirty soda
If you’ve been to Utah — where Lindsay Lohan’s comeback Christmas movie, Falling for Christmas takes place — you’re no stranger to dirty soda. Dirty soda, to the uninitiated, is a Utah special: soda and dairy in one drink. It’s creamy, sweet, and delicious. Dairy and soda is a really common combination — think root beer floats (root beer and vanilla ice cream) or egg creams (chocolate syrup, seltzer, milk). And it’s not just America, the dairy and soda combination is popular all over the world. There’s Milkis (Korean milky soda), Calpis (Japanese lactic acid, milk, and fizzy water), and Italian soda with cream (flavored fizzy water and cream). Fizzy soda and dairy are a match made in heaven.How to make pilk
- Pour a can of Pepsi into a chilled glass with ice.
- Top it off with 2 tbsp to 1/4 cup whole milk.
- Enjoy as is, or mix it up then enjoy.
Pilk ingredients
You only need 2 ingredients for pilk: Pepsi and milk.- Pepsi - go for the classic or Cherry or Vanilla Pepsi
- Milk - whole milk is best, for the creamiest flavor.
Variations
Instead of regular Pepsi, try these variations to make your perfect drink!- Vanilla Pepsi - a delicate, creamier flavor thanks to the vanilla.
- Cherry Pepsi - if you love cherry soda, then cherry Pepsi pilk is amazing. I love the tart sweetness of cherry Pepsi.
- Vanilla ice cream - a classic Pepsi float with vanilla ice cream, not pilk at all, but certainly delicious.
- Cream - cream is much better than milk, it dims the bubbles and is thick and luxurious.
- Vanilla sweet cream - this is the elite move, the sweetness and richness of vanilla sweet cream will make your pilk something to sip and enjoy by the fire.
If you’re looking for cookies to serve with pilk, please try out some of my favorite cookie recipes
- brown butter chocolate chip cookies
- soft and chewy gingerbread cookies
- the best snickerdoodles
- four giant cookies in one
How to make Pilk
Pilk is actually really good, especially if you like ice cream floats.
- 12 oz Pepsi (of choice)
- 1/4 cup milk (or to taste)
Pour chilled Pepsi into a large glass filled with ice.
Add 2 tbsp milk, or to taste. Mix, if desired, or drink as is, with swirls. Enjoy!
Estimated nutrition based on diet pepsi and reduced fat milk

I Am... Instant Pot Turkey: Perfectly Cooked Turkey in 20 mins
One of my favorite things is Instant Pot turkey. I love turkey. It happens to be one of my favorite meats, partially because it tastes so good but also because it just gives me those warm and cozy holiday feels. Mike and I actually eat turkey a lot, at all times of the year, because instant. A couple of years ago, we did a whole Instant Pot Thanksgiving, just to see if we could. Spoiler alert: we did it! Turkey, stuffing, mashed potatoes, sprouts, the Instant Pot did it all. The thing I was most impressed with was the turkey. It was juicy and incredibly fast. No basting, no guessing, just super simple juicy turkey.
Instant Pot Turkey?!
Absolutely yes! We made a little skin-on boneless turkey breast roast rubbed with butter, garlic, thyme, rosemary, and sage. All the classic turkey flavors you know and love. And bonus, you’ll even get some drippings to make turkey gravy.How to make turkey in an Instant Pot
- Get your turkey. Decide if you want turkey breast or turkey legs. I went with turkey breast because when breast is done right, breast really is best. There’s way more meat with breast compared to legs. If you’re a dark meat lover, legs are good too, the Instant Pot will make turkey legs super tender and juicy.
- Make herbed garlic butter. Mix together soft butter with chopped herbs and garlic. Classic poultry herbs include sage, rosemary, thyme, marjoram, tarragon, and parsley. Pro tip: they sell little fresh packs of poultry blend herbs in the fridge section at the grocery store.
- Season the turkey. Lightly pat your turkey dry, season generously with salt and pepper, then rub the herbed garlic butter all over.
- Instant Pot time. Pour a bit of chicken stock into your Instant Pot then put in the steam rack that it came with. Arrange the turkey on top and cook on high pressure (see below for times).
- Broil. When the turkey’s done and the pressure has been released, you can give your turkey a quick blast of heat for color, then you’re ready to eat!
How long to cook Instant Pot turkey breast
The magical ratio is: 6 minutes per pound of boneless turkey breast at high pressure. Six minutes per pound will give you supremely juicy turkey without that weird stringy texture you get when you cook poultry for too long. With turkey breast you want to quick release right away and take the turkey out of the Instant Pot so it doesn’t continue to cook and get dry.What about Instant Pot turkey legs?
If you’re a dark meat fan, cooking turkey legs in the Instant Pot makes the meat tender and fall off the bone. Cook the turkey legs for 20 minutes on high pressure, let it natural release for 10 minutes so it can continue to get tender, then release the pressure and take the legs out.Crispy golden brown skin
After you’re done, give your turkey a blast of heat in the oven. Just 2-3 minutes under the broiler will give you the classic golden brown skin that you associate with a good bird. If you don’t have a broiler or don’t even like turkey skin (you monster!), then you can skip that step all together.Instant Pot turkey ingredients
This is the simplest recipe with the smallest ingredient list: turkey, butter, garlic, fresh herbs, salt and pepper, and chicken stock.You get turkey gravy too!
Good news: you can make a super simple gravy with the drippings and stock that are in the Instant Pot. Measure out the drippings. Pour the drippings into a liquid measuring cup and top it off with more chicken stock (or water) so you have 2 cups of liquid. Make a roux. Melt some butter over medium low then stir in some flour to make a roux. Cook the mixture, stirring, until it is light golden and smells toasty. Add the liquid. Slowly stream in the liquid while stirring. Let everything come to a simmer and reduce slightly. Taste and season.What size Instant Pot do I need?
This Instant Pot turkey will work in an 8 quart Instant Pot and a 6 quart Instant Pot. It could work in a 3 quart, but it would be a very tight squeeze, unless you find a very small turkey breast roast. The cooking time remains the same across all Instant Pots, the only difference is that smaller Instant Pots come to pressure faster.
What to serve with this
Since you probably only have one instant pot, here are some ideas for non-instant pot yet quick and easy sides:- The best scratch made green bean casserole
- An easy mushroom shallot stuffing
- Mashed potatoes (non instant pot version) or Mashed potatoes(instant pot version)
- the Velveeta mac and cheese of your childhood, but better
Instant Pot Turkey Breast
Twenty minutes, five ingredients, and one awesome turkey breast.
- instant pot
- 2 tbsp butter (room temp)
- 2 cloves garlic (crushed)
- 2 tbsp herbs (chopped, herbs of choice, see notes)
- 2.5-3 lb boneless skin-on turkey breast roast (see notes)
- salt and freshly ground pepper
- 1/2 cup chicken stock (low sodium preferred)
Turkey Gravy
- 2 tbsp butter (room temp)
- 2 tbsp flour
- 1/2 cup drippings (from above)
- 1.5 cup chicken stock (low sodium preferred)
In a small bowl, mix together the butter, garlic, and herbs.
Season all sides of the turkey breast generously with salt and freshly ground pepper. Rub the turkey with the herb butter. Pour the chicken stock into the Instant Pot insert and set the steam rack that came with the pot inside. Place the turkey on the rack and cook on high pressure for 6 minutes per pound of turkey. Quick release when done. Carefully remove. If desired, broil in the oven on high for crispy skin, about 2-3 minutes.
After you remove your turkey from the Instant Pot, you’ll probably only have a little bit over 1/2 cup of stock. If your instant pot has inner volumetric markings, top it off with chicken stock until you have 2 cups. If not, transfer to a liquid measuring cup and top off. Set aside.
Melt the butter over medium low heat then stir in the flour. Cook, stirring occasionally until lightly golden brown. Slowly stream in the stock/drippings while stirring. Bring to a simmer and let reduce and thicken slightly. Taste and season with salt and pepper, then serve with your turkey.
Our turkey breast was 2.3 pounds and we used a package of poultry herbs that had thyme, rosemary, and sage.
Gravy made with butter instead of roasted fat tends to be on the lighter side – if you want a classically brown gravy, you’re going to need to boost this with a little bit of roasted fat. I simply deglazed the sheet pan that the turkey was broiled on with a bit of hot water and added it to the gravy for a bit of extra color.
Turkey is shown served with instant pot mashed potatoes.
Estimated nutrition is for turkey and gravy.

I Am... 75 of Our Best Thanksgiving Side Dishes
Thanksgiving is all about the sides. I love Thanksgiving side dishes with a passion, but how exactly do you decide what you’re going to make?
The Five Essential Thanksgiving Side Dishes
Everyone knows the feeling of getting sucked into a research hole on the internet. There are so many sites with massive lists of side dishes out there. But, if you’re anything like me, you get choice paralysis. There is definitely too much of a good thing. So, here are my five (yes, only five!) favorite Thanksgiving sides. I hope one of them makes it on to your Thanksgiving menu.The Ultimate Green Bean Casserole
Let’s start off with this one because, green equals health. This is the mushroom-iest green bean casserole you’ll ever have. I love how the beans are crisp, snappy, and so fresh, all thanks thanks to an ice bath that leaves them an almost absurd shade of green. The mushroom sauce has a quadruple dose of umami thanks to mushrooms, soy sauce, fish sauce, and parm. Store bought crispy onions finish the whole thing off. Honestly, I can eat just these and call it a meal. [wprm-recipe-roundup-item id="35659"]Velveeta Mac and Cheese
Who doesn’t love mac and cheese? Velveeta mac forever and ever because it’s a creamy, dreamy classic. I mean, just look at that bowl. It’s got the the cheese! Glossy, smooth, and simply delicious. It’s the best and will forever be on our Thanksgiving menu. [wprm-recipe-roundup-item id="34521"]Soft and Fluffy Dinner Rolls
Some people might think that making your own homemade rolls is overkill, especially considering stuffing is an essential. I say, give me all that carb on carb action. Thanksgiving is just once a year and homemade squishy buns are so dreamy. It’s a pro move to brush garlic butter on top after they come out of the oven. [wprm-recipe-roundup-item link="https://safedealform.info/soft-and-fluffy-dinner-roll-recipe/" newtab="0" name="" summary=""]The Best Mashed Potatoes
I’m a mashed potato connoisseur. Mike once did a double blind taste test for me with varying potato varieties and recipes and I was able to identify every singe one. This is my go-to recipe for mashed potatoes. It’s smooth and creamy, buttery and fluffy. It’s truly the best. The secret is that there is no secret, just good technique. Pure potato goodness from just potatoes, garlic, butter, and milk. [wprm-recipe-roundup-item id="36567"]Mushroom Shallot Stuffing
Stuffing (or dressing, if you must) lovers unite! I love stuffing so much that I make extra so I can eat it for breakfast every single day after thanksgiving. Turkey sandwiches? No thanks, give me stuffing please! This recipe, which I love making in the crock pot so it frees up the oven, is crisp and custard-y, and full of flavor. You can make it in the oven too, but don’t skip out on toasting the bread before making the stuffing, it’s what makes it so good. [wprm-recipe-roundup-item id="35797"]Is it even Thanksgiving without Potato??
I love potatoes so much that I draw potatoes in my spare time. A potato buffet is my dream buffet.Instant Pot Mashed Potatoes
Super creamy, super Instant (Pot) mashed potatoes with garlic and cream and butter. [wprm-recipe-roundup-item id="34840"]Cheesy Potato Balls
Cheesy potato balls because even better than mashed potatoes are mashed potatoes stuffed with cheese and deep-fried with a crispy outer crust. [wprm-recipe-roundup-item link="https://safedealform.info/how-to-make-cheesy-potato-balls/" newtab="0" name="" summary=""]Air Fryer Potatoes
Crispy air fryer potatoes for those times when you want a crispy roast potato but the turkey’s in the oven. [wprm-recipe-roundup-item id="35009"]Potato salad
Potato salad because why can’t you have potato salad at Thanksgiving? This one has addictive kewpie mayo and rice vinegar in it. [wprm-recipe-roundup-item link="https://safedealform.info/perfect-picnic-potato-salad-recipe/" newtab="0" name="" summary=""]Potato Pancakes
Irish boxty potato pancakes are soft on the inside and crispy on the outside. Nothing like latkes, more plush and potato-y. [wprm-recipe-roundup-item link="https://safedealform.info/potato-pancakes-like-youve-never-seen-before-irish-boxty-recipe/" newtab="0" name="" summary=""]Jalapeño Bacon Ranch Twice Baked Potatoes
Mini little potatoes you can just keep popping into your mouth, filled with ranch, bacon, and cheese. [wprm-recipe-roundup-item link="https://safedealform.info/jalapeno-bacon-ranch-mini-twice-baked-potatoes-recipe/" newtab="0" name="" summary=""]Crispy Stovetop Roasted Reds
If your oven isn’t free, these are the potatoes for you: crunchy on the outside and deliciously creamy on the inside. [wprm-recipe-roundup-item link="https://safedealform.info/crispy-stovetop-roasted-red-potatoes-recipe/" newtab="0" name="" summary=""]Duck Fat Roast Potatoes
If you want the most flavorful roast potatoes, duck fat is what you need. Maybe the best roasties you’ll ever make. [wprm-recipe-roundup-item link="https://safedealform.info/crispy-duck-fat-oven-roasted-potatoes/" newtab="0" name="" summary=""]Smoked Gouda Potato Pancakes
Smoked gouda adds creaminess and a deep smoke flavor to these crispy little potato pancakes. [wprm-recipe-roundup-item link="https://safedealform.info/smoked-gouda-potato-pancakes/" newtab="0" name="" summary=""]Crispy Roast Potatoes and Burrata
Make your roast potatoes extra lux this Thanksgiving and serve them up with some melty creamy burrata. [wprm-recipe-roundup-item link="https://safedealform.info/crispy-roasted-potatoes-burrata/" newtab="0" name="" summary=""]Miso Butter Mashed Potatoes
White miso gives these creamy potatoes an extra warm hit of super savory umami. [wprm-recipe-roundup-item link="https://safedealform.info/miso-butter-mashed-potatoes-recipe/" newtab="0" name="" summary=""]Potato Dominos
This might be one of my favorite ways of making potatoes: thinly sliced, trimmed into rectangles, and baked. The edges turn into a crispy chip and the centers are thick and creamy. [wprm-recipe-roundup-item link="https://safedealform.info/potato-domino-recipe/" newtab="0" name="" summary=""]Japanese Roasted Sweet Potatoes
This is the purest sweet potato you’ll ever taste. Toasty, caramelized goodness. [wprm-recipe-roundup-item link="https://safedealform.info/yaki-imo-roasted-japanese-sweet-potatoes-better-roasted-chestnuts/" newtab="0" name="" summary=""]Chili Roasted Potatoes
Roasted potatoes and sweet potatoes tossed in a lime-soy dressing with a crunchy savory granola situation on top. [wprm-recipe-roundup-item link="https://safedealform.info/chili-roasted-potatoes-with-lime-and-soy-recipe/" newtab="0" name="" summary=""]Stuffings
After potatoes, stuffing is my next favorite side dish. Sometimes, when I feel like some extreme comfort food I’ll bake up a small dish of stuffing. Weird flex, I know, but damn, stuffing is the good stuff.Rosemary Challah Stuffing
Classic stuffing flavors with the power of soft and plushy challah bread. [wprm-recipe-roundup-item link="https://safedealform.info/mushroom-rosemary-thyme-challah-stuffing/" newtab="0" name="" summary=""]Mushroom and Onion Stuffing
This stuffing is made in the Instant Pot and it’s gosh darn delicious! [wprm-recipe-roundup-item link="https://safedealform.info/stuffing-lovers-unite-5-ingredient-15-minute-instant-pot-mushroom-and-onion-stuffing/" newtab="0" name="" summary=""]Crispy Stuffing Cakes
If you love the crispy bits on stuffing, these little stuffing cakes are for you. [wprm-recipe-roundup-item link="https://safedealform.info/sunday-brunch-crispy-stuffing-cakes-with-quail-eggs-recipe/" newtab="0" name="" summary=""]Lemongrass Stuffing
A little bit of herb-y lemongrass is always a good thing. Stuffing with a Vietnamese twist. [wprm-recipe-roundup-item link="https://safedealform.info/lemongrass-stuffing-recipe/" newtab="0" name="" summary=""]Herby Stuffing
Technically this isn’t stuffing, more of a herby breakfast strata, but really, what is stuffing if not bread cubes soaked with deliciousness and baked up? [wprm-recipe-roundup-item link="https://safedealform.info/sunday-brunch-make-breakfast-strata-without-recipe/" newtab="0" name="" summary=""]Acorn Squash Stuffing
Creamy acorn squash and bread cubes together forever, topped off with cheese because cheesy stuffing is a game changer. [wprm-recipe-roundup-item link="https://safedealform.info/acorn-squash-breakfast-pudding-recipe/" newtab="0" name="" summary=""]Vegetable Thanksgiving side dishes
Green things, because health. And not so green things because we’re inclusive and you don’t have to be green to be a vegetable.Honeynut Squash
Not only are they cute, they taste good too! Serve up some honeynut squash with greek yogurt and honeyed walnuts. [wprm-recipe-roundup-item id="34356"]Crispy Air Fryer Brussels Sprouts
Sweet and tender with crispy edges, almost just like deep-frying :) [wprm-recipe-roundup-item id="34801"]Cheddar Cauliflower Tots
These oven baked tots are only 5 ingredients and full of cauliflower-cheesy goodness. [wprm-recipe-roundup-item link="https://safedealform.info/cheddar-cheese-cauliflower-tots/" newtab="0" name="" summary=""]Miso Dijon Green Beans
Forget your classic green been casserole and serve up some crisp green beans tossed in a miso dijon dressing. [wprm-recipe-roundup-item link="https://safedealform.info/miso-dijon-green-bean-mushroom-salad/" newtab="0" name="" summary=""]Pan Seared Honey Garlic Sprouts
Sweet and savory honey garlic sprouts because honey garlic vegetables are basically like candy. [wprm-recipe-roundup-item link="https://safedealform.info/pan-roasted-honey-garlic-brussels-sprouts-recipe/" newtab="0" name="" summary=""]Honey Garlic Eggplant
Again, see above :) [wprm-recipe-roundup-item link="https://safedealform.info/honey-garlic-eggplant-recipe/" newtab="0" name="" summary=""]Honey Garlic Butternut Squash
Ditto, but make it squash. [wprm-recipe-roundup-item link="https://safedealform.info/honey-garlic-roasted-butternut-squash-recipe/" newtab="0" name="" summary=""]Oven Roasted Cauliflower
I love how sweet and caramelized cauliflower gets when you roast it. Hmm, I think I like sweet vegetables, gotta work on getting more of those bitter greens in my life. [wprm-recipe-roundup-item link="https://safedealform.info/roasted-cauliflower-recipe/" newtab="0" name="" summary=""]Burrata and Kale
Kale is a leafy green! One that tastes amazing when you braise it in tomato sauce and top it off with burrata. [wprm-recipe-roundup-item link="https://safedealform.info/burrata-and-kale/" newtab="0" name="" summary=""]Broccoli Tots
I love all things in tot form and these broccoli tots are just so poppable. And forkable. And delicious. [wprm-recipe-roundup-item link="https://safedealform.info/cheddar-cheese-broccoli-tots/" newtab="0" name="" summary=""]Creamy Lemon-y Zoodles
Zucchini but make it noodle-y. And add cream sauce. [wprm-recipe-roundup-item link="https://safedealform.info/keto-friendly-creamy-lemony-zoodles/" newtab="0" name="" summary=""]Air Fryer Asparagus
So fresh, so green. The air fryer makes all vegetables taste good, to be honest. [wprm-recipe-roundup-item link="https://safedealform.info/easy-roasted-air-fryer-asparagus/" newtab="0" name="" summary=""]Lemon and Dill Roasted Brussels Sprouts
Fresh and feisty oven roasted sprouts with lemon and dill. [wprm-recipe-roundup-item link="https://safedealform.info/lemon-dill-pan-roasted-brussel-sprouts/" newtab="0" name="" summary=""]Kale Chips
What do you mean kale chips aren’t a Thanksgiving side?! When you think about it, kale chips are just crispy kale and that’s a side in my books. [wprm-recipe-roundup-item link="https://safedealform.info/crispy-air-fryer-kale-chips/" newtab="0" name="" summary=""]Spicy Roasted Cauliflower
Oven roasted cauliflower but make it tangy and spicy kind of like buffalo wings, but cauliflower. [wprm-recipe-roundup-item link="https://safedealform.info/sriracha-roasted-cauliflower-recipe/" newtab="0" name="" summary=""]Pan Seared Asparagus with Miso Butter
Super simple pan-seared asparagus with rich and savory miso butter. [wprm-recipe-roundup-item link="https://safedealform.info/asparagus-with-miso-butter-recipe/" newtab="0" name="" summary=""]Air Fryer Roasted Broccoli
Perfectly crips with just the right amount of char. [wprm-recipe-roundup-item link="https://safedealform.info/how-to-make-crispy-air-fryer-roasted-broccoli/" newtab="0" name="" summary=""]Instant Pot Brussels Sprouts
If you’re more a fan of tender sprouts without the crispiness, this is the sprouts recipe for you. [wprm-recipe-roundup-item link="https://safedealform.info/easy-green-super-tender-instant-pot-garlic-butter-brussels-sprouts-recipe/" newtab="0" name="" summary=""]Bread and Biscuit Thanksgiving side dishes
Warm bread and biscuits fresh out of the oven are a treat but more so at Thanksgiving because it makes the house so warm and cozy.Milk Bread
This is the softest, most plush bread you’ll ever make. Spread some butter on and sprinkle on the flaky sea salt! [wprm-recipe-roundup-item id="33435"]Brazilian Cheese Bread
I love the chewy crisp texture of pao de queijo and bonus, it’s gluten free! [wprm-recipe-roundup-item link="https://safedealform.info/gluten-free-pao-de-queijo-brazilian-cheese-bread-recipe/" newtab="0" name="" summary=""]Moroccan Pita Bread
These little pillow puffs are so soft. Break one open and make the best turkey slider. [wprm-recipe-roundup-item link="https://safedealform.info/youre-gonna-love-batbout-pan-grilled-moroccan-pita-bread/" newtab="0" name="" summary=""]Pretzels
Pretzels are a celebration food and Thanksgiving is a celebration! [wprm-recipe-roundup-item id="34555"]Sourdough Focaccia
Fluffy crisp focaccia dimpled with olive oil and seasoned with rosemary. [wprm-recipe-roundup-item id="31520"]Sourdough
Make a loaf of sourdough: crusty, fragrant, hearty, and soul stirring. [wprm-recipe-roundup-item id="30909"]Parmesan Garlic Knots
These guys will go like hot cakes! So garlicky and so good. [wprm-recipe-roundup-item id="34896"]Everything Bagel Dinner Rolls
Soft and fluffy dinner rolls brushed with butter and everything bagel spice. [wprm-recipe-roundup-item link="https://safedealform.info/everything-bagel-dinner-rolls/" newtab="0" name="" summary=""]Challah
A easy basic challah! [wprm-recipe-roundup-item link="https://safedealform.info/challah-recipe/" newtab="0" name="" summary=""]Potato Buns
Little mini potato buns that are soft and squishy with the power of potatoes. [wprm-recipe-roundup-item link="https://safedealform.info/potato-slider-buns/" newtab="0" name="" summary=""]Buttermilk Biscuits
Use your food processor to make these biscuits: light and fluffy with crispy bottoms. [wprm-recipe-roundup-item id="30722"]Cheddar Scallion Biscuits
Sky high biscuits studded with scallions and cheddar. [wprm-recipe-roundup-item link="https://safedealform.info/extra-flaky-cheddar-scallion-biscuits/" newtab="0" name="" summary=""]Smoked Salmon and Chive Biscuits
Salty, smoky specks of salmon and punchy chives in these flaky biscuits. [wprm-recipe-roundup-item link="https://safedealform.info/smoked-salmon-and-chive-biscuits/" newtab="0" name="" summary=""]Cheddar Bay Biscuits
Soft on the inside, crispy on the outside copycat Red Lobster style biscuits. [wprm-recipe-roundup-item link="https://safedealform.info/homemade-cheddar-bay-biscuits-red-lobster-style/" newtab="0" name="" summary=""]Black Pepper Parmesan Biscuits
Quick and easy drop biscuits with pepper, parm, and chives. [wprm-recipe-roundup-item link="https://safedealform.info/small-batch-black-pepper-parmesan-chive-biscuit-recipe/" newtab="0" name="" summary=""]Salad and Salad-Adjacent Thanksgiving side dishes
I love salads with Thanksgiving dinner because they offer a fresh and tart counterpoint to all the richness. Plus they make me feel like I’m being a little healthy.Sesame Soy Broccoli Salad
I could eat just this salad and be happy! Crunchy tender broccoli, red onions, sliced almonds, and craisins. [wprm-recipe-roundup-item link="https://safedealform.info/the-best-broccoli-salad/" newtab="0" name="" summary=""]Apple Hazelnut Quinoa Salad
A nutty crunchy satisfying salad that eats like a meal. [wprm-recipe-roundup-item link="https://safedealform.info/quinoa-salad-with-hazelnuts-apple-and-dried-cranberries/" newtab="0" name="" summary=""]Cucumber Avocado Salad
Crunchy cucumbers and creamy buttery avocados. [wprm-recipe-roundup-item id="32581"]Shiitake Salad
Pan seared shiitakes with avocado and quinoa in a shallot oil dressing. [wprm-recipe-roundup-item link="https://safedealform.info/shiitake-quinoa-salad-recipe/" newtab="0" name="" summary=""]Fattoush
If you’re looking for a light salad that will bring some freshness to the table, this is it: chopped veggies, crispy pitas, and a sumac lemon dressing. [wprm-recipe-roundup-item link="https://safedealform.info/fattoush-salad-recipe/" newtab="0" name="" summary=""]Mint and Cucumber Quinoa Salad
Kind of like a Vietnamese vermicelli bowl but with quinoa. Super refreshing. [wprm-recipe-roundup-item link="https://safedealform.info/vietnamese-quinoa-salad-recipe/" newtab="0" name="" summary=""]Kabocha Celery Salad
Pumpkin because it’s fall and celery because it crunches. This is a fall celebration salad. [wprm-recipe-roundup-item link="https://safedealform.info/fall-salad-kabocha-celery-salad-recipe/" newtab="0" name="" summary=""]Smashed Cucumber and Green Bean Salad
Super refreshing and crunchy to offset the richness of Thanksgiving dinner. [wprm-recipe-roundup-item link="https://safedealform.info/miso-smashed-cucumber-green-bean-salad-recipe/" newtab="0" name="" summary=""]Papaya Pear Arugula Salad
Juicy papayas, crunchy pears, and peppery arugula in a lime mustard vinaigrette. [wprm-recipe-roundup-item link="https://safedealform.info/papaya-pear-arugula-salad-recipe/" newtab="0" name="" summary=""]Pear and Pecan Quinoa Salad
A super festive quinoa salad with all the textures and flavors in a orange honey vinaigrette. [wprm-recipe-roundup-item link="https://safedealform.info/sweet-side-dish-holiday-quinoa-recipe/" newtab="0" name="" summary=""]Mac and Cheeses are the best Thanksgiving side dishes
The preferred side dish on the East Coast. Those folks know! Creamy cheesy mac and cheese is a welcome addition to any Thanksgiving spread.One Pot Creamy Pumpkin Mac and Cheese
Pumpkin mac and cheese at Thanksgiving is just the right thing to do. [wprm-recipe-roundup-item link="https://safedealform.info/one-pot-creamy-pumpkin-mac-and-cheese-recipe/" newtab="0" name="" summary=""]Spicy Green Chile Mac and Cheese
Just in case you need a little spice in your life. [wprm-recipe-roundup-item id="29059"]Mac and Cheese Waffles
Did you know you can waffle mac and cheese!? The edges get wonderfully crisp and crunchy and the insides are soft and cheesy. [wprm-recipe-roundup-item link="https://safedealform.info/mac-and-cheese-waffles/" newtab="0" name="" summary=""]Stovetop Jalapeño Broccoli Mac and Cheese
Spicy and creamy with bonus broccoli. [wprm-recipe-roundup-item link="https://safedealform.info/creamy-stovetop-jalapeno-broccoli-mac-and-cheese-recipe/" newtab="0" name="" summary=""]Scoobi Doo with Burrata and Tomatoes
This one isn’t really a mac and cheese but I had to include it because it has scoobi doo mac and it has burrata, which is cheese! [wprm-recipe-roundup-item link="https://safedealform.info/scoobi-doo-pasta-with-burrata-and-tomatoes/" newtab="0" name="" summary=""]Creamy Herby Garlicky Mac and Cheese
Literally the EASIEST mac and cheese you will ever make because it is just penne and Boursin cheese. [wprm-recipe-roundup-item id="29409"]
Latest Comment
“Made these in the Dutch oven in the oven- THEY WERE AMAZING”AJ on Birria Tacos RecipePopular
 2015 Holiday Giveaway
  One-Pot Lemon Scallop Pea Spaghetti
  Beer Battered Onion Rings, Jalapeno Aioli
  2014 Holiday Gift Guide and a Giveaway
  Easy Gourmet Hot Wings and a Giveaway!
 The Ultimate Veggie Sandwich
  Vegan(!) Creamy Corn Soup Recipe
  Sunday Brunch: Grilled Cheese Eggs Benny
