
I Am... Larb Moo Pork Larb Recipe – Thai Pork Salad
If you’ve been to northern Thailand or Laos, you’ve probably had larb moo, or meat salad.
What is larb
Meat salad might not sound very appealing, but it’s incredible. Think: juicy minced pork, fish sauce, lime juice, roasted rice, and fresh herbs. Paired with sticky rice balls, it’s absolutely addictive. It’s unofficially the national dish of Laos and incredibly popular in the Isan region of Thailand. Larb is classic street food, fast, easy, fun, and most importantly, delicious.How to make larb
- Toast the rice. Use a small pan over medium low heat, shaking often, 2-3 mins. Then grind in a mortar and pestle or spice grinder.
- Brown the pork. Using a skillet over medium high heat, brown the ground pork until it's cooked to your desired doneness (we prefer it on the juicier side but some prefer it well cooked and dry).
- Stir in the rice powder and chili flakes. Mix well to evenly coat the pork.
- Add the remaining ingredients. Sugar, fish sauce, lime juice, shallots, green onions, cilantro, and mint.
- Mix well and adjust to taste. Enjoy hot over rice!
How to serve
Larb is usually served with vegetables, lettuce to wrap, and sticky rice - so good! We had ours with both lettuce cups and sticky rice. Sticky rice recipe here!Toasted Sticky Rice
The essential ingredient in larb is the toasted sticky rice. It gives everything a nice crunch and roasted toasty fragrance. If you don’t have sticky rice, you can easily toast up some uncooked Jasmine rice instead.How to toast rice
Toasting rice is pretty easy: just pop uncooked rice into a dry pan and toast over medium low heat, while shaking occasionally. After a while, the rice takes on some color and starts to smell amazing - kind of like popcorn. Take your time while you’re toasting, be careful not to burn. Toasting the rice is probably the longest part of this recipe. After that you’re just 10 minutes away from porky, herby heaven. The next time you’re looking for a quick and easy dinner that’s a bit different, I hope you try this larb. It hits all the right notes: sweet, spicy, salty, and sour.Serve larb with:
- Thai Sticky Rice
- 15 Min Khao Soi Coconut Curry Chicken Noodle Soup
- Thai Basil Chicken
- Thai Curry Stir Fry Udon
- Better than Take Out Peanut Free Pad Thai
Larb Moo (Thai Pork Salad)
Larb: the best kind of salad, with a mix of textures and flavors.
- 1 tbsp uncooked rice (preferably sticky or jasmin)
- 1 tbsp neutral oil
- 1 lb ground pork
- 1 tbsp chili flakes
- 1 tbsp sugar
- 1 tbsp fish sauce
- 1 lime (juiced, plus extra wedges to serve)
- 1-2 shallots (sliced)
- 1/2 cup fresh cilantro (chopped)
- 3 green onions (sliced)
- 20 leaves fresh mint (washed)
- Thai sticky rice (or lettuce, to serve)
In a small pan, toast the rice over medium low heat, shaking the pan often, about 2-3 minutes.
Once golden brown, let cool slightly and move to a mortar and pestle. Crush it into a fine powder. Transfer to a small bowl and set aside.
In a skillet, heat the oil over medium high heat. When hot, add the pork, and brown, breaking into pieces.
Remove from the heat, and stir in the toasted rice powder and chili flakes, then add the sugar, fish sauce, and lime juice. Stir in the shallots, green onions, cilantro, and mint.
Mix well and adjust to taste. Serve with hot Thai sticky rice and enjoy immediately!

I Am... Homemade Carnitas
Easy peasy carnitas. Alongside barbacoa, tinga, and birria, I think carnitas is the best taco filling you can make at home. Whenever we’re too tired to cook, or just want to have a homemade taco night, carnitas is the answer.
What is carnitas
Carnitas is juicy and succulent pork that’s been slow braised and confit-ed in its own fat along with spices, then pulled apart and crisped to perfection. It’s simply the best (pork based) taco filling.How to make carnitas
Making these carnitas is super easy, barely an inconvenience. All you need is an instant pot and to follow these steps:- Brown the pork. Cube up your pork and season well with salt and pepper. Preheat your instant pot on the saute high setting, with enough oil to cover the bottom of my instant pot. Sear the pork cubes on 2-6 sides (depending on your level of meticulousness) for 1-2 minutes per side. I generally sear 2 sides. It takes about 2 batches to brown 3.5lbs of pork shoulder. Long tongs and a splatter shield is highly recommended here.
- Add your braising liquid. For the instant pot you’d ideally have about 1” less liquid than the top of the pork cubes. More on the braise in the ingredients section below.
- Cook at pressure. Close the lid of the instant pot. You may need to open the release valve to get it to close as it may still be hot the browning step. Cook at high pressure for 45 minutes, then quick release.
- Shred and crisp. This is an important step that you shouldn’t skip. Using two forks, shred the cubes of pork completely. Transfer to a cast iron skillet or other pan. Working in batches, form a thin layer of meat about 1/2” thick and crisp for 4-5 minutes on medium heat. Once you’re done, add about 1/2 cup of the braising liquid in. Mix it up, and you’re done. Enjoy on tacos, in burritos, or any other way you’d like.
Ingredients
The ingredients for this carnitas are pretty straightforward. Some notes:- Well marbled pork shoulder. We skip the pork fat in this recipe, so you’re looking for a nicely marbled piece of pork shoulder to replace that fat. Save yourself some time and opt for the slightly more expensive boneless cut as well.
- Coke. Believe it or not, coke is a pretty traditional ingredient. I’ve made carnitas without coke and it’s no contest, carnitas made with coke is far better than without.
- Mexican oregano. Mexican oregano is a different species of oregano that is more floral than conventional oregano. I love it a lot more. Dried Mexican spices tend to be much cheaper than conventional ones too. This one will be easy to find in the Mexican aisle, so there is no reason not to try it.
Instant pot carnitas
An instant pot is definitely the best way to make these. But, it’s not the only way. You can also make these with any of these other methods below. The major difference is that it’ll take closer to 6-10 hours to achieve the right texture without pressure.Stovetop carnitas
It’s the same process for stovetop carnitas. The best pot for stovetop carnitas is a large dutch oven or a stock pot that’s not non-stick.- Brown the pork. Cube up your pork and season well with salt and pepper. Add enough oil to cover the bottom of your dutch oven and place over high heat. When the oil is just about smoking, sear the pork cubes on 2-6 sides (depending on your level of meticulousness) for 1-2 minutes per side. I generally sear 2 sides. It takes about 2 batches to brown 3.5lbs of pork shoulder. Long tongs and a splatter shield is highly recommended here.
- Add your braising liquid. On the stovetop (as well as in the oven and crock pot) you’d ideally have just enough liquid to cover the top of the pork cubes.
- Simmer. Simmer for 4-6 hours at the lowest possible temp your stove supports, about 1 bubble every 30 seconds. You’ll need to keep an eye on the liquid level. Check back about once an hour and add hot tap water as needed to keep the liquid level stable.
- Shred and crisp. This is an important step that you shouldn’t skip. Using two forks, shred the cubes of pork completely. Transfer to a cast iron skillet or other pan. Working in batches made of a thin layer of meat about 1/2” thick, crisp for 4-5 minutes on medium heat. Once you’re done, add about 1/2 cup of the braising liquid in. Mix it up, and you’re done. Enjoy on tacos, in burritos, or any other way you’d like.
Oven carnitas
Oven carnitas are a bit of an upgrade over stovetop. It’s the exact same process, but instead of simmering, you braise in the oven at 200ºF for 4-6 hours. Because it’s in an oven, evaporation should be low and you won’t need to baby it as much. It’s also impossible for it to roll over into a boil.Crock pot carnitas
Crockpot carnitas are awesome and generally what the crockpot excels at. The only issue is, the crockpot can’t sear and takes a good 4 hours to come to its ideal temp. What I like to do is do all the searing and getting up to temp on the stove, then transfer to a crockpot on low for the remaining time. If for whatever reason you don’t have a stove handy, you can do this without the searing step. Just assemble everything into your crock pot. Cook on high for 2 hours and then switch to low for 6 hours.Why make carnitas
If you’re asking, why can’t I just order it from my local Mexican place? The answer is, you can, but carnitas is expensive and pork is (relatively) cheap. This carnitas recipe is just as good and it costs just the price of pork shoulder. Plus, there's the satisfaction of making it yourself.How to make carnitas tacos
So now you have carnitas! The best thing to do with them is to make tacos. Below is everything I know about making good tacos:The right amount of meat and importance of crisping
In general, but especially for tacos, it’s very important to crisp, then finish your carnitas with a little braising liquid. Specifically for tacos, one of the biggest differences between a great taco and a sad one is how dry the filling is. I don’t think anyone likes a dry taco. You might even want to add a little more than the half cup I recommend.The best tortillas and the importance of warming your tortillas
Another tip for really good tacos are your tortillas and how you warm them. After all, they’re what holds your tacos together. I like to use locally made uncooked corn tortillas or flour tortillas and cook them myself. Whole foods often carries really good local tortillas, even uncooked ones in the fridge section. If you are in a place without access to good locally made tortillas, some of the best mass-produced tortillas around are La Tortilla Factory and Santa Fe Tortilla Company. With store bought tortillas, you need to warm them to make them pliable and delicious. The best way to warm tortillas is to wrap 6-12 at a time in a damp paper towel and microwave for 30 seconds. You can also buy a tortilla warmer instead of the paper towel thing. Of the major, major brands, Mission Foods is probably the way to go. For me, the best tortillas come from Sonora - Southern Arizona and New Mexico. Anything you can get from around those parts is going to taste insanely good.Taco toppings
Last but not least, great tacos need great toppings:- Chopped onions, fresh cilantro, and lime wedges are standard and non-negotiable. Is it even a taco without these? I also like to have extra sliced jalapenos on the side as well.
- Queso fresco adds a cheesy umami to your tacos.
- Pickled shallots add a bright tart note.
- Freshly made pico de gallo is a game changer for me. The important detail is to make it fresh that day and let it sit for 15 minutes to let the flavors meld. I always try to make some before we have tacos. Pico de gallo in our house is just chopped roma tomato, 1/2 small onion, jalapeno, cilantro, the juice of a half lime, and a little salt to taste.
- Finally, hot sauces are an excellent optional but not really optional thing. For us, we don’t really make these, we buy them locally from our favorite restaurants. Hot sauces are made differently everywhere, and I’ve found restaurants pretty much beat anything that’s available commercially. We usually get a salsa roja, salsa verde, and a salsa picante. Basically, a red sauce made of chipotle, a green sauce of mostly tomatillos, and a spicy sauce of mostly habeneros. If you don’t have a good Mexican restaurant nearby, I recommend the Aardvark Habanero and Aardvark Serrabanero as a pretty decent substitutes.
The Best Carnitas Recipe
Super easy, 100% foolproof and juicy, delicious carnitas that might even be as good as your favorite taqueria’s.
- instant pot
- 3 lb pork shoulder/butt (cubed, well marbled)
- 1 medium onion (chopped)
- juice of 1/2 orange (about 1/4 cup)
- 1/2 cup coke (coke zero preferred)
- 2 sticks cinnamon
- 2 tbsp oregano (Mexican preferred)
- 2 tsp ground cayenne pepper
- 2 tsp ground cumin
- 2 bay leaves
Cover the bottom of your instant pot with high heat oil (about 2tbsp) and preheat on saute high. Cube the pork and season with salt and pepper, keeping an eye on the instant pot to make sure it’s not smoking.
Brown 2 sides of your pork cubes, in batches if needed,
Add the rest of the ingredients and set to high pressure for 45 minutes, then quick release.
Using two forks, shred the cubes of pork completely. Transfer to a cast iron skillet or other pan. Working in batches made of a thin layer of meat about 1/2” thick, crisp for 4-5 minutes on medium heat. Once you’re done, add about 1/2 cup of the braising liquid in.
Mix it up, and you’re done. Enjoy on tacos, in burritos, or any other way you’d like!

I Am... Air Fryer Chicken Wings
Air fryer chicken wings coming in hot! Do you love chicken wings? Do you love your air fryer? To me, chicken wings and the air fryer are a match made in heaven. These air fryer chicken wings are faster than going to the bar, ordering, and waiting for them to fry your wings. Even better, they’re super juicy, taste amazing and only take 20 minutes in the air fryer. And they’re not deep fried!
Chicken wings in air fryer, a match made in heaven
To me, the air fryer is the best option for juicy crispy chicken wings. Air fryers circulate hot air and oil all around the wings to get a perfectly crisp shell while keeping the insides extra juicy. Baking wings in the oven takes an hour, but air fryer chicken wings only take 20 minutes from start to finish which means your wings don’t have a chance to dry out.How to make air fryer chicken wings
- Lightly pat your chicken dry. Moisture is not your friend when you want a crispy chicken wing, so be sure to pat your wings dry with a paper towel.
- Lightly oil. Lightly oil the chicken by tossing it with oil or spraying it with spray oil. This will promote even browning.
- Coat the chicken. This is where the magic happens. Toss the wings in a large bowl with a bit of baking powder, garlic powder, onion powder, salt, and pepper.
- Air fry. Lightly spray (or brush) the air fryer basket with oil. Arrange the wings in a single layer, with some space in between each wing.
- Flip. Flip the wings and fry again.
- Toss. Enjoy the wings as is or toss with sauce!
How long to cook chicken wings in air fryer:
It takes 20 minutes to cook wings in the air fryer. Cook your wings for 15 minutes at 400°F, flip them and cook them for another 5 minutes at 400°F. If you want extra crispy wings, let them rest for 5 minutes then give them another 5 minute blast at 400ºF to get them extra crunchy. Wings cook based on wing size and how packed your air fryer is, if your wings are extra big, add an extra 5 minutes to the cook time.Basic air fryer chicken wings recipe
The key to really tasty air fryer chicken wings is a well seasoned base. You know how wings taste super good and flavorful at restaurants in way that never seems achievable at home? The secret is seasoning your wings before you sauce them. It’s layers on layers of flavor, all the way down! For these wings, I coated them in a bit of baking powder, along with some salt, garlic powder, onion powder, and pepper. The result was unbelievably juicy, crisp, and flavorful. This basic seasoning mix of salt, garlic, onion, and pepper is the perfect base layer for all other sauces. It will make your wings extra: extra flavorful, extra saucy (because the sauce will have something to cling to), and extra delicious.Extra crispy air fryer chicken wings
The secret to extra crispy air fryer chicken wings is baking powder (not baking soda) and salt. Basically, the pH of the baking powder makes the surface of the wings brown more easily. A bit of salt draws out any extra moisture off the surface of the skin and your air fried chicken wings end up crispy and golden.Buffalo wings vs other sauces
These wings are 100% good enough to eat naked, on their own. But variety is the spice of life too, amirite?! Air fryer chicken wings make the best ever buffalo wings. Buffalo wings are super simple: equal parts Frank’s Red Hot and melted butter. We like to mix it up and use other hot sauces too, like sriracha buffalo or Crystal buffalo. Truth is, we almost always reduce the amount of butter or leave it out entirely for a healthier twist. We made these specific wings with just Secret Aardvark Habanero Sauce (the best hot sauce ever) and they were phenomenal. You can also make these wings:- Korean wings - in small pan, heat up 1 tablespoon each of ketchup, gochujang, honey, and brown sugar, 1/2 tablespoon of soy sauce, toasted sesame oil, and grated ginger, along with 2 cloves crushed garlic. Read more about Korean Fried Chicken here.
- Pok Pok fish sauce wings - combine 1 tablespoon each of lime juice, fish sauce, and sugar, along with 1 clove crushed garlic and 1/2 sliced Thai bird’s eye chili. Let sit for 10 minutes for the flavors to meld before tossing. Read more about Pok Pok Style Fish Sauce Chicken Wings here.
- Honey garlic wings - Melt 1 tablespoon of butter in a small pan over medium heat and add 8 cloves of crushed garlic and cook until soft but not brown. Stir in 2 tablespoons honey, 2 teaspoons soy sauce, and 1 tablespoon water, bring to a simmer, then toss with the wings.
- Ranch Wings - Ranch is a must for dipping and let me tell you, tossing wings in ranch powder is a pro move. For the recipe, check out this whole post on ranch wings.
- Vietnamese wings - this is a dry toss that is out of this world, believe me. It's the ultimate umami wings. I could eat pounds and pounds of these wings and never get tired of them. For more information, check out this post on Vietnamese air fryer wings.
Frozen chicken wings in the air fryer
Can you make frozen chicken wings in the air fryer? Surprisingly, you can! You’ll need to cook the wings a bit longer and they won’t come out as crispy, but if you’re in hurry, it’s a pretty amazing party trick.To make air fryer frozen chicken wings:
- Toss the wings in the baking powder spice mix and lay the wings out in a single layer in the air fryer basket.
- Set the air fryer to 400°F for 15 minutes, flip, and cook for another 10 minutes.
- Flip them again, give them a spray with some oil, and cook for 5 minutes.
- Give them one final flip, spray, and cook for a final 5 minutes.
How many wings can I make at once?
You can make about 1 pound of wings at once, depending on how big the wings are. If you’re a wing lover, look into getting a rack for your air fryer because you can triple your wing making abilities. If you're buying a rack, whether online or offline, don't forget to check the diameter so you can be sure it fits in your air fryer!Which air fryer do you have?
We've used a lot of air fryers and this one is our new daily driver and it's been awesome. The window is more than just fun (though it is too!) it's also great to see your food frying so you can make sure everything is A-OK.Can I make these in an oven?
Yes, you can bake them in the oven, it takes 45 minutes @ 400ºF. Stick them on a wire rack on a foil lined baking sheet and flip them half way through. If you have convection mode, it means you have a giant air fryer! Just follow the same instructions as with an air fryer, maybe with an extra 5 minutes in case the oven temp is not as accurate.Tips for the best air fryer chicken wings:
- Season your chicken
- Dry the chicken as much as possible, the drier the chicken, the crispier
- Don’t crowd the air fryer
- Use tongs to flip your wings instead of shaking the basket
- For ultimate crisp ones, double fry: let the chicken rest after frying, the pop it back into the air fryer for an extra 5 minutes
More Air Fryer Recipes!
Air Fryer Chicken Wings
The best way to make chicken wings, period.
- air fryer
- 1 lb chicken wings
- 1 tsp baking powder (not baking soda)
- 1 tsp garlic powder
- 1/2 tsp onion powder
- 1/2 tsp freshly cracked pepper
- 1/4 tsp kosher salt (or to taste)
Optional Buffalo Wing Sauce
- 1.5 tbsp hot sauce (optional, see notes)
- 1.5 tbsp butter (melted, optional, see notes)
Pat the chicken dry with paper towels. In a bowl, toss the wings in oil.
Mix the baking powder, garlic powder, onion powder, pepper, and salt together in a small bowl. Add to the wings and toss to coat evenly.
Spray the air fryer basket with oil or lightly brush with a thin coat of oil. Arrange the chicken in a single layer and air fry at 400°F for 15 mins. When the 15 minutes is up, flip the chicken and air fry for another 5 minutes.
Remove the chicken immediately. Enjoy as is or toss with your sauce of choice!
Check out the post for more sauce ideas than just basic Buffalo!
Nutrition facts are for wings only and don't include sauce.

I Am... Vietnamese Coffee
Nothing is more refreshing or more energy life giving than an icy cold Vietnamese coffee. Sweet and creamy, with a huge kick of intense coffee flavor. This is the caffeine hit I want all day, every day. After Brazil, Vietnam is the largest producer of coffee in the world and it’s no surprise that Vietnamese coffee culture is fierce. Cafes line the streets and morning, noon, and night, you’ll see people drinking coffee. It’s just a way of life. After pho and banh mi, I think Vietnamese coffee might be the most well known Vietnamese culinary export.
What is Vietnamese coffee?
Dark, intense, rich, and deep, Vietnamese coffee is coffee made from Vietnamese grown coffee beans, strong and flavorful, often cut with sweetened condensed milk and drunk hot or cold. Nowadays, lots of people think Vietnamese coffee is just regular old coffee with sweetened condensed milk in it. If we’re going to be purists: true Vietnamese coffee is made from robusta coffee beans (or a mix of robusta and arabica) grown in Vietnam. Robusta beans are bitter, less acidic, and have twice as much caffeine as the more commonly used Arabica beans. Robusta beans produce a very dark, very strong coffee that’s beautifully balanced out by sweetened condensed milk. For the sake of simplicity in this post, we’ll define Vietnamese coffee as coffee made from beans grown in Vietnam and or coffee served with sweetened condensed milk. We’re using Vietnamese grown beans and if you want a truly authentic cup, you should use them too ;)What does Vietnamese coffee taste like?
In a word: delicious! I am addicted to that sweet milky coffee-forward flavor. It tastes like how you imagine coffee to taste. Deliciously dark and deep with a hint of roasty caramel, sweet milkiness, nutty buttery-ness, with just a touch of chocolate notes.How to make Vietnamese coffee
- Get the coffee equipment ready. Gather your phin, the ground coffee beans, sweetened condensed milk and a mug or glass. I like to use a heatproof glass because aesthetics.
- Boil the water. To be specific, you want the water between 195°-205°F. Essentially boil it and remove from the heat.
- Preheat the phin and cup. Pour a bit of water through the filter. It’ll run right through and warm the filter and cup. Carefully pour the hot water out.
- Add the condensed milk to the cup. Spoon some condensed milk (if using) into the cup. Add the body of the phin back on top, leaving the filter and lid to the side.
- Bloom the coffee. Scoop in 1 heaping tablespoon of fine coffee grounds and use the filter press to lightly press down on the coffee. Pour in about 1 tbsp hot water over the filter. Let bloom for about 30-40 seconds.
- Brew the coffee. Slowly pour more hot water into the phin until it reaches the top then cover it with the lid. Let the coffee brew, it should take about 3-5 minutes and it should drip through slowly.
- Enjoy! When the coffee is done brewing, remove the phin. Stir it up and pour over ice or add more hot water if desired.
Hot vs iced Vietnamese coffee
In Vietnam, coffee is enjoyed both iced and hot, it’s really up to personal preference.- Hot: Simple enjoy the coffee brewed straight from the phin. If you want your coffee slightly diluted, more like an americano, add some hot water.
- Iced: There are two ways of making iced coffee. You can brew the coffee then pour it over ice or you can brew the coffee directly over ice.
Vietnamese coffee ingredients & equipment
Coffee Phin
What is a phin? It’s an individual stainless steel coffee filter that sits on top of a glass. A phin is made of three parts: the body, the press or filter disk, and the lid. Coffee grounds go into the body, the press is placed lightly on top and finally, the lid covers everything. The coffee drips out slowly into the waiting cup at the bottom. It’s kind of a mix between pourover and a French press. And of course, if you would like a black phin like you see in the photos, a similar one is available here.Coffee beans
Some people say that it’s the condensed milk or way it’s been brewed that makes Vietnamese coffee Vietnamese coffee, but really it’s the beans. Lots of Vietnamese roasters roast with butter for extra richness. For a true Vietnamese coffee, try to find a bean that’s grown and roasted in Vietnam. Contrary to popular belief, Cafe du Monde coffee (which is often used in Vietnamese restaurants) are not actually Vietnamese beans. There are a variety of Vietnamese beans on the market and lots of them are sold online.Sweetened condensed milk
Contrary to popular belief, Vietnamese coffee doesn’t need to have sweetened condensed milk in it. In fact, Mike drinks his Vietnamese coffee black (ca phe den) and so do a lot of other people. I’m a huge fan of sweetened condensed milk – sometimes I eat it with bread. My preferred brand of sweetened condensed milk is Longevity Brand. You can find it online or in Asian grocery stores. After opening, use a rubber spatula to scoop it into a clean container with a lid and pop it in the fridge. I like to get mine in a squeeze bottle so I can squeeze to my heart’s content. Sweetened condensed milk will keep in the fridge forever. If you’re just at a regular grocery store, go for Eagle Brand, Carnation, and Nestle’s La Lechera sweetened condensed milks. I especially like the tubes that they sell now (Eagle Brand, La Lechera) because it’s so easy to squeeze out, no can opener needed.Cheater’s Vietnamese Iced Coffee
When you want Vietnamese iced coffee and you want it fast, here is a quick and easy way to make it, no phin needed! Here's how:- Make a cup of very strong coffee, either espresso (at least 2 shots) or extra strong brewed coffee.
- Stir in 1 tablespoon sweetened condensed milk or to taste then top off the glass with ice.
- The hot coffee will melt the ice. Top it off with cold water if desired. Enjoy!
Starbucks Vietnamese iced coffee hack
This is a trick I use when we’re on the road and I need a sweet and creamy Vietnamese ice coffee but I don’t have any sweetened condensed milk handy. You can adjust the shots of espresso and pumps of white chocolate mocha as needed based on your caffeine and sweetness needs. When I want it to taste almost exactly like a Vietnamese iced coffee, I order an Iced grande quad espresso with 3 pumps white chocolate mocha.Egg Coffee
Egg coffee or cà phê trứng is a specialty of Hanoi, the capital of Vietnam. Whisked egg yolks, condensed milk, and strong coffee come together in a perfect cup. Egg coffee’s beautifully layered with contrasting flavors: bitterness from the coffee, sweetness from the condensed milk, and richness from the whipped egg yolks. It’s like drinking a liquid tiramisu.How to make egg coffee
Brew a cup of Vietnamese coffee, without any sweetened condensed milk. The fluffy, creamy egg topping will add all the sweetness you need. While the coffee is brewing, make the sweetened egg cream by whisking together egg yolks and sweetened condensed milk with a milk frother. I like this one because it whips up eggs incredibly fast. You can use it to make dalgona coffee too! Once your sweetened egg cream is whipped up and your coffee is brewed, gently spoon the cream on top of the coffee. Enjoy sipping as is, or use a small spoon to stir everything together.Where to buy already brewed Vietnamese coffee
If, after reading all this, you feel like you want to try a cup of Vietnamese coffee but don't want to make it yourself, there's another option. Just hit up your local banh mi deli. They’ll always have Vietnamese coffee on the menu.Frequently Asked Questions
- Where is the black phin from? It was a limited edition thing from a friend who owns a Vietnamese coffee shop, unfortunately you can't get it anymore but if anyone knows where else you can get one, please leave me a comment!
- Vietnamese coffee is too sweet for me Pro tip, when you order it at Vietnamese bakeries or restaurants, you can ask them for less condensed milk if you like your coffee on the less sweet side.
- Can you drink it black? Yes you can and lots of people do. It’s called ca phe den and it’s pretty common actually!
- Why use sweetened condensed milk? Back when coffee started to become really popular in Vietnam, fresh milk wasn’t as readily available as sweetened condensed milk. Fresh milk is much more perishable and sweetened condensed milk was so much easier to store and use. Now the combination of strong and sweet is synonymous with Vietnamese coffee.
What to serve
Vietnamese Coffee
Sweet and creamy, with a huge kick of intense coffee flavor.
- coffee phin
- 1 tbsp Vietnamese coffee (ground)
- 1-2 tbsp sweetened condensed milk (optional)
For egg coffee
- 2 egg yolks
Boil some water until it reaches 205°F. Preheat the filter and cup by pouring hot water through it. Carefully pour the water out. Optionally add 1-2 tablespoons sweetened condensed milk to the bottom of your cup.
Remove the filter and add 1 heaping tablespoon of fine Vietnamese coffee grounds. Use the filter to gently tap down the grounds flat.
Pour about 1 tablespoon of hot water over the filter press to bloom the coffee. Let it bloom for 30-40 seconds.
Slowly pour more hot water into the filter, until it reaches the top. Place the lid on and let the coffee drip slowly, it should take about 5-6 minutes for all of the water to filter through the coffee.
Stir it up and enjoy! You can also brew it over ice, pour it over ice, or enjoy it with extra hot water.
To make egg coffee
While the coffee is brewing, make an egg foam by combining 2 egg yolks and the condensed milk in a glass. Use a milk frother to whisk until thick and foamy, 2-3 minutes.
Spoon the fluffy egg on top of the brewed coffee. Serve the cup of egg coffee in a bowl of hot water, if desired. Sip the coffee as is or stir before enjoying!
Estimated nutrition for coffee with 1 tbsp condensed milk. Black coffee is essentially 0 calories.

I Am... TikTok Scrambled Pancakes
So wrong it’s right? Scrambled pancakes are trending on TikTok. They look like scrambled eggs but they’re topped with syrup and fruit and people are eating them up. Are they any good? Make scrambled pancakes with me and I’ll tell you my true thoughts. I love TikTok viral recipes as much as any basic girl, but when I first saw scrambled pancakes my reaction was a hard no. A little while later, Mike asked me if I heard of them. I told him I thought they look extremely unappetizing. Then he showed me kaiserschmarrn and my curiosity sparked.
What are scrambled pancakes?
Scrambled pancakes, as the name implies, are pancakes, that are scrambled. You add regular pancake batter to a pan and instead of letting it bubble and cook into a perfect round, you use a spatula to push the batter around, breaking it up into pancake curds. The pancake pieces continue to cook until the outsides brown and turn slightly crispy and the insides cook up soft and fluffy. From there, you serve them topped with your favorite pancake toppings.How do you make scrambled pancakes
- Make your batter - start with making your favorite pancake batter. I like a thicker pancake batter because a thin one won’t give you as fluffy curds.
- Pour into the pan - heat a non-stick pan over medium-high heat and add either butter or oil (or the best of both worlds, which is both). When the pan is hot and ready, pour in the pancake batter.
- Scramble - once the pancake batter is in the pan, let the bottom set for a couple of seconds, then grab a silicone spatula and start scrambling, pushing the batter around and making pancake curds, just like how you would scramble eggs.
- Cook - once you break up the pancake batter into little pancake bits, continue to cook and crisp up the outsides, shaking the pan and flipping as needed. When the scrambled pancake bits reach a golden brown, they’re ready to serve.
- Serve - scoop the scrambled pancake on a plate or into a bowl and dust with a generous amount of powdered sugar and any desired toppings. Dig in!
Scrambled pancake ingredients
- all purpose flour - super simple classic all purpose flour is the base of all pancake recipes. sugar - some pancake recipes don’t include sugar, but I find that a bit of sugar is just what pancake batter needs, especially if you’re not partial to adding a whole lot of toppings.
- baking powder and baking soda - lots of pancake recipes only use baking powder, but a combination of baking powder and baking soda gives this pancake scramble lightness and lots of loft. The buttermilk activates the baking soda, giving these pancakes extra volume.
- egg - one large egg is what you’ll need for these pancakes. You can add to the buttermilk straight from the fridge.
- buttermilk - buttermilk pancakes are superior to all other pancakes. Buttermilk adds heft, fluff, and tenderness. If you don’t have buttermilk at home, simply make some by pouring out 1 cup milk, removing 1 tbsp of the milk, and adding either 1 tbsp white vinegar or lemon juice to the milk. Stir the milk and vinegar/lemon juice and let it sit for 5-10 so it can thicken and buttermilk itself, then use it in the recipe.
How do you make sure the insides of scrambled pancakes are done?
After scrambling the pancakes, when the pancakes are in little pieces, be sure to continue cooking until the outsides are golden brown. You can grab one of the larger pieces and break it open to check if the insides are ready. You want them to be fluffy and soft inside, so be careful not to over cook. One to two minutes of stir-frying the pancake bits should be enough time to ensure they’re ready.What do scrambled pancakes taste like?
Unsurprisingly, they taste like pancakes. But, the difference is in the texture. Because they’re scrambled, they get more crispy edges compared to regular pancakes. Plus, because they’re smaller, they don’t have as much of a doughy center. Instead, they’re a little more fluffy on the insides. When dusted with icing sugar, they taste a little like a healthier (is that possible?) funnel cake thanks to the form factor. They’re soft and sweet with craggily pancake edges.What is kaiserschmarrn?
Kaiserschmarrn is an Austrian-Hungary pancake dish that is essentially scrambled pancakes. They are commonly thought of as shredded instead of scrambled, but the cooking process is pretty much the same. The name translates to “Emperor’s Mess” and that comes from the fact that Austrian Kaiser Franz Joseph I was especially fond of them. Classically, kaiserschmarrn is a dessert or a light lunch, instead of breakfast and instead of using a spatula to break up the pancake batter, two forks shred the batter in the pan. Think of it this way: kaiserschmarrn is scrambled pancakes grandpa.The best kitchen tools for scrambled pancakes
- non-stick pan - some people believe cast iron is best for pancakes, but I really believe in non-stick or ceramic. You never use high-heat for pancakes and the release you get from non-stick and ceramic can’t be beat. We’ve been looking to get some new non-stick skillets and this one and this one both look great. If you have a crepe pan or flat top grill, those will work great as well.
- silicone spatula - silicone spatulas are one of my most used tools. You could use a flipper to scramble your pancakes, but silicone spatulas are absolutely superior because they can stand up to heat, scoop and bend, and go in the dishwasher.
- sieve/strainer - for the perfect dusting of powdered sugar, you need a fine mesh strainer or sieve. It’s the difference between clumpy spooned on icing sugar and that ethereal, polished look of a light, even dusting. Any fine mesh strainer or sieve will do but I’m partial to this one which I also use for matcha.
Tips and tricks for scrambled pancakes
Use a mix of butter and oil
A mix of butter and oil with give you the best combination of flavor and browning. The oil prevents the butter from browning too quickly and the butter gives you a nice caramelized crust and flavor.Don’t use too much batter
Even though we’re making a scramble, it’s best to not fill the pan with batter. If you add too much pancake batter to the pan, it will be harder to brown the outsides of the pancake bits and thoroughly cook the insides. Instead, add the same amount of batter as you would when making a regular size pancake.Let the bottoms set
Letting the bottoms of the pancake set and slightly brown will give you larger pancake curds, which means your scrambled pancakes will be fluffier. Don’t immediately start scrambling the batter - unless you want tiny pancake bits for your scramble.Finish with butter
Once your pancake scramble is almost cooked through, if you want to add some extra flavor and you’re a fan of the crispy edges on pancakes, finish with butter. When the pancake scramble is kind of set but pale and not yet golden, add a generous pat of butter to the pan. When it melts, make sure all of the pancake scramble bits have a light coat of butter and continue to cook until the butter browns the edges of the pancake bits.Blackstone griddle scrambled pancakes
If you have a blackstone griddle, I’m jealous. Scrambled pancakes are absolutely the BEST thing to make on a griddle. Heat the grill to medium-high, make sure you have an adequate amount of butter or oil and then go ahead and pour out ALL of your pancake batter on the grill. Use your spatula to spread the batter out and flip and break up just like scrambled eggs. Because you have such a large surface, you can really make sure the pancake scramble cooks perfectly with crispy edges and fluffy middles.What to put on top of scrambled pancakes
I love a simple dusting of powdered sugar. At the table, berries such as strawberries, blueberries, and raspberries are a delicious add on. Freshly squeezed lemon juice and granulated sugar is stunning. Oh, and pure maple syrup is always a good thing.Are scrambled pancakes good?
Yes! I am happy to report that I was wrong to be put off by scrambled pancakes. It looked and felt wrong but it was so right. I think it depends on which photo slash video you saw first. I like my scrambled pancakes in larger curds, not tiny overly-cooked brown bits. Once you figure out your scrambled pancake preferences, I’m pretty sure you’ll love them too. To be honest, I’m not the best at flipping pancakes and if you’re anxious about that, scrambled pancakes are an absolute win. That’s it - happy scrambled pancake making! I never thought I would be into them but here we are. Am I going to be making scrambled pancakes over regular ones? Maybe no. Am I going to enjoy a bowl of scrambled pancakes now and again? Definitely, yes! They’re fun, spoonable, and a little quirky, why not!? xoxo stephMore viral-ish recipes to make
Scrambled Pancakes
They’re fun, spoonable, and a little quirky.
- 1 cup all purpose flour
- 1 tbsp sugar
- 1 tsp baking powder
- 1 tsp baking soda
- 1 large egg
- 1 cup buttermilk
- 1 tbsp butter (or oil for the pan, as needed)
In a large bowl or large liquid measuring cup, whisk together the flour, sugar, baking powder, and baking soda.
In a separate small bowl or liquid measuring cup, whisk together the egg and buttermilk, until the egg is completely incorporated.
Add the buttermilk-egg mix to the dry ingredients and use a fork to gently combine, making sure most of the large clumps of flour break up and incorporate. Some small lumps are okay and will help keep your pancake scramble fluffy. Let the batter sit and hydrate for 10 minutes.
Heat up a large non-stick pan over medium-high heat. Add just a touch of oil and a small amount of butter to the pan. When the butter and oil are hot, stir the pancake batter, then add a generous amount of the pancake batter to the pan.
Let the pancake sit for 20 to 30 seconds to form a slight crust, then use a silicone spatula to scoop under the pancake and fold it up over. Cut and push the batter around the pan, making large pancake curds.
Continue to cook the pancake scramble, flipping and shaking the pan as needed, until the outsides of the pancake scramble bits turn golden brown and the insides cook through. Remove from the pan, serve, and repeat with any remaining pancake batter.
Serve dusted with powdered sugar and desired toppings. Enjoy!

I Am... How to Make Crispy Air Fryer Roasted Brussels Sprouts
If you love deep fried Brussels sprouts, you’re going to love air fryer Brussels sprouts! I’ve been air frying ALL the things. I’m in love with that crispy crunchy texture that the air fryer gives vegetables. It’s funny because I thought our main use for the air fryer would be for frozen french fries, but more often than not we’ve been air frying vegetables. It’s been all vegetables, all the time. Okay, and chicken, because I’m obsessed with air fried chicken. Anyway, after the air fryer broccoli success, I knew the next vegetable I had to do was Brussels sprouts. I love how Brussels sprouts taste when roasted and I wanted to do a air fryer comparison. The result: crispy burnished leaves with tender sprouts. They’re not as soft when you air fry, unless you add extra time, but I really like vegetables with a bit of bite, so I don’t mind at all. I especially loved that I was able to have a vegan keto roasted Brussels sprout snack so quickly.
Why you should make Brussels sprouts in the air fryer
If you haven’t air fried Brussels sprouts yet, please do!- Air fryer Brussels sprouts are sweeter, crunchier, and more flavorful
- Air frying Brussels sprouts is so much faster than roasting
- You won’t heat up your whole house
- It saves energy because it’s a small appliance compared to an oven
- You don’t need a lot of oil
- You can season the sprouts in infinite ways
How to make the crispiest Brussels sprouts: air fryer edition
- Trim and halve the sprouts. Cutting the sprouts in half means the insides will get tender in a short amount of time. It’ll also give your sprouts more surface area and more crisp.
- Toss with oil. Toss with a bit of oil so the sprouts get a nice golden color and crisp up evenly. Season with salt and pepper.
- Air fry. Air fry, stopping every so often to give the air fryer basket a shake.
- Dress. While the sprouts are cooking, make a quick dressing. When the sprouts are done, toss in the dressing and enjoy immediately!
What are some sauces I can dress my brussels sprouts with?
I kept it simple and just enjoyed the sprouts as is, but you can make a sauce to dress the sprouts up. Dress them while they’re hot!- Garlic butter: mince 2 cloves of garlic and heat with 1-2 tbsp butter over low heat.
- Creamy dijon: whisk together 1 tbsp olive oil with 1-22 tsp dijon, and 1-2 tsp apple cider vinegar.
- Lemon dill butter: melt 1-2 tbsp butter over low heat and mix in 1 clove minced garlic with 1 tbsp freshly chopped dill and the zest of 1 lemon
- Balsamic butter: melt 1-2 tbsp butter and whisk with 1-2 teaspoons balsamic vinegar
- Honey mustard: whisk together 1 clove minced garlic with 1 tbsp honey and 1/2 tbsp whole grain mustard and olive oil
- Honey garlic: heat up 1-2 tbsps honey with 2 tsp soy sauce and 1 clove garlic. Read more
- Vietnamese fish sauce: whisk together 1 tbsp neutral oil with 1 tsp fish sauce, 1 clove garlic, 1 tsp sugar, and a pinch of pepper flakes. Read more
- Spicy chili oil: mix together 1 tbsp soy sauce with 1/2 tbsp Chinese chili oil and 1/2 tbsp rice vinegar. Read more
- Miso: wisk together 1 tbsp neutral oil with 1-2 tsp miso, 1 tsp rice vinegar, pinch of sugar
The best air fryer?
If you're wondering which air-fryer we have, it's this one. I don't know if it's the best on the market because it's the only one we've used, but it works great. It's quiet and easy to clean and really big (which is good because you can put a lot of food in it and bad because it takes up a lot of room in our place). Happy air-frying! xoxo stephAir Fryer Brussels Sprouts
Crispy air fryer Brussels sprouts in just minutes.
- air fryer
- 1/2 lb Brussels sprouts
- oil (or cooking spray)
- salt and freshly ground pepper
- 2-4 shallots (quartered, optional)
Prep your sprouts by washing and throughly drying. Trim the bottoms and cut in half.
Place the sprouts in the air fryer basket and lightly mist with cooking spray or toss with a small amount of oil. Season with salt and pepper. Add the shallots, if using.
Turn the air fryer on at 400°F for 5 minutes. Shake and flip the sprouts, then set it again for 5 minutes at 400°F. At this point the sprouts will be crisp and tender with some charred leaves. Remove from the basket and enjoy!

I Am... Instant Pot Chili
Instant pot chili is the way to go! Chili is one of those foods where everyone has a favorite style – it’s one of those regional things that people fight to the death over. Beans/no beans, vegetables/no vegetables, tomatoes/no tomatoes, ground meat or stew meat?! White chili, green chili, chicken chili, vegan chili, Cincinnati chili, serious competition chili, the list just goes on and on. I love cooking in the Instant Pot, especially soups and stews. The Instant Pot keeps all the delicious smells inside the pot, which means that the flavors stay in the food! Plus I love how quickly Instant Pot chili can come together (30 mins!) because sometimes I just don’t want to be waiting hours for a chili to stew. This version is extra special because it's somewhat based on Texas competition style chili, which means, no beans and two spice dumps. I think it's the best chili around. It's definitely worth the two spice dumps, and you can add beans if you need to.
How to make instant pot chili
- Cook the onion. Lightly sauté the onion in the Instant Pot insert with a bit of oil over high heat until soft, but not brown.
- Brown the meat. Add the ground beef the insert and brown, breaking up. Use a potato masher to help you break everything up. If there’s a lot of fat, drain most, but not all, of it off.
- Add the liquids and the first spice dump. Add in the tomatoes, tomato paste, and broth, along with the first spice dump then set the Instant Pot to high pressure for 30 minutes. Quick release when the Instant Pot is done.
- Add the second dump. Stir in the second dump of spices and simmer slightly on high to reduce if needed. Done!
Can I make instant pot chili in a crock pot or on the stove?
- For the crock pot: Use a skillet to brown the onions and meat, then add to the crock pot with the chicken stock, tomatoes, tomato paste, and first spice dump. Cook for 6-8 on low or 3-4 hours on high, stirring in chicken stock if the pot gets too dry. Stir in the second spice dump right before serving.
- For the stove: In a large pot, brown the onions and meat, then add to the crock pot with the chicken stock, tomatoes, tomato paste, and first spice dump. Bring to a simmer and cook, covered, for 1-2 hours, stirring occasionally, adding in chicken stock if the pot gets too dry. Stir in the second spice dump right before serving.
Chili powder vs chile powder
You might be wondering, what’s the difference between chili powder and chile powder, besides the “i” and the “e”:- Chili powder with an “i” is a blend of spices and ground up chile peppers to make chili stew that you can buy at the store.
- Chile powder with an “e” is ground up chile pepper (like ancho, cayenne, habanero, ghost, jalapeños, etc) and ideally nothing more.
Our chili powder recipe
- 1 tbsp green chile powder
- 1 tbsp Chimayo chile powder
- 2 teaspoons ancho chile powder
- 1 tsp smoked paprika
- 1 tsp dried Mexican oregano
- 1/2 tsp coriander
- 1 tsp black pepper
- 1 tsp garlic powder
- 1/4 ground bay leaf
- 1 tsp onion powder
- 1 tsp cumin
Chili spice dumps
You might notice that the spices are added twice: once at the beginning and one at the end. It's not just being finicky! Adding your chili spices, called “dumps” in the pro chili competition world, is usually done in two batches so you can get the maximum flavor notes and subtleties from the spices. Some spices will get muddled when cooked for too long, so adding them in at both the beginning and the end means you get the full flavors.What even is chili, anyway?
If you ask a Texan (and the International Chili Society) a real chili is “any kind of meat or combination of meats, cooked with red/green chili peppers, various spices and other ingredients, with the exception of beans and pasta which are strictly forbidden.” Yup, that’s right: no beans! When many people think chili, they often think of beans, but for me, I’m a Texas chili lover all the way. I love the pureness of Texas chili: perfectly seasoned, tender ground beef swimming in a pool of smoky, spicy, garlicky, roasty tomatoes and broth.Beans vs no beans
There’s a saying in Texas: If you know beans about chili, you know chili ain’t got no beans. That’s because the chili that we all know and love is an offshoot of chile con carne, which originated in Texas/Northern Mexico where it butts up against Texas. Traditionally, chile con carne is a spicy stew with meat and chile peppers and no beans. Nowadays, what we call chili is essentially a stew/soup made with meat (or not meat), beans, tomatoes (or no tomatoes), and spices, but if you want to stay true to the original, the beans are out.No beans about instant pot chili
This is a chili no beans recipe. Of course, if you love beans, feel free to add them in. Personally, I love the way Texas style chili tastes: hearty, meaty, heavily spiced but not spicy, just the right amount of heat, with a stick-to-your ribs feeling you just don’t get with chili with beans. If you've never tried chili with no beans, you owe it to yourself to try it today! Unless you're just in the mood for the bean-ful chili you know and love, which is totally ok too.How do I make chili less spicy?
This is an easy fix - you can still enjoy a super flavorful bowl of chili without the spiciness of chile powders. Just make your own chili powder seasoning and reduce (or leave out entirely) all the spicy chile powders!Tips to make the best instant pot chili
- Let your ground meat sit out at room temp for 15 minutes before cooking it. If you let it come to room temp before browning, less water will cook out during the browning process, making the outsides crisp and in the insides tender.
- Do two spice dumps: this makes sure that your chili is perfectly spiced without any muddled flavors
- Chili tastes more delicious the next day - it’s science! Resting your chili overnight melds and redistributes the flavors throughout and lets the chili thicken a bit.
- Toppings! Don’t forget the toppings because sometimes that’s the best part! I love crunchy Fritos, the freshness of green onions, sometimes a squeeze of lime, shredded cheddar, sour cream, cilantro, sliced jalapeños, and avocados. The chili you see above is orange because of all the sour cream in it and it's the best thing ever.
Instant Pot Chili
Maybe the best thing you could ever make in your Instant Pot
- instant pot
Instant Pot Chili
- 1 tbsp oil
- 1/2 cup medium onion (diced)
- 1 lb ground beef (lean preferred)
- 14 oz crushed tomatoes (one small can)
- 6 oz tomato paste (one small can)
- 1 cup chicken stock (no sodium preferred)
- 1 bay leaf
Spice Dump 1
- 1 tbsp chili powder (store bought or our mix above)
- 1 tsp onion powder
- 1 tsp garlic powder
- 1/2 tsp smoked paprika
- 1/4 tsp ground cayenne pepper
- 1/4 tsp black pepper
Spice Dump 2
- 2 tbsp chili powder (store bought or our mix above)
- 2 tsp ground cumin
- 2 tsp onion powder
- 2 tsp garlic powder
- 1/4 tsp ground cayenne pepper
- 1 tbsp hatch chile powder (optional)
Add the oil to the Instant Pot on saute high. When hot, add the onion and cook, stirring, until soft, but not brown. Add the meat along with salt and pepper (to your preference) to the pot and cook, breaking up. You can use a potato masher to help break up all the meat. Cook just until the beef breaks up and the meat is no longer pink.
Stir in the crushed tomatoes, tomato paste, chicken stock, bay leaf, and first spice dump. Put the lid on, set the pressure to high and cook time to 30 minutes. Quick release the pressure when cooking time is completed.
Give the chili a stir, and add in the second spice dump, tasting and adjusting with salt and pepper as needed. Enjoy!
For the crock pot: Use a skillet to brown the onions and seasoned meat, then add to the crock pot with the chicken stock, tomatoes, tomato paste, and first spice dump. Cook for 6-8 on low or 3-4 hours on high. Stir in the second spice dump right before serving.
For the stove: In a large pot, brown the onions and seasoned meat, then add to the crock pot with the chicken stock, tomatoes, tomato paste, and first spice dump. Bring to a simmer and cook, covered, for 1-2 hours, stirring occasionally. Stir in the second spice dump right before serving.

I Am... Egg Fried Rice
Egg fried rice is my favorite. It’s kind of silly, because it’s the most basic of all fried rice, but there’s something about eggs and rice that just go together. Egg fried rice is delicious in it’s simplicity: soft scrambled eggs, perfectly crisp and fluffy rice, all accented by aromatic green onions. I season my egg fried rice with garlic and ginger and just a hint of white pepper. Simple comfort food at it’s best! I could eat egg fried rice all day everyday and never tire of it. If you love egg fried rice too, read on for all the tips and tricks to making the best egg fried rice of your life.
How to make egg fried rice
- Prep all the ingredients. Because fried rice is about speed cooking on high heat, it's helpful to have everything prepped and ready to go. Slice up the green onions in one bowl, lightly beat the eggs in another, and make a simple seasoning in a last bowl (more on that below).
- Season your rice. See below for my specific seasoning mix. Stirring the seasoning mix into cold rice has several benefits. It seasons the rice, breaks it up so that all the grains are separate, and hydrates everything so you don’t have dry rice kernels. The heat of frying the rice evaporates the chicken stock and you’re left with flavor coating each rice grain. The oil in the seasoning mix also helps you not use as much oil when frying. It’s genius! I can say that because Mike invented it. I love this method so much. Trust me, it works!
- Fry. Heat up a bit of oil in a wok and add the whites and light green parts of your green onions. Stir briefly then add the lightly beaten eggs. You want to fry your eggs so that they’re just set. When they’re done, remove them from the wok.
- Crisp. Add a tiny bit more oil, turn the heat on high and add all the rice and cook, stirring occasionally until the rice is hot, toasty, and crisp. You don’t need to move the rice around too much, the goal is to let it crisp up. When it’s hot and toasty, add the eggs back in and mix everything up. Stir in the green parts of the green onion and it’s time to eat!
Egg fried rice seasoning
I mix up a bit of chicken stock (you can use water if you don’t eat chicken) with oil, garlic power, ginger powder, salt, white pepper, and a bit of sugar. Using garlic and ginger powder gives you all the flavor without chopping or tiny bits. I love garlic and ginger powder because it’s simply garlic and ginger, dehydrated and ground up.The right kind of rice
You'll hear that good fried rice is made with day old rice, and that's certainly one way to do it, but most Chinese restaurants don't have time or fridge space for that. What they do is make rice on the drier side (1:1 water to rice ratio) and spread it out on a baking sheet to dry it quickly. You can also fry the rice in the wok on low at first to dry out the rice before turning up the heat to crisp it. This is a more traditional Japanese method, and it's the method we use at home.Egg fried rice ingredients
- rice: cold, day old rice is best, but if you have to use fresh rice because you’re desperate, you can do it: be sure to spread it out and try to cool it down so it’s not hot and steamy. More on what kind of rice you want below.
- eggs: this is an ultra luxurious egg fried rice with a 1 cup of rice to 1 egg ratio. You can use less egg if you like but the fluffy eggs are the best part!
- green onions: Slice up two big bunches of green onions, keeping the greens and whites/light green parts separate.
- seasoning: We’ll be using chicken stock, ginger, garlic, and white pepper to season. There’s also just the tiniest bit of sugar - it adds contrast and accents the rice so you get the barest hint of sweetness. Note: if you don’t eat chicken, you can use a bit of water with an extra pinch of salt.
What kind of rice do I use for fried rice?
To be honest, you can use any kind of rice for fried rice! At home we mostly use Koshihikari or Kokuho Rose, but growing up, fried rice was day old jasmine rice. Now, I totally prefer fried rice made from Japanese rice. The kernels are so plump and chewy. If you haven’t tried it, please do, it’s a whole new world of fried rice, especially if you’re looking to make a Din Tai Fung fried rice copycat. Din Tai Fung uses Nishiki rice, a Californian grown medium grain rice that is super similar to Kokuho Rose or Calrose.Do I need a wok for fried rice?
The answer is yes and no. You don’t need a wok, but if you have one, use it. A wok, with its different heat zones, due to its cute round shape, is ideal for frying and tossing, perfect for fried rice. If you use a wok, you’re going to get some wok hei, that essential smokey essence you get when you get when you use a wok over hot heat. Chinese people are crazy about wok hei, which means “wok breath” and if you want that authentic fried rice flavor, a wok is how you’re going to get it. A good carbon steel wok is usually not too expensive and will last you a lifetime. If you have a gas stove, you’ll want a wok that is perfectly round on the bottom. If you are on electric or induction, you need to get a flat-bottomed wok. In either case, it’s best to get a pre-seasoned one so you don’t need to remove the handle and season it yourself. If you don’t have a wok, using a cast iron or non-stick pan is perfectly acceptable, just make sure it it’s big enough and remember that with non-stick, don’t turn up the heat as much. Of the multiple kinds of non-stick pans out there, a ceramic/non-teflon coating is your best bet.How much oil do I need for fried rice?
If you want delicious, restaurant quality fried rice, you’re going to need oil. Hot oil helps the rice move around and distributes heat and flavor. Fried rice shouldn’t be oily, but it does have oil in it! Having said that, please don’t go overboard, no one likes super oily fried rice.What to add to egg fried rice
I love the simplicity of egg fried rice, but the beauty of it is that you can essentially add anything to it to customize it for your very own. Go the classic Din Tai Fung route and top with with some plump and juicy shrimp, or add in cubes of bbq pork, or diced chicken. Pictured: ham and egg fried rice.What to serve with egg fried rice
- green and crisp garlicky gailan
- quick and easy homemade char siu
- home style classic Chinese tomato eggs
- juicy Taiwanese popcorn chicken
Egg Fried Rice
If you love egg fried rice, read on for all the tips and tricks to making the best egg fried rice of your life.
- Wok
- 1/4 cup chicken stock (no sodium preferred)
- 1 tsp salt
- 2 tsp ground ginger
- 2 tsp garlic powder
- 1/2 tsp ground white pepper (optional)
- 1/2 tsp sugar
- 4 tbsp neutral oil (divided)
- 2 bunches green onions (sliced)
- 6 large eggs (lightly beaten)
- 6 cup rice (cooked, day old jasmine preferred)
In a small bowl or liquid measuring cup, whisk together the chicken stock, salt, ground ginger, garlic powder, white pepper, sugar, and 1 tablespoon oil. Mix the sauce into the cold rice, breaking up the rice, until you coat all the the grains of rice. Set aside.
In a bowl, whisk together the eggs with a pinch of salt.
Heat up 1 tbsp of oil in a wok or frying pan and add the white parts of the green onion, and fry for 30 seconds.
Add the eggs to the hot wok and scrabble the eggs until mostly set, but slightly runny. Remove from the word and set aside.
Heat up 1 tablespoon of oil to the wok and add the rice, stirring occasionally, until the rice is crispy and hot.
Add the eggs back into the wok, mixing and breaking up so everything is evenly distributed.
Add the remaining green onions, toss, and enjoy hot!

I Am... Elote (Mexican Street Corn) Recipe
If you love corn, you’ll fall in love with elote: grilled corn on the cob smothered with mayo and topped with cheese, lime, and chile. It’s smoky, sweet, creamy, tangy, corny deliciousness. It’s fresh corn season! I keep seeing buckets of fresh corn for sale and when I do, I can’t resist making elote. I love, love, love street food at home and elote is no exception. It’s easy to make and so worth it. Let’s do it!
What is elote?
Elote, aka Mexican street corn, is a way of preparing corn on the cob. Fresh ears of char-grilled corn covered in mayo or crema (a type of Mexican sour cream) and then topped with cotija (Mexican cheese), chile, and a generous squeeze of lime. It’s the perfect snack or BBQ grilling side dish.How to make elote
- Grill - Griller’s choice: husked or unhusked, it’s up to you. Grill the cobs over hot until the corn starts to char and the kernels are juicy, sweet, and almost bursting.
- Mix - Make the sauce by mixing mayo or creama with lime juice and lime zest.
- Slather - When the corn is ready, generously slather each ear with the sauce.
- Dust - Cover the smothered ears of corn with cotija, chopped cilantro, and a sprinkle of chile powder.
- Serve - Enjoy immediately with any extra sauce and toppings on the side.
Elote ingredients
Now that you know what it is, it’s time to make it. Here’s what you’ll need:- corn on the cob - fresh sweet corn, best from May through September. The sweetness and crunch of corn work beautifully with the tangy, savory, spicy flavors.
- mayo or crema - this is what’s going to give your elote richness and flavor. Both mayo and crema are popular for elote, but mayo is more of a common fridge item. That being said, crema, or Mexican sour cream, is delicious! It’s a slightly thick, drizzlable tangy sauce that tastes a little like sour cream.
- limes - use the whole lime! The zest adds a delightful zing and squeezes of fresh lime juice bring everything together.
- chile powder - spicy, sweet, and just a little heat. Use your favorite chile powder. Chile powder will give you smokiness and heat. That is, don’t use a chili spice mix, but ground up chile peppers. We like chipotle chile powder, ancho chile powder, or even Tajin. Usually, we go with chile powder so we can control the salt content ourselves, but you can also try Trader Joe’s Everything but the Elote seasoning blend or other seasoning blends.
- cotija cheese - crumbly, salty, a little bit firm, there’s nothing quite like cotija, a Mexican cheese. Made from cow’s milk, it comes in young or aged and the difference is mild with more moisture and dryer and firmer. You can usually find it in the cheese area. If you can’t, a passable substitute is parmesan.
- cilantro - fresh cilantro adds a nice herby-ness and aroma.
How to choose the best corn on the cob
Look for cobs with bright green, tightly wrapped, slightly damp husks. The little fluff at the top, called a corn silk tassel should be a golden light color with silky, distinct strands. When you gently squeeze the cob, it should feel firm and plump.What kind of cheese for elote?
The gold standard for elote is cotija, a firmish white Mexican cheese that’s mild and salty. It comes both young and aged and both are delicious, with the younger being a bit more mild and the aged having more flavor. If you can’t find cotija, you can also go with queso fresco, which is mild and milkier. If you don’t have access to either, parm or mild feta is delicious as well.What kind of chile powder for elote?
In Mexico, they typically use chile pequin. Pequin peppers are tiny and cute but pack a punch. For the powder, dry pequin are ground into powder. It’s citrusy and nutty, smoky and spicy. You can find it online in Mexican grocery stores, or sometimes in the international aisle.Do you need to cook corn before grilling?
Nope! You can eat fresh corn raw. Of course, just because you can, doesn’t mean you should. That being said, you don’t need to cook corn before grilling. If you’re wondering why we are grilling corn if you can eat it raw, it’s because corn tastes even better cooked. Grilling makes the corn sweet and tender while adding smokiness.Can you make elote without a grill?
Yep! You can simply boil, steam or microwave your corn and skip out on the grilling. Your corn won’t have a signature smoky grilled flavor but it will still be delicious. You can also grill/char corn on a grill pan or in a frying pan on the stove. Simply heat a frying pan or grill pan over medium-high and cook, turning the cobs, until slightly charred.Elote in a cup
Most corn-on-the-cob eaters know the pain of corn floss. No more! Elote in a cup aka esquites has all the deliciousness of on the cob without the pesky undignified gnawing. Elote en vaso or corn in a cup is super popular. Little cups of steaming hot corn dressed with lime, creama, cheese, and spice spooned up and sold on the streets of Mexico. Simply cut the corn off the cob before dressing it and you’ll have corn floss no more.How to cut corn off the cob
I like laying corn flat on a cutting board and cutting. The kernels stay intact and it’s not at all messy. I think it’s the safest way to cut corn off the cob.- Place the ear of corn flat on a cutting board
- Use a chef’s knife along one side of the ear of corn and cut off the kernels.
- Flip the flat side so it’s on the surface of the cutting board and is stable. Cut off another side, flip and continue until all the corn is off the cob.
- That’s it! Hope you get a chance to enjoy some elotes this summer! I’ll be enjoying mine out of a bowl (not a cup, a cup is too small) to avoid cornfloss.
Elote (Mexican Street Corn)
- 4 ears corn
- 1/4 cup Mexican crema (or mayo)
- 1 lime (zested and juiced)
- 1/3 cup cotija cheese (crumbled, about 3oz)
- 2 tbsp cilantro (chopped)
- 1/2 tsp chile powder (or to taste)
Shuck the corn, removing the husks (or leaving them on if desired). Grill over high to medium-high, flipping as needed, until tender and charred, about 8-10 minutes.
Mix the mayo and crema together with the lime juice and zest.
Remove the charred, cooked corn from the grill. Brush or generously spoon on the sauce then top with cotija, cilantro, and chile powder to taste.
Enjoy!

I Am... Crunchwrap
A do-it-yourself homemade crunchwrap supreme is the ultimate cheat day eat. Imagine an extra large flour tortilla topped with seasoned ground beef, melty nacho cheese, a crispy tostada shell, freshly shredded lettuce, ripe tomatoes, and cool sour cream, folded up and grilled. It’s a Taco Bell classic and it’s one of my favorite things to make and eat. I love Taco Bell. But if I’m being honest, I also love making things at home because, I dunno, it gives my life some sort of semblance of being grown up? Somehow, making dinner from scratch just feels good. It's certainly got to be healthier!
What is a crunchwrap supreme
It’s the best combination ever of crunchy and soft, savory and fresh. It’s basically a flattened burrito with a crispy crunchy tostada core. There’s seasoned beef, nacho cheese, a giant crunchy corn chip, lettuce, tomatoes, and sour cream all tucked into a flour tortilla that’s grilled. It’s SO GOOD. It’s definitely one of my guilty pleasures. Making it at home makes it not-so-guilty because, everything’s healthier when you make it at home, right? Even if you eat three of them?!A crunchy secret
The secret ingredient in a crunchwrap is the crunch. Crunchy things make you want to keep taking bite after bite and the crunch inside a crunchwrap is no exception. The crunch in a crunchwrap is a tostada, similar to a giant round tortilla chip.How to make a crunchwrap supreme
- Prep. Get all your ingredients ready. You’ll need to cook up some taco seasoned beef, make or buy nacho cheese (I bought mine), shred some lettuce, and chop some tomatoes.
- Layer. Lay a giant flour tortilla on a flat surface. Place a scoop of seasoned beef into the middle and spoon on some warm nacho cheese. Place a tostada on top and layer on sour cream, then shredded lettuce, tomatoes, and shredded cheese.
- Fold. Fold the sides of the flour tortilla up and over the filling, making a hexagon.
- Grill. Place the crunchwrap on a non-stick pan and grill until toasted, flipping once.
- Enjoy. That’s it! Enjoy your homemade crunchwrap!
How to fold a crunchwrap supreme
The end shape of a crunchwrap is a hexagon, with six sides. Take an edge of the tortilla and fold it down on to the fillings. Use one hand to hold it down in place and use your other hand to lift and fold another edge of the tortilla over the filling. Continue folding and holding until you make 6 folds, then flip the crunchwrap, seam side down onto a non-stick frying pan and lightly grill over medium heat.Ingredients
- Extra large flour tortilla. The larger your tortilla, the easier it will be to fold your crunchwrap. Go for the XL burrito size tortillas, at least 12 inches.
- Seasoned ground beef. You can use a handy seasoning packet – they even sell Taco Bell branded ones, but I’ve included a recipe that you can easily make at home with pantry spices.
- Nacho cheese. The gooey nacho cheese is a signature in a crunchwrap. If you don’t have have nacho cheese and don’t want to make it, you can used shredded. They sell nacho cheese at the store but if you want to go all out and make queso, here’s a recipe. Pro tip: keep some extra around for dipping.
- Tostada. They sell tostadas right next to the tortillas. They look like crispy fried corn tortillas because that’s what they are. You can also fry up small corn tortillas if you don’t want to buy tostadas.
- Sour cream. Sour cream is pretty self explanatory. You can also sub greek yogurt if you’re looking to be a bit healthier.
- Lettuce. I like green leaf lettuce but any shredded lettuce will do.
- Tomatoes. diced tomatoes add sweetness and juiciness.
- Shredded cheese. the shredded cheese is a bit over the top considering there’s nacho cheese, which is why Taco Bell doesn’t actually have a shredded cheese layer. But more cheese = more better!
What is a tostada?
A tostada is a small corn tortilla that’s been fried, baked, or grilled so it has a crispy crunchy texture like a tortilla chip.How to make tostadas at home
Add a bit of oil to a frying pan and heat it up over medium heat. Add a corn tortilla and fry it, until it sizzles and turns golden brown, flipping as needed. Let it cool and drain. It will become crisp and crunchy after it cools down.FAQ
What size tortillas do I need for crunchwrap supremes?
The bigger the better! An extra large tortilla, at least 12 inches in size will make it easier for you to fold up and over the fillings.What if I can’t find extra large tortillas?
If you can’t find giant flour tortillas, grab the biggest ones you can find. Get a second pack of the smallest flour tortillas. Assemble your crunch wrap and in the middle, on top of the fillings, place a small flour tortilla on top and fold the original tortilla over the fillings covered with the tortilla.What can I put inside a crunchwrap?
Absolutely anything. If you’re a fan of chicken, pork, or turkey, you can use those instead of ground beef. You can even make crunchwraps with carnitas, barbacoa, chicken tinga, al pastor, the list goes on. If you’re vegetarian you can use beans, refried beans, or tofu.Other crunchy things to add to a crunchwrap
- doritos
- flaming hot cheetos
- takis
The crunchwrap hack
Try the tiktok wrap hack if you want a slightly different (and easier) way to fold your crunchwrap. Both are good! Happy Crunching!Crunchwrap Supreme
The ultimate cheat day eat
Taco Seasoning
- 2 tsp chili powder
- 2 tsp ground cumin
- 2 tsp onion powder
- 2 tsp garlic powder
- 1 tsp paprika
- 1/4 tsp cayenne (optional)
Crunchwrap
- 1 lb ground beef (lean preferred)
- 1/2 cup tomato sauce
- 1/2 cup nacho cheese (warmed)
- 6 flour tortillas (extra large/12"/burrito sized preferred, see notes)
- 6 tostadas (or street sized corn tortillas fried until crispy)
- 1/2 cup sour cream
- 2 cup lettuce (shredded)
- 1 cup tomato (diced, about 1 large hot house )
- 1 cup cheese (shredded, Tex Mex blend preferred)
Brown the beef in a frying pan over medium high heat, breaking up, until browned and cooked through. Add the spices, tomato sauce, and 1/4 cup water. Simmer until slightly reduced but still saucy. Taste and season with salt and pepper. Set aside.
Lay out a large flour tortilla and place a scoop of the taco beef into the middle, about the size of the tostada. Scoop a generous amount of warmed nacho cheese over the beef.
Place the tostada shell on top of the beef. Spread some sour cream on top of the tostada.
Top with shredded lettuce, diced tomatoes, and shredded cheese.
Tightly fold the edges of the tortilla up and over the filling. Repeat 5 times so you have six folds and the crunchwrap is a hexagon.
Heat up 1 tsp of oil in a non-stick pan over medium heat. Add the crunchwrap, seam side down and grill until golden brown. Flip and brown the second side. Remove from the pan, slice in half and enjoy!
If you’re not using extra large tortillas, place a extra tortilla in the middle on top of the filling before folding.
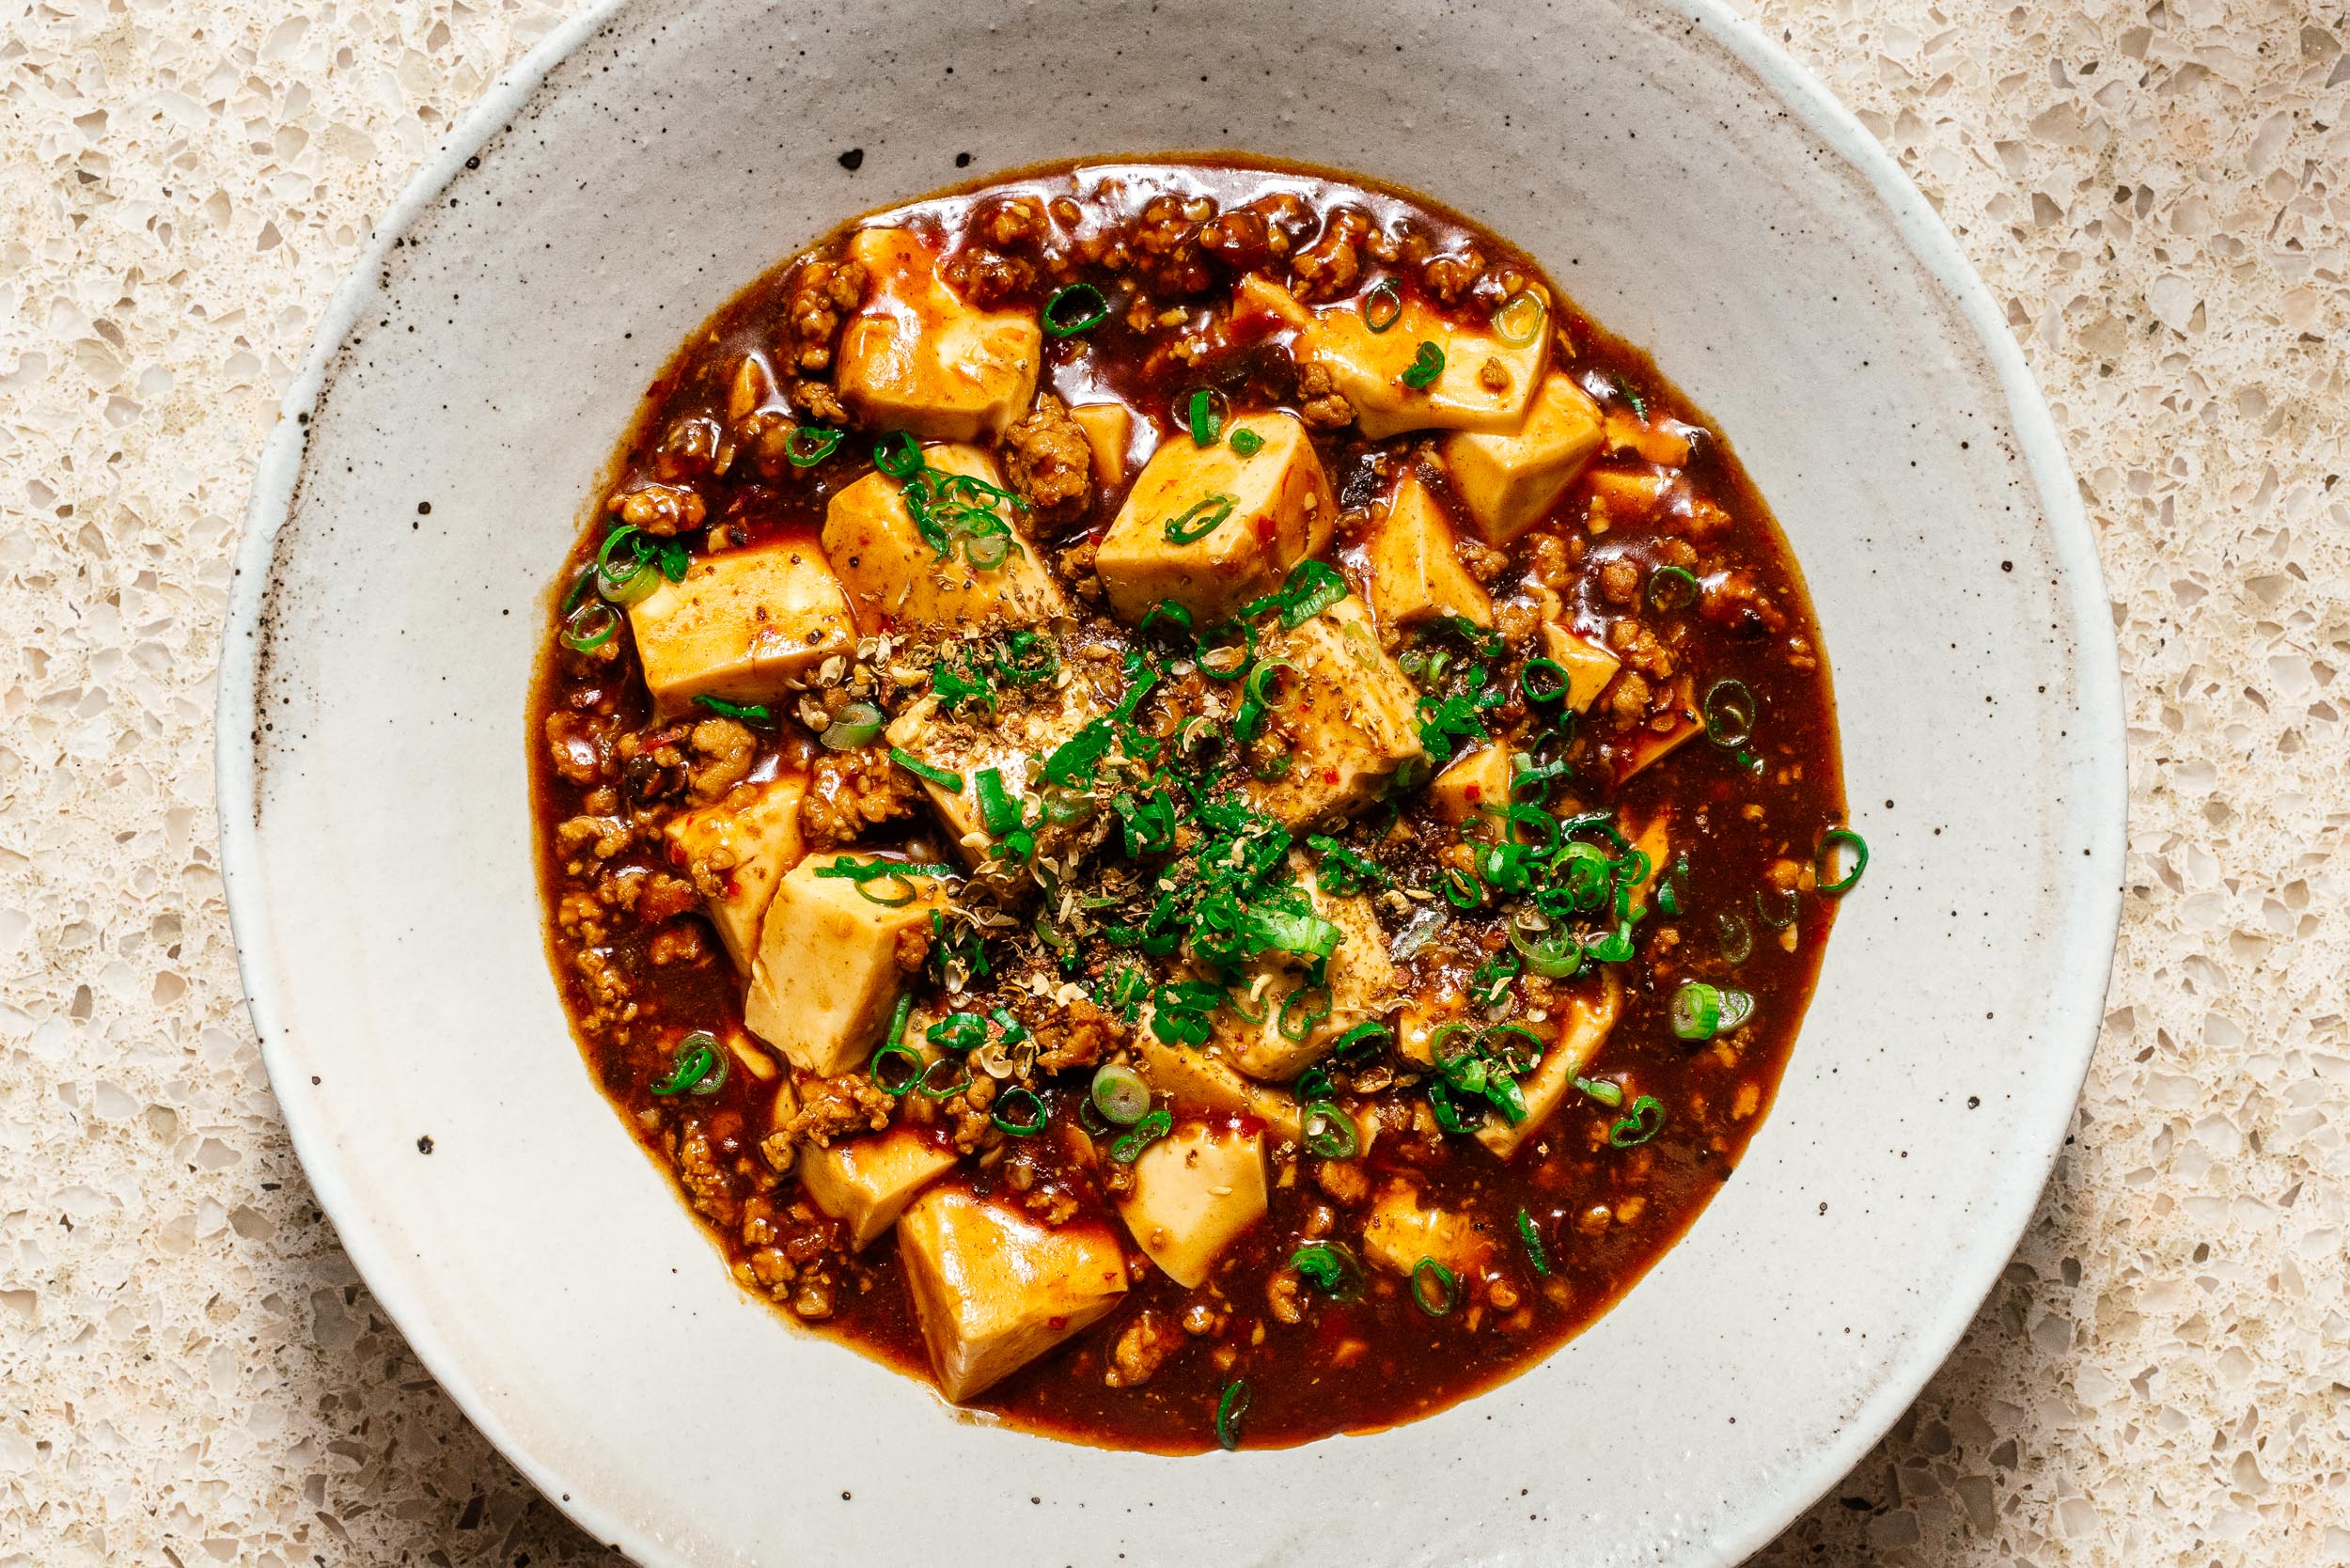
I Am... Mapo Tofu
I'm addicted to the magical combination of silky soft tofu and saucy spicy pork. If you're in the know, you know what I'm talking about: mapo tofu.
What is mapo tofu?
Mapo tofu is a famous Sichuan tofu dish that has plenty of mala, the signature numbing spiciness of good Sichuan food. If you haven’t had Sichuan food before, you might be scared of its fire-y red color, but once you get past that heat, you’ll be coming back for more! If you love tofu and you love spicy, you’re going to love mapo tofu too. And, if you’re not so big on spicy, the good thing about this dish is that you can adjust the spiciness level by altering how big of a pinch of Sichuan pepper you finish it with. If you’re not familiar with it, here’s a quick breakdown: mapo tofu is a super popular Chinese dish from the Sichuan province. It has soft tofu in a spicy bright red sauce with a bit of ground pork. The name of the dish roughly translates to “pockmarked grandma’s tofu,” kind of like old grandma’s tofu. There are lots of mapo tofus out there but this is a traditional, authentic mapo tofu recipe.How to make mapo tofu
Once you have your ingredients in hand, it’s a pretty simple recipe. You start off by blanching your tofu in salty water. Then, it’s just a question of frying the pork and doubanjiang, adding some chicken stock and thickening it up. Frying the doubanjiang and releasing the oils is what makes everything super tasty and fragrant. The sauce gets a bit of thickening up with cornstarch and everything is glossy and golden and clings perfectly to your tofu cubes. It’s a match made in heaven for rice.- Blanch the tofu. Gently simmer the tofu over low heat in salted water, then remove the pot from the heat and let it hang out in its salty bath.
- Fry. Brown the pork so it crisps up a bit then add the doubanjiang and fry it so that the heat releases its spicy red oils. Stir in the garlic and ginger.
- Sauce. Add the chicken stock and soy sauce and bring everything up to a bubble. Add the drained tofu cubes and stir in a cornstarch slurry. Simmer until the sauce is thick and gloss then you’re ready!
Key Ingredients
There are two key ingredients to this tofu: chili bean paste (doubanjiang) and Sichuan peppercorns. You can find both of them at your local Asian grocery store. The other ingredients are pretty standard fare.- Doubanjiang. Sometimes, with authentic recipes, there’s that one ingredient that you have to search far and wide for. You’ll be searching the aisles wondering, is this worth it? I’m here to tell you that it is! Doubanjiang is a spicy fermented mix of soy and broad beans. It’s been called the soul of Sichuan cooking and it’s what will give your mapo tofu that glorious red hue. When shopping, you want to look for the Pixian (an area in China) variety if you can. It’s kind of like how, if you can, you want to buy champagne from the Champagne region in France. But, like champagne, if you can only find sparkling wine, don’t sweat it, Lee Kum Kee also sells a serviceable easier to find Cantonese style doubanjiang that they call chili bean sauce/toban djan. You can also always find it online. Read more about doubanjiang here.
- Sichuan peppercorns. In regards to Sichuan peppercorns, you can buy pre-ground Sichuan peppercorn powder, but if they’re available, go for whole Sichuan peppercorns and toast and grind them yourself. The spice will be much more fresh and apparent if you do.
- Soft tofu. Soft tofu is key to authentic mapo tofu. The tofu should be smooth, creamy, and soft.
- Ground pork. There’s just a bit of ground pork in this dish, just enough to compliment the tofu.
- Ginger and garlic. Ginger and garlic add a punch of aromatics.
- Chicken stock. Chicken stock is what makes up the bulk of the sauce.
- Cornstarch. We’ll use cornstarch as a thickener to make the sauce silky and smooth.
- Soy sauce. Just a touch of soy for some extra umami.
What does mapo tofu taste like?
Mapo tofu tastes spicy: both conventionally spicy with heat on your tongue, and málà, a numbing kind of spicy that is characteristic of Sichuan food. The sauce is pleasingly oily, which ampliflies the spiciness and flavor. It also has a deeply savoriness to it thanks to the umami from the doubanjiang. Also key is the texture play mapo tofu has going on: the silky creaminess from the soft tofu coats your tongue and the crispy-ish bits of pork add a pleasing contrast to the overall softness and sauciness of the dish. Mapo tofu is soul food and maybe the best comfort food out there, especially when paired with perfectly fluffy rice.How spicy is mapo tofu
The pleasant numbing spice of mapo tofu comes from Sichuan peppercorns, which have a pleasant numbing effect which makes it so you can eat more and more spice until you realize that you’re entirely spiced out. It’s called “málà” in Chinese and is prized in Sichuan cooking. Málà literally means numbing (ma 麻) hot/spicy (la 辣). Spicy hot fiends love Sichuan peppercorns because they’re fragrant and have a specific flavor. Warning: Sichuan peppercorns are very spicy. If you have high quality or fresh peppercorns, they're more numbing and powerful. In this recipe, we’re not going to cook the peppercorns because they have a tendency to get over toasted if you’re not careful and can lead to bitterness. Instead, you’ll finish your dish off with a generous sprinkling, which is perfect for adjusting spice levels right at the table.On tofu
I have to say, the most frequently asked questions about mapo tofu are of the following variety: What kind of tofu for mapo tofu? Can you use firm tofu in mapo tofu? It seems like everyone needs to know: which tofu is it? Lots of recipes out there say you can use firm or medium tofu and of course, you can, but if you’re going for an authentic mapo tofu, go for soft tofu. The tofu should be smooth and jiggly and almost break apart the moment your chopsticks touch them. I think a lot of recipes recommend firm or medium firm tofu because soft tofu is notoriously difficult to work with. But I believe in you. Do the soft tofu. It’s worth it! Pro tip: to help your tofu stay together when you toss it into the sauce, blanch it. To blanch tofu: simply place in just simmered salted water for a couple of minutes and let it sit. Blanching tofu in salted water will season it and help firm it up. The tofu will become even more creamy and supple while retaining its shape when you mix it into the mapo sauce. It also has the bonus of making the tofu warm so that you don’t have to heat it up as much in the sauce.Can mapo tofu be vegetarian/vegan?
Yes! You can skip out on the ground pork and it will be vegan. If you have some dried shiitake mushrooms on hand, soak them, drain them, chop them up and give them a fry in place of the pork. Switch the chicken stock out for vegetable stock.What do you eat mapo tofu with?
Traditionally mapo tofu is served with rice. You can also have mapo tofu with noodles (or zoodles), bread, you name it. Essentially it goes with any carb. We’ve even made mapo tofu pizza and mapo tofu poutine. And of course, it goes great with wonton. [caption id="attachment_26331" align="alignnone" width="1450"] Tastes good on zoodles too![/caption]Frequently asked questions
- Can I make this vegan/vegetarian? Easily! Just substitute in finely diced mushrooms for the ground pork. The ground pork isn’t really the star of the show, so using rehydrated shiitakes or even button mushrooms works at adding umami.
- Substitutes for doubanjiang To be honest, if you’re looking to make an authentic mapo tofu you can’t skip out on the doubanjiang. If you don’t want to order doubanjiang online (buy this brand: Pixian broad bean paste)
- Substitutes for Sichuan peppercorns There are no substitutes for the málà of Sichuan peppercorns. If you’re spice adverse, you can definitely leave them out. Between doubanjiang and Sichuan peppercorns, doubanjiang is infinitely more necessary.
- Substitutes for ground pork If you want to use another ground meat, that’s perfectly alright. Ground chicken or turkey or even ground beef (make sure to use a slightly fattier percentage) will all work.
- How do I make mapo tofu not spicy? Reduce the amount of doubanjiang to 1/2 tbsp and leave out the Sichuan peppercorns.
Mapo Tofu
You might be scared of it’s fire-y red color, but once you get past that fear of heat, you’ll be coming back for more, more, more.
- 14 oz soft tofu (1 block)
- 1 tbsp oil
- 1/4 lb ground pork
- 1.5 tbsp doubanjiang (chopped)
- 2 cloves garlic (minced)
- 2 tsp ginger (grated or finely chopped)
- 1 cup chicken stock (sodium free/unsalted preferred)
- 1 tbsp soy sauce
- 1 tbsp cornstarch (whisked into 2 tbsp water)
- 1/2 tsp ground sichuan pepper (or to taste)
- green onions (thinly sliced, to finish)
Cut the tofu into small cubes and set aside. Bring a pot of water to a boil and add a pinch of salt. Turn the heat down to a simmer then add the tofu and cook for 2 minutes. Remove from the heat and let soak in the salted water while you prepare the rest of the dish.
In a wok, heat up the oil over medium heat. Add the pork and cook, breaking up, until the fat renders out and the pork is cooked through. Turn down the heat and add the doubanjiang and cook, stirring, until the oils release from the doubanjiang and everything looks bright red.
Stir in the garlic and ginger and cook for 1 minute. Add the stock and soy sauce and bring the heat up so everything comes up to a simmer.
Drain the tofu and add it to the wok, pushing it around gently so you don’t break it. Stir in the cornstarch slurry and bring up to a gentle simmer, until the sauce is thick and glossy, about 1 minute.
Turn off the heat and scoop the tofu with sauce into a serving dish. Finish with a sprinkle of ground Sichuan peppercorn and sliced green onions.

I Am... Buldak Carbonara
Creamy, spicy, addictive ramen, in less than five minutes - buldak carbonara is the perfect mix of carbs, spicy, and sauce goodness. If you’re a fan of ramen, you’ve probably heard of Samyang Instant Ramen. They’re the Korean company that makes instant ramen classics like Buldak Hot Chicken, Buldak Hot Chicken with Cheese, and, of course, Buldak Hot Chicken Carbonara. I love instant ramen. I love it a lot. But I definitely don’t love it as much as that little girl who cried tears of joy when she received a 5 pack of spicy buldak carbonara for her birthday. She was so incredibly happy and grateful and it just warmed my heart. It also made me wonder, how the heck is her spice tolerance so high? Because even though buldak carbonara isn’t as spicy as the regular hot chicken buldak, it is still pretty darn spicy! If you’re not instant ramen obsessed, you might be wondering what the heck is buldak carbonara. It’s gone pretty viral on TikTok because it’s creamy, glossy, and delicious-looking. It also happens to be pretty darn spicy and people like watching people when they eat spicy things - just look at how amazingly popular Hot Ones is! Side note, that Hot Ones episode with Sydney Sweeney 🥵.
What is buldak carbonara?
Buldak carbonara is a flavor of instant ramen from Samyang. It’s part of a ramen line that features super hot-n-spicy ramens. The buldak carbonara flavor comes in a pink pouch with a cute drawing of a hot chicken on it. I think the pink denotes the fact that it’s less spicy than the fire red 2x spicy buldak. Essentially, it’s a hot and spicy chicken ramen but with a carbonara-inspired sauce that is creamy thanks to the extra little packet of cheese.How to make homemade buldak carbonara
If you don’t have access to Samyang buldak carbonara and are craving it hard, you can make your own at home! I’ve heard that the carbonara flavor is sold out a lot, but thankfully there’s a homemade hack!- Gather. Start by gathering your ingredients. It’s not as simple as opening a pack of buldak carbonara, but you gotta do what you’ve got to do. You’ll need some ramen noodles, gochujang, soy sauce, sugar, chicken boullion powder, garlic powder, black pepper, 1 egg yolk, milk powder, and freshly grated parmesan.
- Mix. Add gochujang, soy sauce, sugar, chicken boullion powder, garlic powder, pepper, milk powder, parmesan, and one egg yolk to a bowl. Whisk until everything comes together, then set aside.
- Cook. Bring a pot of water up to a boil and cook your noodles of choice according to the package ingredients. Save 1/2 cup of the hot noodle water then drain your noodles.
- Stir. Add 1/4 cup of the hot noodle water to the bowl with your sauce mix. Whisk it all up until it’s smooth.
- Toss. Add the sauce into the pot that has the noodles and mix and toss until the sauce is glossy and coats and clings to the noodles, adding hot noodle water, bit by bit if needed to loosen the sauce. When the noodles are nice and saucy, remove from the heat.
- Enjoy. Scoop your noodles out into a bowl or eat them straight from the pot, no side eye here! Time to get your spicy on!
Buldak carbonara ingredients
For homemade buldak carbonara, you need all the regular ingredients in buldak sauce, plus:- milk powder - milk powder is amazing. If you haven’t tried it, it’s one of those not-so-hard to get ingredients that is a solid pantry staple. You can find it in the baking aisle sold in bags. Milk powder is milk that has been dehydrated and powdered for shelf life and ease. Add water to it and it becomes milk! It’s what’s going to give our buldak carbonara that creamy feel and is what is in Samyang’s powder packet.
- cheese - we’re going to go with freshly grated parmesan cheese because as much as I love cheese powder, I have no idea where to find it. Just make sure you grate your parmesan super finely.
- egg yolk - instant buldak carbonara doesn’t have eggs in it but since we’re doing this homemade style, egg yolk is going to make your carbonara so much better by adding thickness, richness, and flavor.
How to make instant buldak carbonara
When you open up the package of noodles, you’ll see it comes with a noodle cake and two sauce packets, one that’s liquid, and one that’s the cream powder.- Boil. Start off by adding 2.5 cups of water to a saucepan and bringing it to a boil over high heat.
- Cook. When the water is bubbling rapidly, add the noodles and set a timer for 5 minutes. If you like your noodles al dente and chewy, go for 4 minutes. Use a pair of chopsticks or a fork to gently break up the noodles after 2 minutes.
- Save. Use a measuring cup to carefully scoop out 1/2 cup of the hot noodle water. If you don’t want to measure out 1/2 cup of hot noodle water, you can simply drain the noodles, making sure to leave enough hot water in the pot to stir into a smooth sauce.
- Drain. Drain the noodles then add the 1/2 cup of hot water back into the pot.
- Mix. Add both of the seasoning packets and mix, mix, mix.
- Enjoy immediately!
What does buldak carbonara taste like?
Creamy, cheesy, spicy, and delicious! Buldak carbonara tastes super similar to the original spicy buldak fire noodles. That is, hot and spicy. There’s a cheesy, smooth and creamy element to it, thanks to the cheese packet. That helps tone down the spice compared to regular buldak noodles. It’s a cheesy, creamy, spicy noodle. Unlike carbonara, Samyang buldak carbonara doesn’t include pork or egg.Is buldak carbonara spicy?
Yes! Don’t be fooled. Buldak carbonara doesn’t look as fiery hot as regular buldak, but it still packs a punch and is spicy. On the spice level, Samyang rates buldak carbonara a level 3 spicy. For reference, the original buldak is a 4 and the 2x spicy buldak is 5. Technically, Samyang doesn’t think buldak carbonara is incredibly spicy, but it really depends on your spice tolerance.Can you make buldak carbonara less spicy?
Yes, you can, but it won’t be as flavorful. A lot of the flavor in the instant pack of buldak carbonara is in the spice packet. That being said, try this, which will make it less spicy!- In a shallow bowl, add 1 egg yolk, 1-2 tbsp kewpie mayo, 1/2 the package of liquid buldak sauce, the cheese powder, and 2 tbsp cream. Whisk everything together until smooth.
- Cook the noodles according to the package directions, then scoop your noodles directly from the pot into the bowl with your sauce. Toss, mixing well until the noodles are saucy.
- Top with as much shredded cheese as you like and enjoy!
How do you make buldak carbonara less spicy?
If you’re looking for a less spicy version of buldak carbonara and don’t want to sacrifice flavor, look for Samyang’s cream carbonara buldak. The package looks almost the same but is a slightly lighter pink. The chicken on the package is also floating in the air in a hot air balloon instead of sitting in a pot.Cream Carbonara vs Buldak Carbonara
Compared to buldak carbonara, the cream carbonara is a 2 on the Samyang spicy scale. It’s less spicy but still has a nice kick to it. The buldak sauce it comes with is looser and not as fiery red. It’s a slightly milder, more creamy and cheesy buldak ramen. I prefer it over the regular carbo!What to add to instant ramen
Like all ramen, you can top your buldak carbonara with anything and everything! Some popular add-ins/toppings are:- tteokbokki - add some chewy tteokbokki rice cakes (pictured below) to the water while the noodles are boiling for extra carbs on carbs. After all, this is carbo ramen!
- egg - you can add eggs in so many different ways, whisking an egg yolk into the sauce mix, topping with a fried egg, topping with a boiled egg, or even just adding egg to the noodles after they’re mixed for a poached egg approach.
- cheese - yep, there’s already cheese in buldak carbonara, but does anyone ever say no to more cheese? Sprinkle on shredded cheese and cover your noodles with a lid to make sure the cheese melts down into creamy, stretchy cheese pulls. Or, you can stir in some cream cheese for an extra creamy sauce.
- seaweed - crushed up seaweed snack, strips of seaweed, or even using seaweed snack to scoop up your noodles is a pro move.
- protein - anything goes! You can lean into the carbonara of it all and do some bacon or pork belly. Maybe use a can of tuna or add whatever leftover protein you happen to have in your fridge. Steak slices would be super luxe too.
- sesame seeds - toasted sesame seeds add aroma and a bit of crunch.
- green onions -thinly slice green onions add a bit of freshness and greenery.
- kewpie mayo - kewpie mayo can help ease the spice and add creaminess.
Homemade Buldak Carbonara
Buldak carbonara is the perfect mix of carbs, spicy, and sauce goodness
- 1/4 cup finely grated parmesan
- 2 tsbp milk powder (or milk)
- 1 tsbp gochujang (or to taste)
- 2 tsp soy sauce
- 1 tsp chicken bouillon
- 1 tsbp rice vinegar
- 1 tsp garlic powder
- 1 tsp sugar
- 1/2 tsp toasted sesame oil
- 1-2 egg yolks (use double the egg yolks for extra richness)
- 1 portion noodles (of choice, see notes)
In a bowl, whisk together the parmesan cheese, milk powder, gochujang, soy sauce, chicken bouillon, rice vinegar, garlic powder, sugar, toasted sesame oil, and egg yolk (or 2 for extra richness). Mix until well combined.
Bring a pot of water up to a boil and cook your noodles according to the package instructions. Save 1/2 cup of the noodle cooking water and drain the noodles, leaving them in the pan.
Stir 1/4 cup of the hot noodle water into the sauce then add the sauce to the noodles in the pot, tossing to coat. Add more of the hot reserved noodle water as needed, while mixing, over low heat, until the sauce is smooth and creamy and clings to the noodles. Remove from the heat and enjoy!
Estimated nutrition does not include noodles of choice (we recommend samyang or nongshim shin noodles).

Latest Comment
“Made these in the Dutch oven in the oven- THEY WERE AMAZING”AJ on Birria Tacos RecipePopular
 2015 Holiday Giveaway
  One-Pot Lemon Scallop Pea Spaghetti
  Beer Battered Onion Rings, Jalapeno Aioli
  2014 Holiday Gift Guide and a Giveaway
  Easy Gourmet Hot Wings and a Giveaway!
 The Ultimate Veggie Sandwich
  Vegan(!) Creamy Corn Soup Recipe
  Sunday Brunch: Grilled Cheese Eggs Benny
